/** Font types */

Archive for the ‘Tutorial’ Category

How To Make A Gift Card (pun intended) – Creativity Prompt

Friday, December 18th, 2009

Gift Card

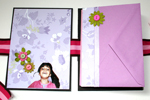
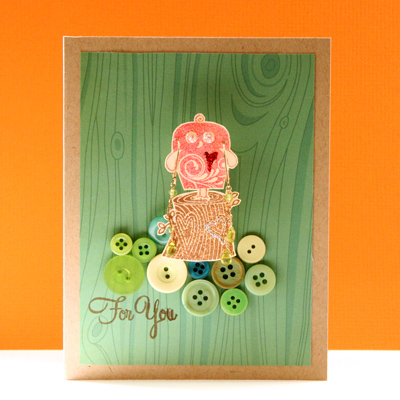
The Hero Arts blog has sparked this idea in my head when they came up with a gift card challenge. I’m always up for a challenge and instead of thinking about a fun way to incorporate money or a store gift card in the card, I thought why not incorporating the gift itself and the idea for this card emerged.

Another fun idea is to stamp and cut a tree image and to wrap a necklace around it, like a twinkling ornament chain.

Tools & Supply

How To


[Watch on You Tube – while there, please rate, comment & subscribe]

Step-by-Step Instructions

  1. Stamp the images over a smooth light cardstock.
  2. Cut around the images with precision scissors, while rotating the cardstock and leaving the scissors at the same position.
  3. Adhere the background piece of the patterned paper centered on the card base with permanent tape adhesive.
  4. Temporarily lay the tree image on the background paper and arrange green buttons around it to simulate a grassy hill. When you are pleased with the buttons’ arrangement – adhere them with glue dots.
  5. Adhere the tree image in its place on top of the buttons with a thick foam adhesive. Either use a ½” thick piece of foam adhesive or layer a few thinner foam adhesive pieces together.
  6. Pierce holes in the owl “ears” and put on the earing. Then adhere the owl on top of the tree with another piece of thick foam adhesive. The thickness of the foam gives room to the earing’s stubs.
  7. Add some more interest and texture with a few touches of glitter glue here and there.
  8. Stamp your greeting with brown ink. Attach the stamp to the left side of the acrylic block, so the buttons won’t stand in your way.
  9. Give the gift card to someone you love and get a smile in return.

Share

If you have any question, suggestion or remark – don’t hesitate to contact me – either leave a comment here, use the contact form or start a new thread on the Creativity Prompt Flickr Group!!!

I would also be very happy to see your own creations, so don’t be shy and share 🙂

Make Your Own Planner Workshop
Jump start your creativity for 2010 and Make Your Own Planner with an affordable workshop that keeps on giving with an unlimited personal use license…

Make Your Own Planner Workshop
“Capture Your Dream” workshop is relaunching as a self-paced workshop. Isn’t this the perfect time for you to capture your dream and make it happen?

Creativity Prompt – Whip Up Quick Handmade Holiday Gifts – 10 Gifts In Under 10 Minutes

Friday, December 11th, 2009
Quick Handmade Holiday Gifts
[Photo by: Ginny]

The holidays are practically here and with all the preparations involved you may feel a little bit behind. As the holidays get closer, the lines at the stores get longer and the stress level – higher.

Let me help you by compiling a list of 10 handmade gifts that can be whipped up in less than 10 minutes. That is even quicker than driving to the store or than browsing online stores.

Each image is linked to the full video + step by step tutorial:

10 minute book - openedA Cute Box Of DrawersSimple Stitched Notebook
A SIMPLE Fabric Covered Mini AlbumStapled NotebookGate Fold Mini-AlbumHow To make An Accordion Brag Book
THE QUICKEST Mini AlbumHow To Make An Art JournalKraft No-Stitch NotebookWhat are you making this year?

…and one more gift idea –

Make Your Own Planner Workshop
Do you have last minute gift giving challenges? Check out the new “Make Your Own Planner” workshop and you may solve them…

Creativity Prompt – A Simple Stitched Notebook

Friday, December 4th, 2009

Simple Stitched Notebook

This week I have a cool project – super duper simple and the results are fabulous. For a no bulk notebook that you can carry around freely, without worrying about wear & tear, I have a cool masking technique for you with a color spray and some chipboard letters.

I also have a fantastic tip for threading your embroidery floss through the needle in a split second, you wouldn’t want to miss that… 🙂

Tools & Supply

How To


[Watch on You Tube. Please rate & comment.]

Step-by-Step Instructions

  1. Cut your papers and cardstock to size & fold in half. Burnish the crease with a bone folder.
  2. Lay the paper stack over the cardstock piece and center it.
  3. Mark the placement of your piercing holes. Find the center and mark at ½” on each side and then go on and mark in 1″ increments.
  4. Pierce all your marked holes, all the way through the papers and the cardstock. Make sure they are aligned together and that the piercer goes through the crease.
  5. Thread your needle with the embroidery floss. TIP – To thread your needle in a split second (no exaggeration here) simply stick a small piece of tape to the end of your floss, fold it over and cut the excess. That will prevent the fraying of the floss and will also provide a slight stiffening effect for a quick and smooth threading.
  6. Start stitching your notebook from the top hole, from the inside – out. Make a simple running stitch, going through each hole – once in and once out. After you go through all the holes, go back through the holes, switching direction, so the stitch will look like a backstitch. When you go through the last hole, tie the ends together in a strong knot.
  7. For a no-bulk embellishment, adhere the chipboard letters with a temporary adhesive. Make sure the adhesive isn’t protruding outside or it will affect the impression of the letters.
  8. Lightly spray from about 10″ above your notebook cover. Spritz the color mist as many times you want until you get the effect you are looking for. [The chipboard letters may be reused in another project, by the way…]
  9. Before removing the letters go over them with a black or white marker, that will create a nice outline and will add visual interest. Just make sure to hold your letters tight, as the temporary adhesive isn’t strong enough and they may move around.

Simple Stitched NotebookSimple Stitched Notebook

Share

If you have any question, suggestion or remark – don’t hesitate to contact me – either leave a comment here, use the contact form or start a new thread on the Creativity Prompt Flickr Group!!!

I would also be very happy to see your own creations, so don’t be shy and share 🙂

Make Your Own Planner Workshop
Check out the new “Make Your Own Planner” workshop and you may solve this year’s holiday gift shopping problem. An affordable workshop that keeps on giving…


Make Your Own Planner Workshop
“Capture Your Dream” workshop is relaunching as a self-paced workshop. Isn’t this the perfect time for you to capture your dream and make it happen?

Cards. Cards. Cards.

Thursday, December 3rd, 2009

This week I was determined to dig deep into my stash and make stuff with forgotten products, side by side with some new products and toys I bought lately. Mix old with the new and get into the holidays’ spirit…

Card
Old: Chatterbox patterned paper, Scalloped circle punch, ink: Palette hybrid in Pure Poppy and vintage Cream by Papertrey Ink.

New: American Crafts cardstock, Bazzill kraft cardstock, Apron Lace border punch by Fiskars, Stamps: Papertrey Ink “Retro Basic Backgrounds”, Ali Edwards “You” for Technique Tuesday, Glitz Design “distress 2”.

Techniques: 1. The striped paper was cut diagonally for a diagonal design. 2. For the flower I punched a gazillion scalloped circles (ok, just 10) and attached them together with a brad. Then I crumpled each layer to create a super-dimensional flower.

Card
Old: Chatterbox patterned paper, wire rimmed ribbon, ink: Palette hybrid in Dark Chocolate and vintage Cream by Papertrey Ink, red felt marker, white gel pen.

New: American Crafts cardstock, Bazzill kraft cardstock, Corner Chomper, stamps: Ali Edwards “You” for Technique Tuesday, Glitz Design “distress 2”.

Techniques: 1. I pleated the ribbon, the wire rim helps it stay put. Then I took a strip of a strong double-sided adhesive and attached it to the cardstock and adhered the pleated ribbon to it. 2. For the layered, distressed background, I first stamped a generic houndstooth pattern in a cream colored ink, let it dry and then stamped a text pattern with brown ink over it.

Card
Old: Cream card, red-brown thread, Palette hybrid ink in Pure Poppy by Papertrey Ink, Kaiser Craft’s clear rhinestones, Fiskars 2″ circle squeeze punch.

New: Brother LS2125I Sewing Machine, American Crafts cardstock, Stamp: Papertrey Ink “Mixed Messages”.

Techniques: This is my first trial ever at sewing, so I’m pretty proud of the semi-straight border 🙂 1. The border is sewn with a zig-zag stitch. 2. the circle was punched with a 2″ circle punch and adhered to the card with temporary adhesive. Then I sewed freely inside and around the circle to create a rose-like abstract pattern. I also made one run with no thread, for a dotted-punctured effect.

Share

Have you been hoarding products that has been collecting dust in the back of the shelf? Have you used your scraps/old supply lately? What have you been doing? Have you been experimenting with a new toy or technique? Share! I love a good discussion 🙂

Make Your Own Planner Workshop
“Capture Your Dream” workshop is relaunching as a self-paced workshop. Isn’t this the perfect time for you to capture your dream and make it happen?


Make Your Own Planner Workshop
Check out the new “Make Your Own Planner” workshop and you may solve this year’s holiday gift shopping problem. An affordable workshop that keeps on giving…

Creativiy Prompt – Super Quick Christmas Cards + Free Template

Friday, November 20th, 2009

Super Quick Christmas Cards

Sending handmade cards is a wonderful and well appreciated gesture, but with a recipients list as long as eternity, who has the time to make them?

What if most of the work was already done? The basic design has been laid down. The greeting has been “stamped” and all you had to do is cut, score, punch and paste? That would really give the push you need to accomplish your goal of sending handmade cards to all your acquaintances.

Search no more. I have sorted out your Christmas cards dilemma for this year.

Below you can find a printable template (PDF file format) that does most of the work for you. If you are interested, keep on reading.

Tools & Supply

How To


[Watch on You Tube]

Step-By-Step Instructions

  1. Print the template on a cardstock of your choice (8½” by 11″). Make sure your printer’s setting is on “No scaling”.
  2. Cut your cardstock at 5½” and score each half at 4¼”.
  3. Cut 1¼” by 1¼” squares from the patterned paper of your choice. Use a punch to make this step super quick.
  4. Adhere your patterned paper squares to the squares on the template, using dimensional foam adhesive.
  5. Either stop here, right a personal greeting inside and send the card OR embellish some more.

Quick Christmas CardsQuick Christmas Cards

Quick Christmas CardsQuick Christmas Cards

Share

If you have any question, suggestion or remark – don’t hesitate to contact me – either leave a comment here, use the contact form or start a new thread on the Creativity Prompt Flickr Group!!!

I would also be very happy to see your own creations, so don’t be shy and share 🙂

Make Your Own Planner Workshop
Check out the new “Make Your Own Planner” workshop and you may solve this year’s holiday gift shopping problem. An affordable workshop that keeps on giving…

Creativity Prompt – Make a Hybrid Board Book

Friday, November 13th, 2009

Hybrid Board Book
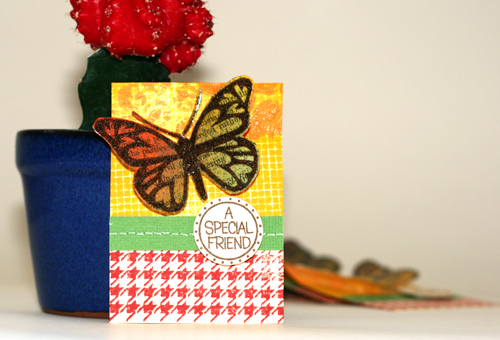
This time I revisit an oldie, but a goodie – the altered board book.

This week there is a twist – I am going hybrid.

That means that part of the book is designed digitally and part of it – traditionally. Together it’s a great mix of new & old.

Using digital elements, such as patterned papers, word art and other digital embellishments helps in keeping a theme and a color scheme for the book. If you want to make this book as a gift, in multiples, then starting on your computer also allows you to include all your journaling on the pages and then printing them either once or a million times, with no extra effort.

Cool, huh?

Tools & Supply

How To


[Watch on You Tube]

Step-by-Step Instructions

  1. Start this project on the computer. Open your photo editing software and either crop or resize the digital patterned papers to the same width and height of your board book.

    Don’t forget to count the spine while making the pages for the cover, leave a gap the same width as your spine between them.

  2. Print your pages on cardstock. Plain paper won’t be opaque over the altered pages of the board book.

    Use the borderless printing setting, otherwise the printer will scale down your images to allow a white border around them and it’ll distort your measurement.

  3. Start working on the cover – trim off the excess paper and score your spine’s fold lines to get crisp creases. You may also go over the folds again with the bone folder, for an even crisper look.
  4. Adhere the cover by applying a generous layer of glue stick on the board book cover and burnish with a brayer. Let dry.
  5. In the meantime, start cutting the pages and your photos and any other digital element you have printed (word art, embellishments, journaling tags, etc.)
  6. Once the glue has dried, turn your page around and cut off the excess with a very sharp craft knife. If you get uneven edges, you can file them down with sand paper.
  7. Repeat the same process with the rest of the pages: adhere, go over it with a brayer, let dry and trim off the excess.

    Make sure you trim off the edges of a page before adhering the printed cardstock to the other side.

  8. Some ideas for embellishing your mini altered book:

    • Adhere your titles with foam pop-dots to give some extra dimension.
    • Stick to one type of embellishment (buttons in my case) to maintain cohesion.
    • Use different sizes of pen tips to create interesting handmade word art.
    • Outline your pictures, letter stickers and other elements with your journaling pen to anchor them to the page and add dimension.
    • Using 3D embellishments can make dents in your photos, so make sure both pages have the same “elevation” so the elements won’t touch the pictures themselves.
    • Have fun!!!

Hybrid Board BookHybrid Board BookHybrid Board BookHybrid Board Book
Hybrid Board BookHybrid Board BookHybrid Board Book

Share

If you have any question, suggestion or remark – don’t hesitate to contact me – either leave a comment here, use the contact form or start a new thread on the Creativity Prompt Flickr Group!!!

I would also be very happy to see your own creations, so don’t be shy and share 🙂

Make Your Own Planner Workshop
Check out the new “Make Your Own Planner” workshop and you may solve this year’s holiday gift shopping problem. An affordable workshop that keeps on giving…

Creativity Prompt – Reuse A Bottle Lid To Create Your Own Patterned Paper

Friday, November 6th, 2009

Reuse A Bottle Lid To Create Your Own Patterned Paper

Every time I manage to find a new use to something that would otherwise find itself in the recycling bin, I am happy, even skittish… (I will deny if you tell).

In this week’s creativity prompt I am reusing bottle lids to create artistic patterned papers.

The polka-dot-circular-spotty look is extremely popular right now and almost ALL the patterned paper manufacturers have a few in their latest collections. Before you reach your hand to the wallet and buy some new papers why not stopping at the recycling bin and make your own ones?

If you are interested in some ideas, then keep on reading.

Tools & Supply

How To

Watch on You Tube.
[I have had lots of comments requesting me to speak on my videos. I hate talking because my funny accent shines through. This time I took a deep breath and created a voice over – with my voice (I have to write it to believe it). Tell me the truth, don’t you want the fabulous music back?]

Step By Step Instructions

  1. Dip the lid in a pool of acrylic paint and stamp over the cardstock. To get a good impression of the lid make sure its entire surface is covered with paint. You may also use a brush to apply the paint more evenly to the lid. Apply some pressure on the lid, but beware of the paint’s slipperiness. I was going for the artistic look so I didn’t mind the imperfect stamping.
  2. You may use the opposite side of the lid to create a circular outline. Use it as a frame, or as an outline to the solid circle you stamped with the other side of the lid.
  3. Experiment –

    • Create different patterns.
    • Use different sizes of lids.
    • Use other mediums (instead of acrylic paint):

      • Ink pads.
      • Embossing ink + embossing powder.
      • Glue + glitter/ flock/ foil.
    • Use different objects to stamp with:

      • Toilette paper rolls.
      • Paper swirls.
      • Cardstock/ corrugated cardstock.
      • Old credit or gift cards.
      • Vegetables (if they went bad…)

Share

If you have any question, suggestion or remark – don’t hesitate to contact me – either leave a comment here, use the contact form or start a new thread on the Creativity Prompt Flickr Group!!!

I would also be very happy to see your own creations, so don’t be shy and share 🙂

Make Your Own Planner Workshop
Check out the new “Make Your Own Planner” workshop and you may solve this year’s holiday gift shopping problem. An affordable workshop that keeps on giving…

Creativity Prompt – Make an Artist Trading Card (ATC)

Friday, October 23rd, 2009

Artist Trading Card (ATC)
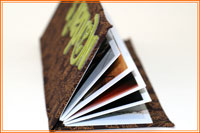
An Artist Trading Card (aka: ATC) is basically a 2½” by 3½” piece of original artwork which is traded among artists.

Participating in an ATC swap is a great way to express yourself creatively without being overwhelmed with a huge blank canvas. It is also a great way to get to know other artists and expand your artistic world.

As soon as I heard that Hero Arts is arranging an ATC swap I knew I had to participate.

On this week’s creativity prompt I want to walk you through the process of creating my ATC for the swap.

If you want to find out how I made this ATC (plus learn some valuable tips and tricks) then keep on reading:

Step by Step Instructions

  1. Cut your cardstock to the traditional 2½” by 3½” size. To make the most out of an 8½” by 11″ sheet of cardstock, start by cutting it at 2½” lengthwise twice and then you’ll end up with a 3½” strip.
  2. Adhere a vintage text paper (from an old book. I used an old text book about Roman Law…) to another piece of non-textured cardstock with a glue stick.
  3. Color the vintage paper with distress ink using the foam applicator with a swirling motion, from the outside in. Blend a few colors together. I used: Broken China, Fired Brick, Peeled Paint and Mustard Seed.
  4. Stamp the heart winged butterfly image in dark brown ink over the colored vintage background. Try to stamp the images as close as possible, but leave a small gap between them. Let the ink dry completely.
  5. Mask off 2/3 of the ATC with a post-it note and stamp the houndstooth background stamp using one of the distress inks.
  6. Take off the post it and use it again, masking the part you’ve just stamped. Then stamp over it with the screen shadow stamp.
  7. Take a small piece of bubble wrap and apply a layer of distress crackle paint over it. Use the wet bubble wrap to “stamp” with it over the screen shadow background. Let dry.
  8. After the crackle paint is completely dry cover it with a thin layer of clear glue or glaze to prevent the paint from breaking and falling off.
  9. In the meantime stamp the circular greeting on another piece of non textured cardstock using the same dark brown ink (I used the Clear Design: Who Loves You – CL309 – stamp set by Hero Arts, but it is no longer available). Punch the greetings out with a 1″ circle punch.
  10. Cut a green textured cardstock to 2½” by ½” strips. Poke a line of holes, 1/8″ apart from each other, along the middle of the strip and “connect the dots” with a white gel pen. Adhere the strip to the border where the two different background patterns meet.
  11. Cut the butterfly images with precision scissors. I am using Fiskars spring action micro tip scissors and I absolutely love them.
  12. Cover the butterfly images with an embossing ink and dip it into a mix of 1 part glitter to 3 parts clear embossing powder. Set with a heat gun.
  13. Attach the circular greeting to the cardstock strip with a foam dot.
  14. Attach the butterfly above the strip in an angle using some mini glue dots behind its body and some pop up glue dots behind its wings.
  15. Don’t forget to add your name, date and signature on the back!

Artist Trading Card (ATC)

Share

Have you ever participated in an ATC swap? Are you interested in assembling an ATC swap group here on creativity prompt? If you are, please leave a comment and show your interest.

If you have any question, suggestion or remark – don’t hesitate to contact me – either leave a comment here, use the contact form or start a new thread on the Creativity Prompt Flickr Group!!!

I would also be very happy to see your own creations, so don’t be shy and share 🙂

Creativity Prompt – How To: Envelopes Mini Album

Friday, October 16th, 2009

Envelopes Mini Album

This week’s project is also quick and easy to put together. You decide how much time you want to spend embellishing each page later on…

All you need is a bunch of envelopes, 2 pieces of chipboard and a long piece of ribbon. Pretty straightforward.

You can take your time and decorate each page individually, or just adhere a photo on the back of each envelope and insert your journaling in each corresponding envelope. The sky is the limit for you.

Tools & Supply

How To


Watch on You Tube
[Music by Kevin MacLeod with permission]

Step By Step Instructions

  1. Cut 2 pieces of chipboard – ½” taller and wider than your envelopes.
  2. Stick a strong double sided tape at the center of each chipboard piece. You can use the markings of your cutting mat for easy alignment.
  3. Adhere your ribbon to both pieces of chipboard, while leaving a ½” gap between them.
  4. Adhere each envelope to the next at the base with plain packaging/wrapping tape. Make sure you keep the orientation of the envelopes.
  5. Cut the excess tape off the sides of the envelopes stack.
  6. Adhere the envelopes stack to the chipboard with some more strong double sided tape.
  7. Cut the envelope inserts out of cardstock. Make them ½” shorter and narrower than your envelopes.
  8. Insert a piece of cardstock into each envelope.
  9. Embellish and… Voilà!

Envelopes Mini AlbumEnvelopes Mini AlbumEnvelopes Mini Album


Share

If you have any question, suggestion or remark – don’t hesitate to contact me – either leave a comment here, use the contact form or start a new thread on the Creativity Prompt Flickr Group!!!

I would also be very happy to see your own creations, so don’t be shy and share 🙂

Creativity Prompt – Make A SIMPLE Fabric Covered Mini Album

Friday, October 9th, 2009

A SIMPLE Fabric Covered Mini AlbumFor this week’s project you don’t even need cardstock. It’s as simple and easy as it gets…

All you need is a batch of 4″ by 6″ photos, a 5″ by 6″ piece of chipboard and a fabric scrap.

Is that all? Yes. That. Is. All.

In my album I gathered pictures from 5 different apartments my husband has lived at (in 5 different continents). There is one common denominator in each photo – my husband is completely absorbed in his computer. I named the mini album: “Nadav’s Playground”…

If you have a few photos that tell a story and you wish to compile them in this cute album you can carry around or gift to a dear one, than read on.

Tools & Supply

How To


Watch on You Tube [Music is by Josh Woodward with permission]

Step By Step Instructions

  1. Cut 2 pieces of chipboard at 2½” by 6″ each.
  2. Fold each photo in half lengthwise (into 2″ by 6″).
  3. Adhere half of each photo to the next with glue stick – back to back – to create a photo booklet. Go over it with a brayer to eliminate air bubbles or glue bumps.
  4. Lay your chipboard pieces over the left side of the fabric scrap. Leave a gap between the 2 chipboard pieces. The gap should be as thick as the booklet’s spine.
  5. Adhere the chipboard to the fabric with glue stick as laid before.
  6. Trim off the excess fabric. Leave a 2″ edge all around the chipboard pieces.
  7. Cut the corners of the fabric, but leave a small gap for a neat fold later.
  8. Adhere the fabric flaps to the chipboard with glue stick. Use a brayer to ensure the adhesion.
  9. Adhere the booklet to the cover with glue stick.
  10. Embellish! (Although the American Crafts letter stickers are self adhered, I added a dab of strong liquid glue to make sure they stay put. TIP – I ran out of some of the letters so I switched on my creative half. The ‘N’ is actually a trimmed ‘M’ and one of the ‘A’s is an ‘at’ sign – which goes well with the computers theme.)

A SIMPLE Fabric Covered Mini AlbumA SIMPLE Fabric Covered Mini Album

I want to share with you one of my favorite pictures from this mini album. It was taken here at our apartment in California. Note the pasta on his lap and the computer on the dinner table…

My husband's passion for anything computer-wise

Isn’t that a memory to cherish?

Share

If you have any question, suggestion or remark – don’t hesitate to contact me – either leave a comment here, use the contact form or start a new thread on the Creativity Prompt Flickr Group!!!

I would also be very happy to see your own creations, so don’t be shy and share 🙂