[Font: Adler; Digital Kits: KD Happy Day & KD Digi Essentials 5 (the number 7) – all by Karla Dudley.]
I may be prejudiced but I think my niece has the brightest, most beautiful smile I have ever seen.
I’d send some celebrities over for a red carpet seminar if I could. I really would.
Anyways…
This is the third birthday that I have missed and I am forever grateful that my sister takes the time to take the pictures as well as send them my way. I value these pictures so much, in fact, that I always immediately try to put together layouts with the stories behind the photos. As I only live vicariously through these photos, the stories I can tell aren’t so long and detail oriented. I mostly just try to capture the moment visually – as I imagine it had been.
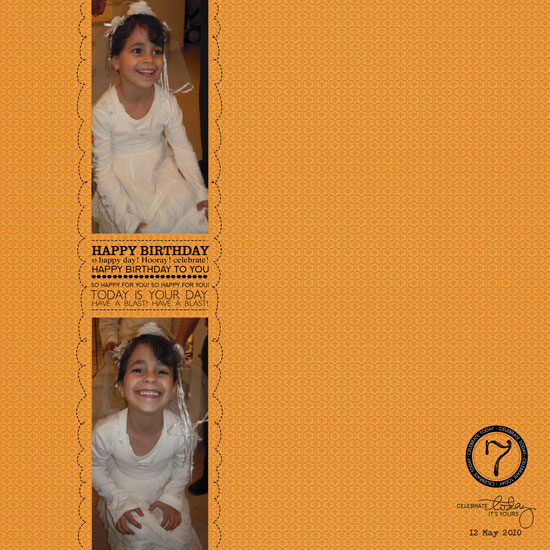
In this layout I used Karla Dudley’s new kit: KD Happy Day, almost exclusively (minus the digit ‘7’). On the right corner of my layout you may find a word-art image: “Celebrate today, it’s yours”. If you take a moment and look at the kit, you won’t find this image as it shows on my layout. Why? Because I had engaged myself in a minor digital surgery… Nipping the second part of the sentence and tucking it underneath.
Rearranging a digital image is basically the same as snipping a clear stamp off and repositioning its parts to conform to your design and needs (or inking up a different part of the stamp each time). Here is how to do that:
How To
- Open your image on Photoshop Elements. (If you are concerned about writing over your original image, use the ‘open as’ option.)
- Pick the rectangle selection tool and by clicking and dragging, choose the part you wish to sever. When you are done you will see the marching ants sign around the outline of the image. Make sure you haven’t accidentally picked any other part of the image. If you did – just choose it, while clicking the ALT/OPT key, to deselect.
- Make sure the layer of the image is selected – it will be highlighted if so.
- Pick the move tool and click and drag the part you have selected to its new place – it’s that easy. (You may also delete it altogether by clicking the DELETE key while it’s selected).
- Be careful not to get addicted and makeover your entire stash of digital images.
Share
Have you ever tried to alter your digital stash (or your traditional stash…)? Please, do share. Just leave a message and brag.


Check out Creativity Prompt’s self paced workshop: “Capture Your Dream”. In this workshop you will capture, follow and make your dream come true as well as document your journey in a fabulous mixed media mini album.
Tags: Digital Brushes, Digital Kits, Digital Scrapbooking, DT, Karla Dudley, tip


[…] I received one great response from Avital Samet, who owns the Creativity Prompt blog. She shared a great tip on giving digital images and brushes a “nip and […]
I love turning things in to “stickers” ever since I learned how in an easy {free} tutorial. If you go image, then “Stroke”, you can fiddle with it and do some neat things with either extractions on pictures, elements from kits or even text. Really fun way to make it “new”.
I love doing that too. Thanks so much for sharing. I think the main thing i absolutely love about digital scrapbooking is that you have FULL control to do everything.
Hi Amy, can you send the place where you learnd how to turn things into stickers?
Thanks in advance