Découpage is a fantastic technique of paper piecing that helps us to create impressive art creations quickly and easily, while actual painting & drawing are unnecessary. This is also a fabulous way to use all your small paper scraps. [or holiday cards’ cut-outs…]
I have been using this technique for quite a while but only recently Meital, a childhood friend of my husband, suggested that I should make a tutorial on this technique, so here you go:
Supply –
- Illustrated napkin/Paper scraps/Tissue paper etc.
- Canvas.
- Acrylic paint. [Use a light color if you are working with a napkin or any other tissue paper.]
- Mod-Podge glue. [or better yet – a gel medium.]
- Foam brush.
- Optional – Alpha stickers + Glitter glue.
Step by Step Instructions –
Napkins Découpage –
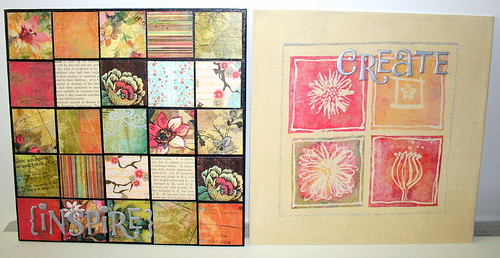
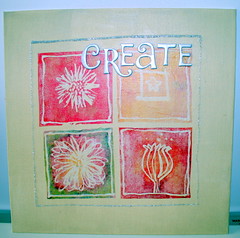
- Go through your stash [if you’re like me and you’ve got a stash…] and choose a napkin with an interesting illustration. I chose a napkin with some flower illustrations. Each napkin usually has 4 prints.
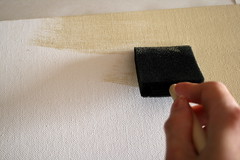
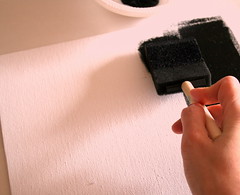
- Next, you need to paint your canvas. Pick a color that goes well with the illustration on your napkin. Using a foam brush, apply an even coat of the acrylic paint to the canvas. [When working with napkins and other light-weight papers it is better to use a very light color, otherwise the illustration will get “absorbed” and lost in the background.]
- While the canvas is getting dried, cut the illustration from the napkin and separate its layers so you end up with the very top layer. You can discard the rest of the layers [it’s recyclable!]
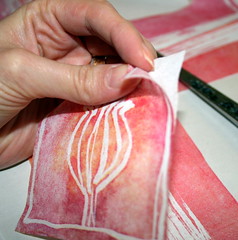
- After the canvas is completely dry arrange your cut-outs on it in a way that pleases your eye. [After applying the glue or the gel medium figuring out the placement of your cut-outs will get trickier.]
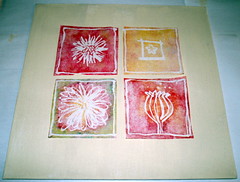
- Then, when you are pleased with the composition, apply the Mod-Podge glue generously with the foam brush both below and above the cut-out, as the glue works as a sealer as well as an adhesive.
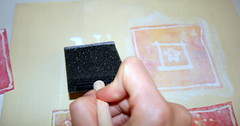
- Repeat the gluing and sealing process with all your cut-outs and make sure you apply an even coat of glue and going with the brush at the same direction all over. When you are finished and the glue has completely dried you can embellish your canvas with alpha stickers and glitter glue or anything else you can think of.
Paper Scraps Découpage –
The process is basically the same, only you can use any color for the background. Therefore I am not going to be as verbose…
- Paint your canvas.
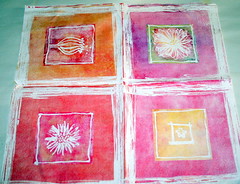
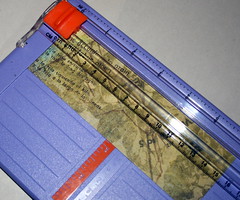
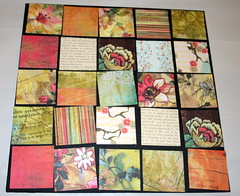
- Choose your scraps and cut to size. On a 10″ by 10″ canvas I used 25 pieces of patterned paper, cut at: 1 7/8″ by 1 7/8″.
- Figure out the placement of all your paper cut-outs.
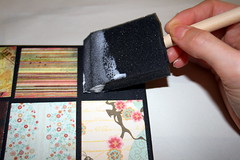
- Apply glue or gel medium below and on top of each piece of paper.
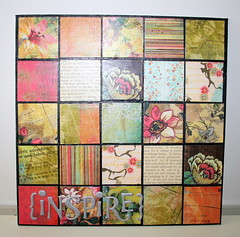
- Finish off your canvas with your favorite embellishments and enjoy your art!
Enjoy!!!
If you have any question, suggestion or remark – don’t hesitate to contact me – either leave a comment, use the contact form or start a new thread on the Creativity Prompt Flickr Group!!!
I would also be very happy to see your artistic creations, so don’t be shy and share 🙂
Tags: art, creativity, creativity prompt, decoupage, Tutorial


Oh how pretty, I love it! I’ll be linking.
What a great idea to create “custom art” without breaking the bank.
wow – i love this!!
WOW! The paper scraps collage is fabulous!!!
Thanks a million!!! I believe I should give the credit to Basic Grey and their fabulous paper collections 🙂 (and my old book about the Roman law…)
i used this idea to make a small christmas picture as a gift for my mom (forgot to take a picture before i gave it to her!) using an image that i printed off the computer. it turned out fine, but i was having some trouble with the ink from the picture bleeding/smearing when i applied the Mod Podge. have you had this problem? or any ideas how i can avoid this?
other than that, it turned out great and my mom loved it! i sprinkled some glitter all over the canvas while the Mod Podge was wet and i think that really finished it off well.
I’m glad to hear you’ve had such a thoughtful use of this prompt.
I printed the images with a laser printer (which uses toner rather than ink). The quality of the print is less good, but it doesn’t smear.
You can also take a photo copy of your regularly printed photo. A photo copier uses toner as well, so it should work out.
Hi Thanks for the great info. Just wondering how you keep your papers from bleeding. I especially have probelms if I have copied a piece of something. Do you think the Modge Podge works better. I have an ink jet color printer. Thanks so much
Thank you, Lynn.
For decoupage I am using a laser printer. I have an inkjet at home and it will bleed.
However, inkjet printout + Mod-Podge is great for an image transfer!
Hi Lynn
If you are the collage artist who sent an email about the 17th Annual collage exhibition in New Zealand please resend the email.
Thanks
Juliet
I’m so excited to share with you some of my decoupage creations. I’ve been doing it for the last 20 years, teaching the craft too! Although I get frustrated sometimes because it’s hard to find unique paper napkin designs in Manila. I love working with paper napkins because it’s just like sculpting, especially when I’m using curved or found objects. I also have a special needs daughter whom I passing on the craft to, and I must admit she does work well with her hands on this particular medium. Many thanks for sharing 🙂 God Bless You!