 OK. I’ll admit it. I am addicted. Addicted to boxes… Luckily I have been moving a lot in the past years, so I got to buy boxes and treys over and over again. I just LOVE that everything has its place. Be it the tiniest of places, but a dedicated one.
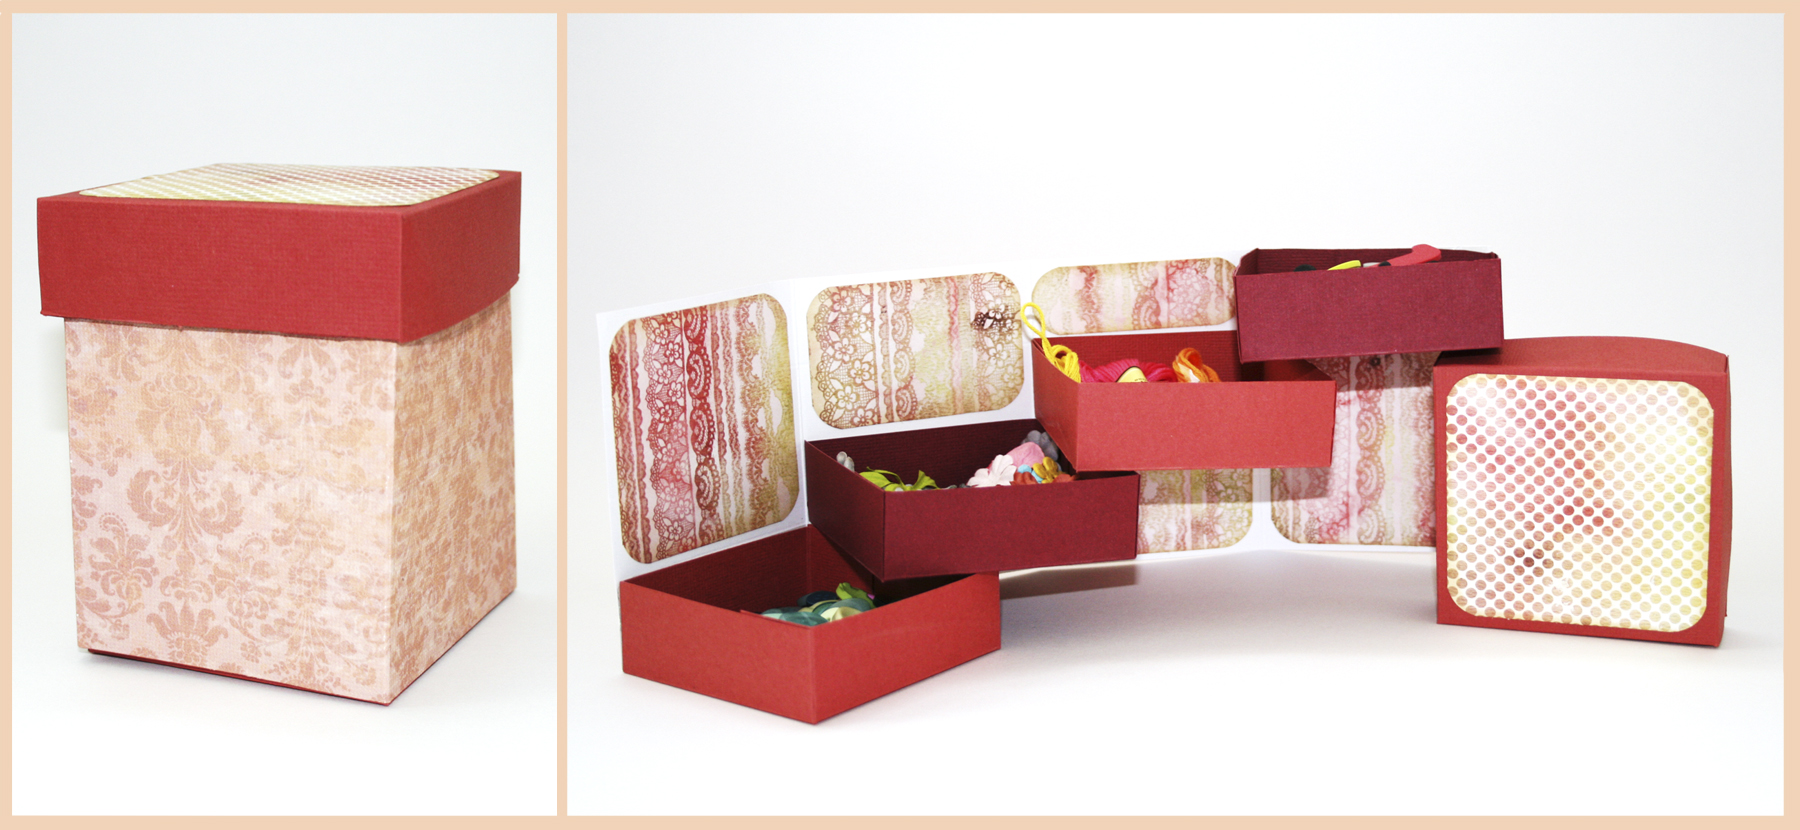
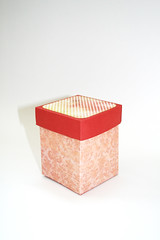
Therefore when I saw this idea of a box of drawers online (in numerous places) I immediately knew that this project is right up my alley. So I whipped up my own version of this project with a couple quick sketches and voilà , in about 20 minutes I had one more box to add to my collection.
Usage Ideas for the Box of Drawers
- Sewing kit – A place for your threads, threaders and needles.
- Embellishments center (as shown above) – You can put your buttons, paper flowers, die cuts, eyelets and brads all in one place.
- Office supply organizer – A chic way to camouflage your paper clips and staples stash…
- Family “Mail-Box” – Attach a name tag to each drawer and leave heartfelt notes to each other. (This project can accommodate any family size, just alter the height of the drawers for a smaller family, or add more drawers and alter the height of the box for a bigger family).
I’d love to hear what ideas you come up with… so please do share!
So if you feel like making your own box of drawers keep on reading:
Tools & Supply
- Cardstock
- Patterned Paper
- Distress Ink
- Strong double-sided tape adhesive
- Tape runner
- Paper trimmer
- stylus
- bone folder
- scissors
- Corner rounder
How To
[The great music is by Josh Woodward from his album “Here Today”].
Step-by-step Instructions
- Drawers –
- Cut 4 pieces of 5″ by 5″ cardstock. [The following applies to each of the 4 pieces]
- Score at 1″ all around. To make it easier to score, align your cardstock with the 4″ mark on your paper trimmer.
- Fold all your score lines with a bone folder.
- Cut one slit on each flap up to the first score line.
- Apply strong adhesive to the back of each flap. Make sure the flap is covered entirely.
- Adhere all the flaps together to the edges of the drawer, aligning edge to edge.
- Body –
- Cut your cardstock at 4″ by 12″. You can use patterned cardstock.
- Score your cardstock at: 3″, 6″ & 9″ lengthwise and fold all your score lines with a bone folder.
- Score LIGHTLY widthwise at each 1″ to draw some guidelines for the placement of the drawers.
- Apply a strong double sided tape to each of the box’s walls in increments of 1″.
- To embellish the inside of the boxes cut 6 pieces of patterned paper, as follows: 2 pieces at 2¾” by 2¾”, 2 pieces at 1¾” by 2¾” and 2 pieces at ¾” by 2¾” – Round their corners and ink the edges with distress ink. Then adhere to their respective place on the interior of the box.
- Adhere the drawers to the box. Make sure not to place a drawer nor to apply adhesive on any of the score lines.
- Lid –
- Cut your cardstock at: 5¼” by 5¼”.
- Score at 1″ all around. [Again you can align your cardstock with the paper trimmer’s 4¼” mark].
- Cut a slit on each of the flaps up to the first score line.
- To decorate the lid, cut a piece of 3″ by 3″ patterned paper. Round its edges and ink it up with distress ink, then adhere to the center of your cardstock.
- Apply strong double-sided tape to the back of each of the flaps and adhere together, aligning edge with edge.

Share
If you have any question, suggestion or remark – don’t hesitate to contact me – either leave a comment here, use the contact form or start a new thread on the Creativity Prompt Flickr Group!!!
I would also be very happy to see your own creations, so don’t be shy and share 🙂
Tags: box, craft, crafts, creativity, creativity prompt, gift, organizing, storage


Wow, this is so cute, I love it! What a fun way to give a gift. I’ll be linking.
Thank you!
http://lifeaslou.blogsome.com/2008/01/30/magic-boxes-a-life-as-lou-online-class/
It’s interesting to see a different take on the box of drawers. Your boxes look beautiful!
Hey, this looks great! Gotta try it. I’m a quilter and also a paper crafter (mostly making cards). I can totally see taking your suggestion and using this to transport sewing supplies. Maybe fill it with threads. Thanks for the tute.
MissesStitches
Thanks! I’d love to see how yours came out 🙂
Thanks for posting this. It is sooo cute. I’ll try to make one as soon as i find the time.
Thanks for taking a peek. I’d love to see your box when you come around to making it 🙂
http://today-i-made.blogspot.com/2009/05/nice-magic-box.html
Beautiful, thanks for sharing!!!
[…] in den här lÃ¥dan med lÃ¥dor. Finns även en film pÃ¥ Youtube hur man […]
That was awesome, I needed a really great gift idea and this suits me fine.
I love it, it’s super-cute!
The tween girls at camp are going to LOVE this – great craft!!
This is a great idea and your tutorial is so bright!
I’ve made one: here it is.
Oh, I sent it to quickly and forgot to thank you!
so….. THANKS A LOT!
Thanks for sharing your take on the drawers, they’re gorgeous!
Aw man, this is one of my favorite blogs. Keep up the good work.
Hi, could be just the ticket; researching box styles for a Graphics project as part of my degree in DT Education. Very clever stuff! Thanks ever so.
TFS your creation and your video! I was so excited, I had to make a box for Easter, you can see it <a href=http://stampinforthefunofit.blogspot.com/2011/04/box-of-drawers.html<here Thanks for the inspiration!
Aloha! I love boxes and bags etc and this is a great one. I enjoyed watching the tute, I can picture it in my mind now when I read your instructions. I know it’s early in the year, but I think I’m going to make a bunch for my walking group. Like you said it can hold sewing kit supplies or office supplies, so it will work for guys or gals.
I love your site. TFS
I know this “Box of Drawers” is old to you since you did it in 2009, but it’s new to me and it’s amazing! I just wanted to thank you for sharing this on You Tube with clear instructions. Thanks so much.
Linda
You are very welcome. Thank you for stopping by!
This is an awesome idea. But my first one didn’t turn out as it was supposed to be. The drawers inside, they were too big…
I’m sorry your first ones didn’t go as planned, but I hope it was easy enough for you to give it another try with a few tweaks 🙂
What a beautiful set of drawers. Thank you so much for the great tutorial and video. I look forward to making some soon.
Thank you for stopping by!
Good design!
I think it’s a useful and beautiful origami work.
Thank you! I appreciate you stopped by.
That’s beautiful! But I am from Bulgaria and we do not use inches here! Can you give me the measures in santimeters! I hope you understand! My English is bad! Sorry 😉
Every inch is 2.54 cm
Thank you! I know that :). It is hard for me to convert 2 3/4, for example. But I found a e- convertor. These are the exact measures:
5″- 12,7 cm
1″- 2,54 cm
4″- 10,16 cm
12″- 30,48 cm
3″- 7,62 cm
6″- 15,24 cm
9″- 22,86 cm
2 3/4″- 6,99 cm
1 3/4″- 4,45 cm
3/4″- 1,91 cm
5 1/4″- 13,34 cm
4 1/4″- 10,8 cm
Thank you for posting them here 🙂
I hope I helped people like me.I will make the box as soon as possible.I think of decorating it with quilled ornaments. I like quilling a lot. The box is a great way of giving money for example.
[…] Creativity Prompt – How To Make A Cute Box Of Drawers | Creativity Prompt Tools & Supply How To So if you feel like making your own box of drawers keep on reading: [The great music is by Josh Woodward from his album "Here Today"]. I’d love to hear what ideas you come up with… so please do share! Step-by-step Instructions […]
[…] CreativityPrompt: Box of Drawers Tut […]
hi..m from india and i’ll appreciate if yu cud help me get some of the tools that yu use.. i really love yur work..had tried making something of this sort last yr..but i din come out neat..so if i could buy these easily i think i can attempt it again..please help!!
You may click on the links on the supply list to find an online store for each tool. You may also try the links to the online shops in the side bar (under “Where I buy paper goodies’.) Thanks for stopping by.
Amazing just love the concept of the card shelves. You are very taltented
Thanks so much!
So cute I just started done 3 of the four boxes so far my 80 year old grandma loves sewing and does it all by hand she sews anything from dresses to coozies I’m making this for her so all of her stuff can be in one place
Thanks! This is so nice of you to do that for your grandma. I’m sure she’d appreciate it greatly.
Can I use a normal a4 sheet paper instead of cardstock
Sure, but it’ll be less sturdy.