I was looking at Shimelle’s new kit: Write It Down Ornate Frames , which “aired” today on Two Peas In A Bucket, and thought it would be just perfect for making a bunch of hybrid cards.
At first I thought to edit them on photoshop, add the greeting with one of my gazillion fonts, print out, add a ribbon, or some gems and call it a day. A great way to make a bunch of coordinating classic cards.
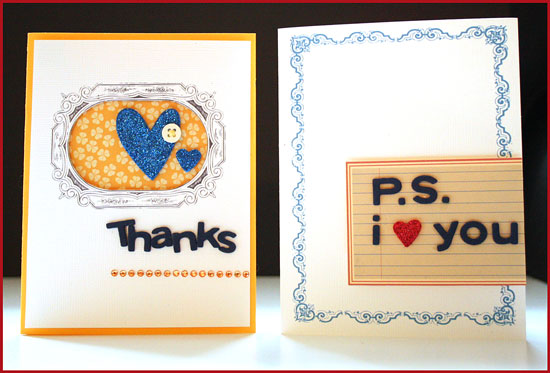
Then I thought, lets take it up a notch… It would be really cool to mix Shimelle’s beautiful, classical, traditional ornate frames with some funky patterned papers and a funky – non-traditional – design, and that’s exactly what I did.
I hope you like it and will give it a try. (Shimelle’s kit costs just 99 cents…)
Step by Step Instructions
- Use a photo editing program to lay the frame on the right side of a letter size document. Size it to measure 4″ by 5¼”. Print out the document on textured white cardstock, using the borderless settings of your printer.
- Cut the cardstock in half – to 5½” and fold in half at 4¼” to create a standard size card.
- Print out Creativity Prompt’s free classic journaling tags on plain non-textured cardstock. Cut out one of the tags and cut off about an inch from its right edge.
- For the letters I used plain and glittered fun foam that I cut with my Cuttlebug, using QuicKutz Moonlight dies, and adhered it with Tombow Mono Multi glue you can also use American Crafts Thickers.
- Adhere the journaling tag to the bottom right edge of the card using foam squares.
- Use a photo editing program to lay the frame on the right side of a letter size document. Size it to measure about 3½” wide (keep its proportions). Print out the document on textured white cardstock, using the borderless settings of your printer.
- Cut the cardstock to 5¼” by 4″.
- Use a craft knife to cut off the oval center of the frame.
- Cut a textured yellow cardstock to 8½” by 5½” and fold in half at 4¼” to make a standard size card.
- Cut a piece of a funky patterned paper at 3½” by 3½”.
- Lay the printed cardstock on the yellow card base and trace the oval window with a pencil. Adhere the patterned paper where the window will lay, over the pencil marks.
- For the letters I used plain and glittered fun foam that I cut with my Cuttlebug, using QuicKutz Moonlight dies, and adhered it with Tombow Mono Multi glue you can also use American Crafts Thickers.
- Adhere the printed cardstock with foam squares.
- Adhere the hearts. I Cut the heart with a Cuttlebug die from the glittered fun foam. (I used a VERY old punch for the small heart)
- Adhere the button (I would have used a yellow button if I had one…) with a couple mini glue dots.
- Adhere the line of yellow gems below the greeting.
Share
If you have any question, suggestion or remark – don’t hesitate to contact me – either leave a comment here, use the contact form or start a new thread on the Creativity Prompt Flickr Group!!!
I would also be very happy to see your own creations, so don’t be shy and share 🙂

“Capture Your Dream” workshop is relaunching as a self-paced workshop. Isn’t this the perfect time for you to capture your dream and make it happen?
Tags: cards, creativity prompt, Digital Kits, hybrid, Shimelle


I love these my friend 😉
Thanks 🙂