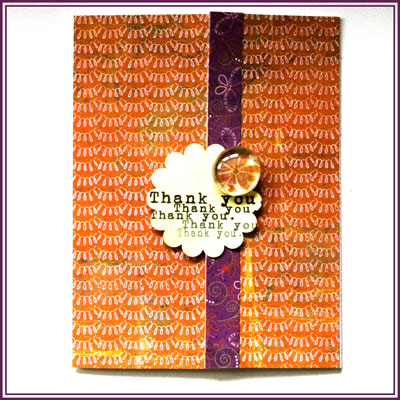
Thank You Card
Supply
- Cardstock – Wausau Paper
- Patterned Paper – Basic Grey “Green At Heart“
- Other – Clear Dew Drops, JudiKins Diamond Glaze, Tattered Angles Glimmer Mist in “Lemon Meringue“
- Tools – Martha Stewart Scoring Board, EK Success 2″ Scallop Circle punch
- Software – Adobe Photoshop Elements 7.0
- Font – Erica Ormig
How-To Pointers
- For the greeting, all I did was to open a new 8½” by 11″ document at 300dpi and write “Thank You” in black with the text tool. Than I duplicated the layer a few times and changed the size by dragging the edge of the bounding box. I Positioned each layer randomly and changed the opacity of each layer. Then I printed it on white cardstock, punched it and sprayed it with Glimmer Mist (immediately absorbing the excess liquid, so the ink won’t spread).
- For the flower accent, I just adhered the dew drop on a Basic Grey paper with some Diamond Glaze. I’ve found it easier to put the glue on the dew drop and then press on the paper than to do that the other way around. Ranger Glossy Accents will also work great. I love it too. After the glue dries up, I cut around the dew drop, which also acts as a weight to help the gate-fold card stay shut.

I Love You Card
Supply
- Cardstock – Wausau Paper
- Patterned Paper – Basic Grey “Green At Heart“
- Other – Glittery fun foam from Michael’s, Anna Griffin Vellum Quote from the “Valentine” collection.
- Tools – We R Memory Keepers Corner Chomper, Martha Stewart Heart Punch, Tim Holtz Tiny Attacher
How-To Pointers
- The self adhesive fun foam wouldn’t go through the punch, so I punched a scrap piece of paper, adhered it to the backer of the fun foam (as the shape is symmetric), and cut around with precision scissors.
- To attach the vellum greeting I used the Tiny Attacher and tried to aim the staples to the lines of the letters… almost successfully… I concealed the back of the staples with a strip of patterned paper I adhered to the back.
- For the faux stitching box, I first marked it with a pencil, using a T-Square ruler and then went over it with American Crafts brown precision pen and erased the pencil marks.
- This card isn’t standard. It’s a square card, measured 4¼” by 4¼”. It started as a standard card, but after finishing it I felt a smaller size would look better. Trial and error, that’s the way to go.
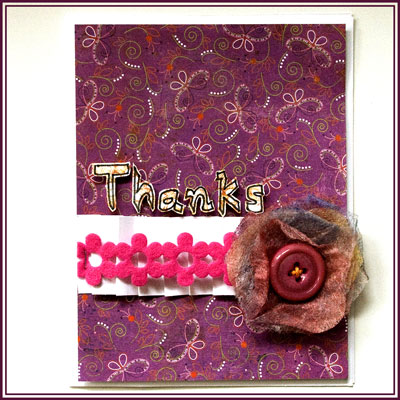
Thanks Card
Supply
- Cardstock – Wausau Paper
- Patterned Paper – Basic Grey “Green At Heart“
- Tools – Martha Stewart Scoring Board, American Crafts precision pen, Fiskars precision scissors, Tim Holtz Tiny Attacher.
- Other – Felt ribbon from Michael’s.
How-To Pointers
- I made the flower from used dryer sheets and Glimmer mists. You may find the video tutorial here.
- I used the scoring board to make the pleated cardstock “ribbon”. I just scored repeatedly in intervals of ½” and 1/8″ and folded the scoring lines later to create the pleats. A mountain fold after each ½” mark and a valley fold after each 1/8″ mark. Down and up and down and up… I attached it to the patterned paper with a line of glue runner, then supported it with 2 tiny staples that also attached the felt ribbon to it.
- For the funky greeting, I first penciled it on the paper lightly (using 2 pencils held together to create the broad line), then I went over the lines with a black pen, erased the pencil marks and cut around it with precision scissors. I adhered each letter with a tiny foam dot to add dimension.
My favorite card is the first one, with the “photoshopped” greeting. Which one is yours?
Share
Have you recently made a card to show you care? Share your thoughts by leaving a comment or share your card on the Creativity Prompt Flickr Group.

Back when we were kids creativity came naturally to us. Everything was possible and our prolific imagination was the only limit we knew.
Through the years we have grown apart from our inner creative child and along with that – have lost our pristine and utter joy of creation.
In this e-book I will pave your way back to your inner creative child, brick by brick.
“Unleashing The Creative Child Within You” will explain why you became distant from your core creativity and will reveal the secret to getting it back.
With exercises designed specifically to help you find the inner child within you, regain its confidence and unleash it – you are bound to get your mojo back faster than you think.
Your inner creative child wants to come out and play, so don’t disappoint it and get “Unleashing The Creative Child Within You“.
Tags: card, cards, creativity prompt


Cute cards! The top is my fave. didn’t realize it was gatefold til i read your tips! Cool to use the dew drop. I love how you layered the text on the scallop! I could type & change font sizes & get something similar (maybe) but afraid your pointers on the text went over my head!
Love the bottom one, too & I am going to try that flower sometime because i do have some glimmer mists!
Loved how you did & explained the the writing thanks – but you must be much more clever with your hands than I am! I have trouble keeping hold of 1 pencil & not dropping it!
Last, but not least.. Thanks for the wonderful journaling boxes. Love them!
I hope you have a lovely weekend.
Kathy
Thank you Kathy! (I never said I did it right on my first try… Working with pencils allows you to erase and try over again…)