Thanks for all the wonderful messages, comments and e-mails.
I have been doing really well.
Enjoying my Maya (and also back to work).
I have taken a few crafty classes in the meantime, to keep my sanity, though I haven’t had the chance to actually make anything (Boooo).
Three of the classes have been with Online Card Classes by Jennifer McGuire and Kristina Werner and I loved every one. They really pack a lot of tips, tricks and general card-inspiration into each class. I highly recommend taking one of their classes.
At the moment I am participating in an ongoing class by them, called: His & Hers.
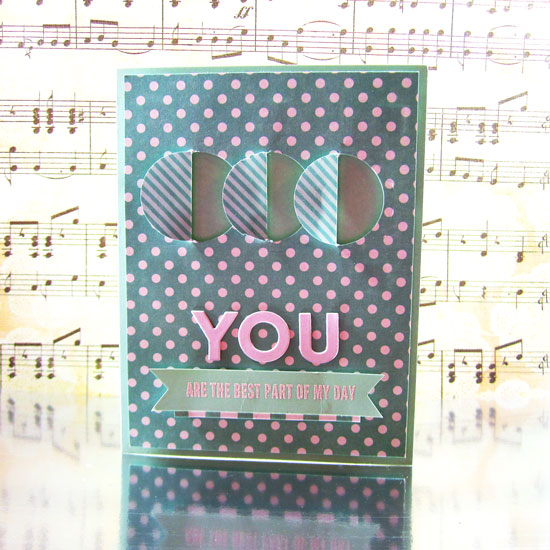
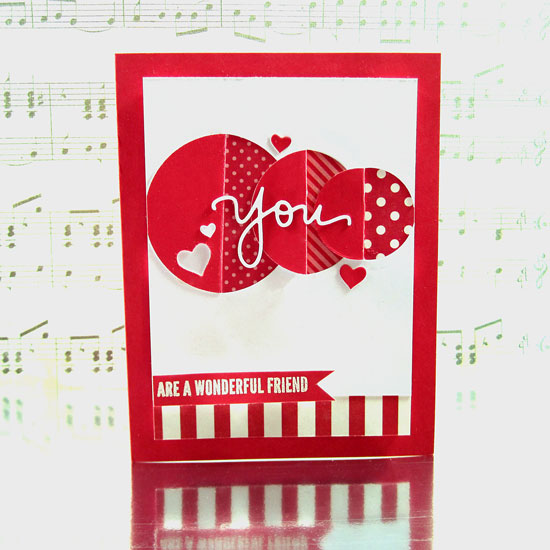
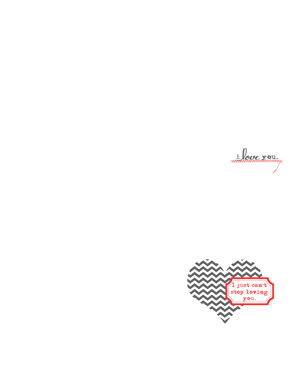
Today Jennifer taught a wonderful technique involving partial die-cutting’ and I knew I HAD to try it out with my own spin, here are my cards:
His:
Hers:
What do you think about the technique that raised me from the online-dead?
What have you been doing today? Have you celebrated this special holiday?
I made a bunch of cards…
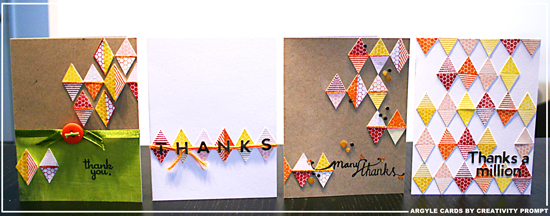
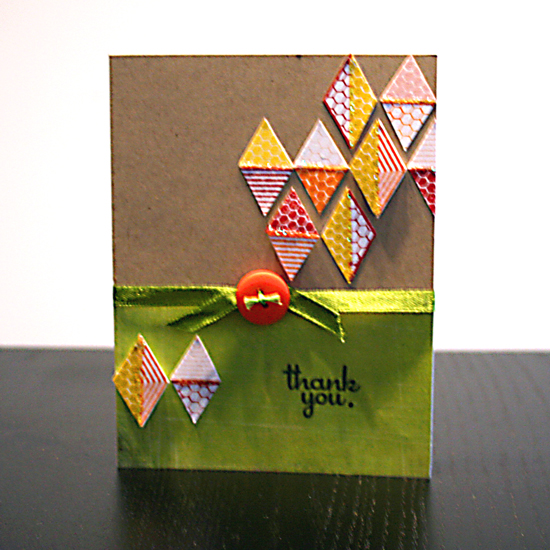
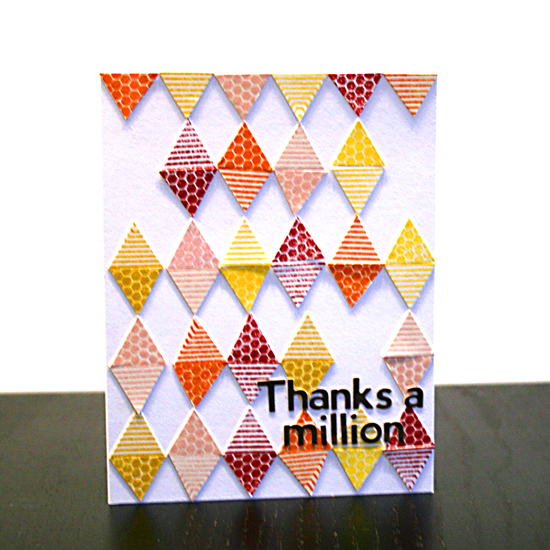
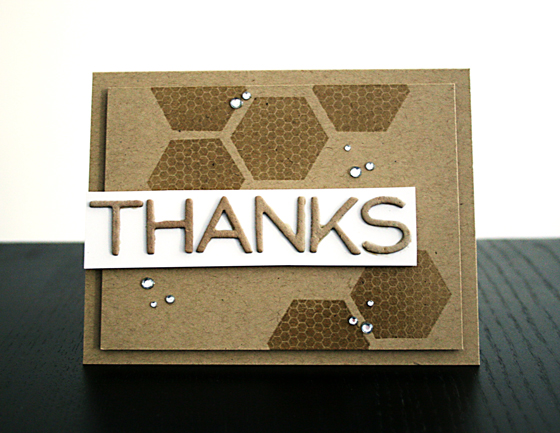
It all started when I went through my Google reader and saw all the WCMD challenges. Then one challenge in particular had caught my eye, Robyn’s Argyle challenge on Studio Calico’s blog. As soon as I saw it I thought about using my Everyday Hexagons stamps to create the argyle with a little bit of paper piecing, as each hexagon is made out of 6 equilateral triangles. Perfect!
So I took a few stamps and inked them with some Distress and Jenni Bowlin inks and started cutting them into triangles… Then all I had left was assembly. Pretty easy.
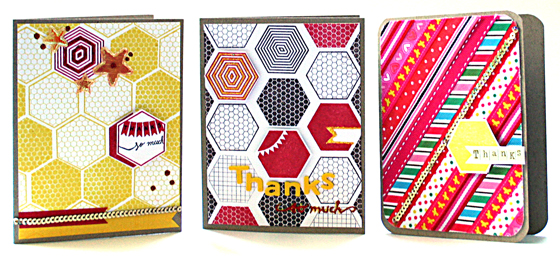
Here’s a closer look at each card and the supply used to make them at the end (Each card is made with pretty much the same supply and tools):
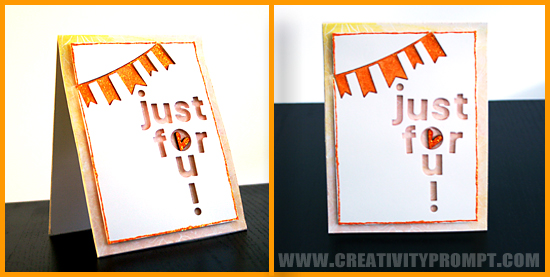
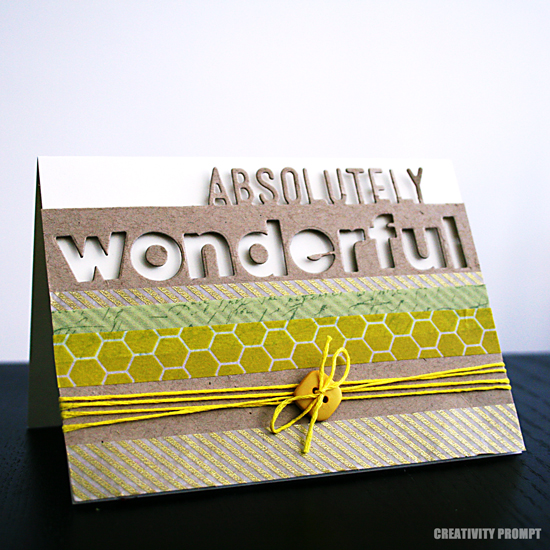
I really liked the look of the die-cut greeting on my ‘Absolutely wonderful’ card, so I decided to create another one.
This time I used a banner die from Simon Says Stamps as well as my trusted Papertrey Ink letter dies. I also made a watercolor background, to shine through the negative spaces.
How did I make this card:
I started out with the background, I stamped the background image with Versamark ink and white-embossed it with a heat gun.
Then I used inexpensive watercolor set, that I got at my local Michael’s, and simply added a wash of light peach, pink and yellow colors. I used a ton of water which caused some warping, so I doubled up the card base with another sheet of cardstock underneath. I really like the result and will definitely try that again.
Next, I cut a slightly smaller panel of cardstock and laid out the individual die-cuts on the panel, secured with some repositionable adhesive and ran it through my Cuttlebug.
I attached the die cut panel to my card base with foam adhesive. Note that the banner die-cut had cut my panel into two pieces, so I adhered each one individually.
Next I added a pop of color with a wood veneer heart by Studio Calico, which I dyed orange with the same watercolor set, then added some orange Stickles on top.
I decided that my card need some more color so I covered the banner ‘positive’ with the same orange Stickles and adhered it flat on the card base, right under the ‘negative’ impression.
I also ran a line of Stickles around the perimeter of my panel.
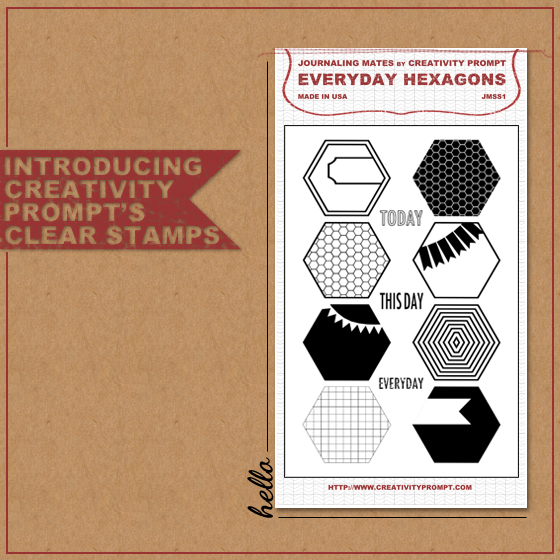
These stamps are made of very high quality photopolymer stamps, in the U.S.A. You’ve got 11 stamps in total: 8 hexagon stamps that you can mix and match – all align together perfectly; as well as 3 journaling stamps: ‘Today’ ‘This Day’ and ‘Everyday’.
The stamp set retails for $14.00 and is currently available exclusively at Creativity Prompt’s online store [S&H and Taxes may apply].
The stamps are great for scrapbooking layouts as well as for cards or any paper crafting projects. Use them to create cute backgrounds or as stand alone accents.
The mix of outline and negative space stamps opens the door to a ton of techniques too.
Another thing I really love about these stamps is that the shape is so simple that ‘fussy cutting’ isn’t fussy it all. Six snips and you have a perfect stamped die-cut.
Check out this video introduction:
Here is a closer look at the card I made on video:
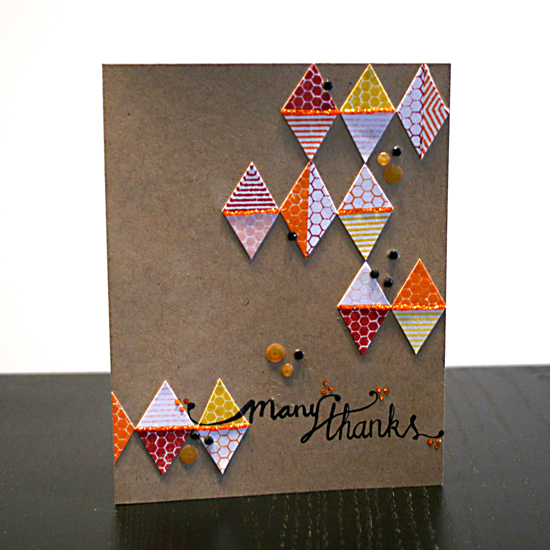
Here are some more cards I made, using Everyday Hexagons:
And Now To The Blog Hop
These cards were sent to the extremely talented and extremely generous Monika, Lisa and Alexandra who are participating in this very special blog hop.
Make sure you head over to each of their blogs [Monika, Lisa and Alexandra] for a fabulous eye candy and more chances to win this stamp set!
Did I say more? Yes, I did!
I am also giving away an Everyday Hexagons stamp set, here, on Creativity Prompt! Yay!!!
For a chance to win a set of Everyday Hexagone clear stamp, check out this Rafflecopter quick and easy form. You have until Sunday, September 30th to enter, as many times as you can 🙂
I will announce the winner here on Monday!
Note, that quantities of the first release, before the next shipment arrives (in a month or so, due to clear stamp manufacturing interruption), are very limited. So the first to purchase this awesome stamp set will be the first in line to get it. If you will have already purchased a stamp set and win the giveaway – you will receive a full refund!
I am taking another class from Jennifer McGuire and Kristina Werner. This time I’m taking ‘Kick Start’, which is all about boosting your creativity.
I don’t want to reveal any inside secrets… but Jennifer shares a tip (which involves a post it note and new products) that helps to come up with creative ideas to use new products. This post-it secret also helps in pruning your shopping cart, while shopping…
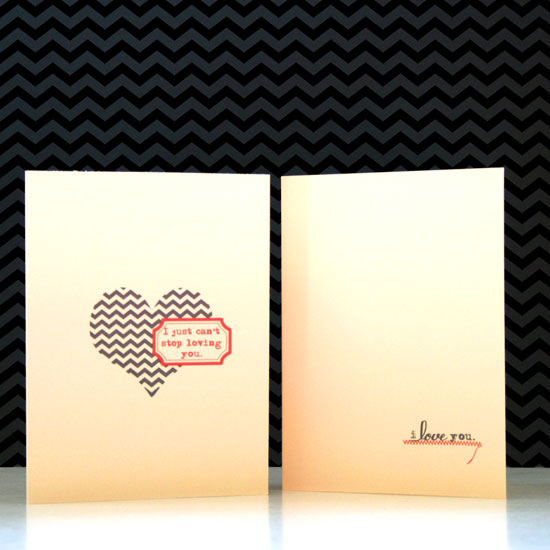
Anyhow, I used it with my new Absolutely die-cut (designed by Kristina Werner for Simon Says Stamp) and came up with the idea to use two die cuts on one panel so I can have both a negative and a positive impression of a word. The different shadows the words cast are really interesting.
I lined up both dies on my cardstock panel and ran it through my Cuttlebug. I prevented movement by temporarily sticking the dies to the cardstock with removable tape.
Side note: I looked for a word with no repeating letters to go with ‘absolutely’ and ‘wonderful’ won… – It isn’t necessary as I could use place holders for repeating letters and run them through the Cuttlebug a couple times.
To spruce the card up a little bit I used some washi tape stripes, an embroidery floss and a button.
SUPER simple, but I really love the clean and simple result.
How about you, what do you think?
Supply
I added a few other alphabet dies at the end, to give you some more options 🙂
I used the one by Papertrey Ink that I bought a while back.
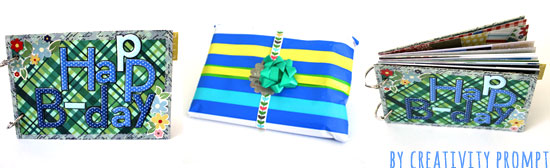
It comes ready with cute stickers, word stickers, letter stickers, border stickers as well as already designed 4″ by 6″ and 3″ by 4″ double sided pages (and other sizes as well). It also contains some 4″ by 6″ transparencies that I used as well (and still have more leftover for other projects).
So all I had to do is come up with the greeting… and the photos and add a few more letter stickers here and there from my stash. I also added a few old Maya Road chipboard arrows. But really – it’s mostly made out of this one paper kit.
Luckily my parents had bought me that stamp set (along with a few other things). Thanks so much!
It took forever (well, a week and a half) to get them and in the meantime I saw this gorgeous card by Alexandra, made with that exact same stamp set. What a tease…
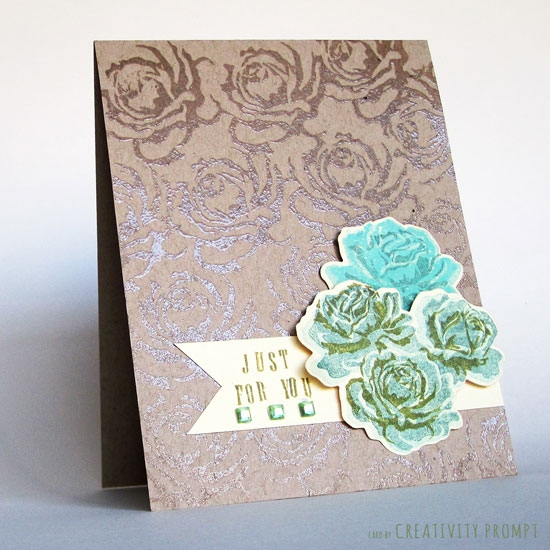
I finally received my Papertrey Ink order yesterday, and this is the first card I made with the stamps.
I used Papertrey Ink’s ink and I must say it isn’t my favorite. I find it a bit splotchy, even with a fresh new ink pad. What do you think about their ink?
To create the portrait card base I cut the kraft cardstock, widthwise, at 4¼” and folded at 5½”. I used Martha Stewart’s scoring board with a stylus but it isn’t necessary, just helpful.
Next I took the large detail rose stamp from Papertrey Ink’s set and repeatedly stamped it with the versamark ink, starting from the bottom left and making my way up.
Then I covered the stamped images with clear embossing powder and set it with a heat tool.
To create the accent flowers I used the three-steps stamps from the set and the matching dies (they went like butter through my ancient Cuttlebug machine). As the dies aren’t see-through I first cut the ivory cardstock and then temporarily adhered the ‘naked’ die-cuts to a scrap paper and stamped, starting from the least detailed stamp with the lightest ink color and moving on to the most detailed stamp with the darkest color.
Then I cut a 1″ strip of the Ivory cardstock and shaped its end into a banner shape, by cutting a slit in the middle and matching up the ends from each edge of the cardstock strip. I adhered it to the card with permanent tape adhesive and stamped the greeting with individual letter stamps (I actually did the stamping after adhering the accents, but this is not recommended…).
Next I adhered the flowers die cuts. I attached the bottoms with regular tape adhesive and the tops with pop dots to add interest.
To finish off the card I added some bling… How can I not, right!?
If you like it –
Back when we were kids creativity came naturally to us. Everything was possible and our prolific imagination was the only limit we knew.
Through the years we have grown apart from our inner creative child and along with that – have lost our pristine and utter joy of creation.
In this e-book I will pave your way back to your inner creative child, brick by brick.
“Unleashing The Creative Child Within You” will explain why you became distant from your core creativity and will reveal the secret to getting it back.
With exercises designed specifically to help you find the inner child within you, regain its confidence and unleash it – you are bound to get your mojo back faster than you think.
So far this is a FABULOUS class with so much information and a TON of inspiration. I will definitely check out their next classes.
The class is broken down into types of stamps (alpha, graphic, etc.) and for each type they have a separate lesson with a ton of non-conventional ways to use these stamps.
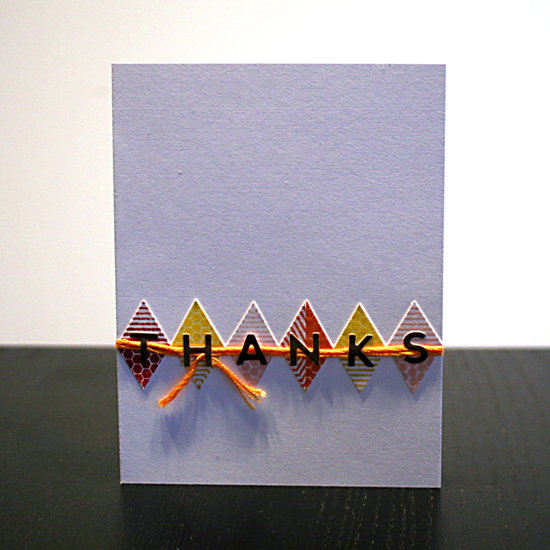
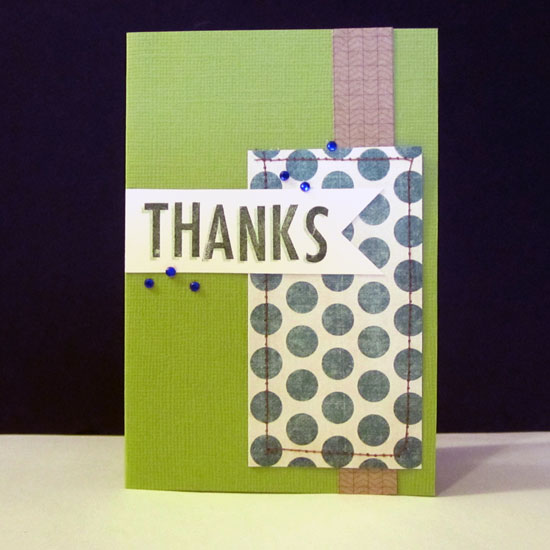
I was really inspired by one of the ideas from the letter stamps lesson, which is stamping the letters twice without re-inking the stamp and creating an offset shadow.
As the letter stamps are all cut to the same length, it is easy to align all the letters together and stamp the entire sentiment at once, rather than stamping each letter individually. It also helps that the word ‘Thanks’ doesn’t have repeat letters…
You should give this double stamping technique a try – it’s so easy and the results are really fun.
[Regrettably I found that most of my ink pads dried out, so my results are not the best – but try it with a juicier ink pad and you’d love it]
Now I need the ink fairy to visit, as I just bought a ton of stamp sets (well, 5 setsis a ton for me…) and I cannot play with them without ink. Bummer.
By the way, the stripe of patterned kraft paper is taken from the sheet I designed for the backers of my Journaling Mates. So with each package you buy, you get a piece of this high quality, exclusive patterned paper as well.
If you liked it –
Bring life to your projects with handmade epoxy stickers.
Just $3.00 per package.
6 stickers in each package.
Each sticker measures approximately ¾â€ by ¾â€.
To download it simply click on the image (or the link) and if it doesn’t work try to right-click on it and opt for the “save target as…†option (it may be phrased a bit differently on different operating systems – but do NOT opt for the “save image as†option, as you will get the low resolution tiny preview image).
I hope you like it and have lots and lots and lots of fun with it.
Make sure you didn’t miss the rest of the free printables on Creativity Prompt.
Share
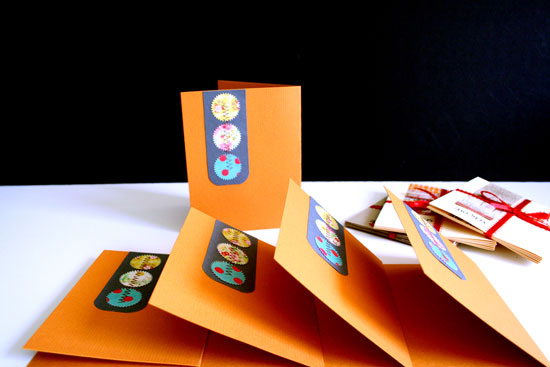
How are you going to use these cards? Please leave a comment and share.
Back when we were kids creativity came naturally to us. Everything was possible and our prolific imagination was the only limit we knew.
Through the years we have grown apart from our inner creative child and along with that – have lost our pristine and utter joy of creation.
In this e-book I will pave your way back to your inner creative child, brick by brick.
“Unleashing The Creative Child Within You” will explain why you became distant from your core creativity and will reveal the secret to getting it back.
With exercises designed specifically to help you find the inner child within you, regain its confidence and unleash it – you are bound to get your mojo back faster than you think.
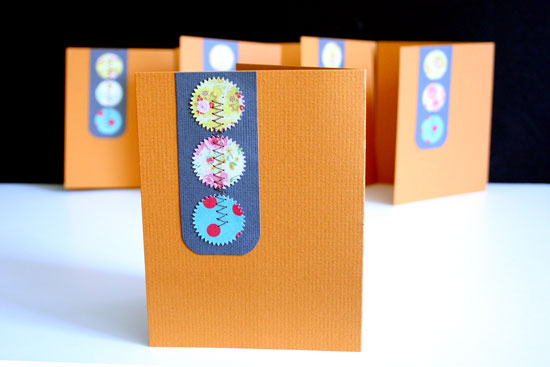
This set is without a greeting because I actually use these cards for the gifts I am giving everyone, so a generic greeting won’t do. I want to write a personal greeting for each person. This is how I roll…
This card set is probably the simplest of themall.
I adhered the three punched pieces to the cardstock using 2-way glue and sew over it [I used the 2-way glue to make sure the adhesive won’t clump the sewing machine].
I secured the ends of the threads with regular tape and rounded the corners, then adhered to the cardstock base.
That is all.
Isn’t it simple?
Check out Creativity Prompt’s new and unique self paced workshop: “Welcome Little One”. This workshop will provide you with everything you need, and then some, to make a fabulous handmade mini album to record the first moments of a new born baby.