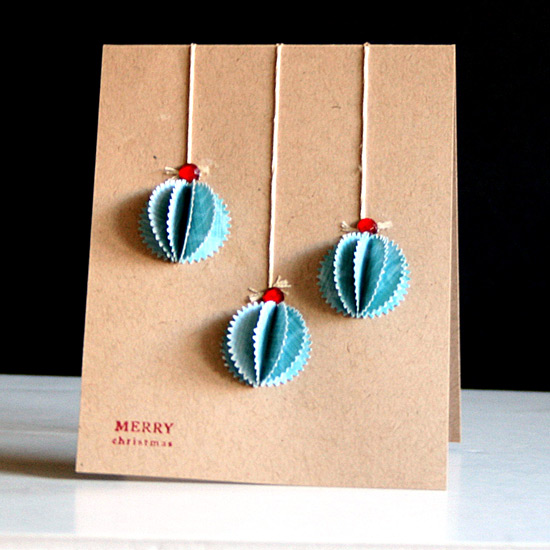
I wanted to share with you a quick and simple card I made. You can also use the same technique to create ornaments for your tree. You may use any symmetrical shape to make it.
Supply
- Cardstock
- Patterned paper [I used specialty paper by Cloud 9 Design]
- Punch
- Paper piercer
- Embroidery floss and a needle
- Gems
- Liquid glue
- Glue pen [you can also use a glue stick]
- Greeting stamp and ink [I used Mixed Messages and Pure Poppy inkpad by Papertrey Ink]
How To
[Go here to watch on YouTube and while there, please rate, comment and subscribe.]
Step by Step Instructions
- Cut you cardstock at 4¼” lengthwise and fold in half to create your card base.
- For each ornament, punch 5 punched pieces of patterned paper and fold each one in half.
- Adhere only one half of the punched piece to the second one, making sure the edges are aligned and repeat on all five punched pieces.
- Repeat for all the ornaments you want to add to your card.
- Decide how you want to lay your ornaments on your card and pierce a hole on top of each ornament and another hole on the fold of the card in a straight line above each ornament.
- Thread your embroidery floss through both pierced holes and tie at the bottom, close to the top of each ornament.
- To secure the knot, apply a glob of a strong liquid glue on each knot and attach a gem to it, to conceal the glue.
- Adhere the ornaments below each knot.
- Stamp your greeting.
Share
What holidays are you celebrating in the next couple months? I am really excited about Hanukkah, the Festival of Lights. Share yours by leaving a comment below.

Check out Creativity Prompt’s new and unique self paced workshop: “Make Your Own Planner”.
This workshop will show you how to make a beautiful handmade planner for the year 2012. Not only are you going to get the entire meticulously designed planner kit for instant download, but you will also get a high resolution video tutorial as well as step-by-step instructions to guide you on each step of the way. Either treat yourself with a fresh and creative start for the coming new year, or get it to create wonderful gifts for your family and friends.
Join now
Tags: cards, Christmas, creativity prompt, holiday cards, holidays, Video Tutorial


Great card my Friend!
Congrats on winning the prize at M.M!!
Thanks, Alexandra. I can’t wait to find out what is it 🙂
That is a great card. Thanks for sharing!
Thanks for stopping by 🙂
What a great card! I made one with a similar technique on Monday:
http://loandread.blogspot.com/2010/11/paper-pompom-card.html
I love the ornament idea!
What a great simple elegant Christmas card! I wasn’t going to make Christmas cards this year but maybe I will now! Thanks for the tutorial!
You’re very welcome! Thanks for your kind words!
Great idea! I love how it’s simple but effective. The 3D is fun too!
[…] Creativity Prompt show you how to make these dimensional ornaments cards, which would be a fun craft to do as a family. It even comes with a video tutorial! […]
[…] Primul model este o felicitare cu globulete 3D, pe care am gasit-o aici. […]
I love this 3D card! Fantastic job! I will try it this year for my ‘special people’ Christmas cards…Thanks for sharing!
This is very clever and sweet!
[…] cards inspired by Creativity Prompt & 3D tags inspired by Warm Hot […]
Thanks a lot for this shared project. My children will enjoy making Christmas cards this year, thanks to your creativity!
You are very welcome!
[…] Modern 3-d Christmas tree & ornament card ♥ Martha Stewart accordion tree card ♥ Martha Stewart button cards ♥ Beaded […]
[…] […]
[…] Felicitare cu globuri – tutorial […]
Very clear instructions…thank you.
Thank you and you are very welcome! 🙂
[…] DIY holiday cards for […]
[…]  DIY Ornament Christmas Cards from Creativity Prompt DIY Hand Painted Holiday Ornaments from MarthaStewart.com DIY Finial Ornaments from Momtastic DIY Giant Pom Pom  – New Super Fast Technique from Handmade Charlotte Share this:EmailFacebookTwitterPrintStumbleUponDiggReddit […]
[…] Video s postopkom izdelave si lahko ogledate na http://www.creativityprompt.com […]
[…] Get the instructions here […]
[…] Creativity Prompt has a video that details how to make these cards. I love the look of 3D images on cards. […]
excellent demo and very cute and simple idea! thanks for posting. Happy Holidays!
Thank you for stopping by and for your sweet comment!
what a cute card! I can’t wait to try it
[…] a pesar de estar en inglés, te servirá para que puedas seguir el paso a paso con detalle. (VÃa: Creativity Prompt – Traducción en […]
Thank you so much!!! This is just what I need! Your instructions are so clear and the 3D effect is so incredible! 🎄â¤ï¸â¤ï¸
Thanks for stopping by. I’m so glad it has been helpful to you and that you liked it!
I loved your video. Thanks for sharing this delightful card.
Thank you!