I love making my own albums and journals. Many times I use recycled materials along with some yummy patterned paper. If you are new to Creativity Prompt, you are welcome to have a look at the different album and journal tutorials I have posted so far:
Album Tutorials –
- Circular mini album.
- Guided album.
- Recycled mini album.
- Mini acrylic album.
- Circular Pocket album.
- Mini chipboard album.
Journal Tutorials –
- Hardbound journal. This journal acts as a base for any hardbound album or journal that I am doing.
- Matchbox journal.
- Tiny hardbound journal.
Now lets get to business and make an accordion spine album – just another fun way of keeping your heartfelt memories.
Materials & Tools –
- Chipboard.
- Patterned paper.
- Cardstock.
- Ribbon.
- Craft knife & Self healing mat & a ruler
- Crop-a-dile.
- Double sided adhesive (with a strong bond).
- Glue stick.
- Paper trimmer with a scoring tool.
- Bone folder.
- Paper clips.
How To –
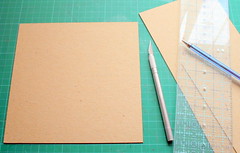
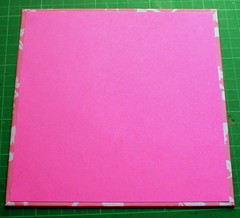
- First cut the cover of the album out of your chipboard. You will need to cut 2 pieces, 7″ by 7″ each.
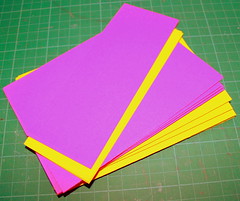
- Next you need to cover each of the chipboard pieces with patterned paper.
- Cut the patterned paper at 8.5″ by 8.5″.
- Adhere the chipboard piece to the middle of the patterned paper with your glue stick.
- Cut the corners of the patterned paper up to 1/8″ of the chipboard corners.
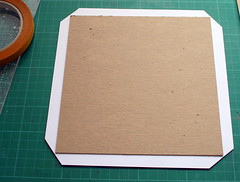
- Adhere the edges of the patterned paper to the chipboard (you can use either the glue stick or a double sided tape). For crisp lines, use a bone folder and work each time with the flaps on the opposite sides.
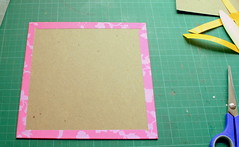
- To finish up the cover’s look, adhere a 6¾” by 6¾” piece of cardstock on each of the chipboard pieces.
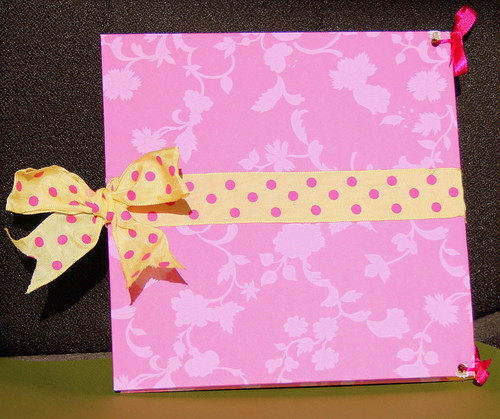
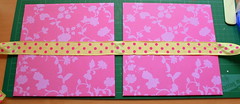
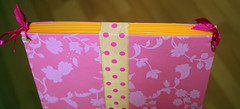
- Now it’s time to add on the ribbon. Position your chipboard covers one next to another with a gap (1″) between them. Put a strip of very strong double sided tape along the midsection of each chipboard piece and adhere the ribbon to it. Keep enough excess of the ribbon on each side for tying it nicely in a bow. Learning from my on experience, I suggest not to use a wire rimmed ribbon.
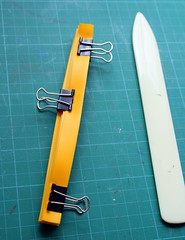
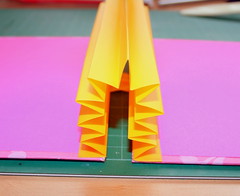
- For the spine you need a 10½” by 7″ piece of cardstock. Score it along the 10½” side at every ½”.

- Next you need to fold the cardstock on each score line in an accordion style – one fold up and one down. It is important to burnish each fold thoroughly with the bone folder. When you finish up folding the entire strip of cardstock, secure the spine with paper clips. If you have the time – let it rest like that for at least a day or so.
- Adhere the spine to the chipboard cover, in a way that creates a mountain fold between the cover and the spine and the other cover (which means the score line is turning outwards). I used a double sided tape for adhering the spine.
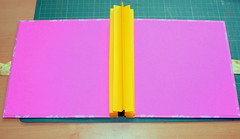
- To control the accordion spine, which tends to get a bit unruly… use your crop-a-dile to punch a hole all the way through it, both at the top and at the bottom of the spine.
Make sure that you leave enough room for the album’s inserts to fit inside.
It’s hard for the regular crop-a-dile to go through the spine and the two chipboard covers. So either use a craft drill (don’t forget to protect your cutting mat, when using the craft drill) or punch the spine and secure it with a ribbon before adhering the spine to the cover (that means doing steps 8-9 before step 7).
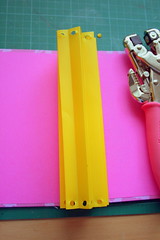
- Secure the spine by threading a ribbon or a strong thread through the holes and tying it in a knot on each side.
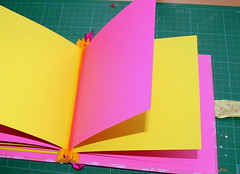
- Cut all your inserts from cardstock at 6¾” by 6¾” (and keep the leftovers for fast card making 🙂 ). I have used 9 inserts in two different colors – you can use as many colors as you wish or make it monochromatic.
- Attach each insert to the spine by lining its edge with double sided tape and adhering it to the inside fold.
Share –
I really hope you’ve enjoyed this tutorial (along with all the others) and that the instructions are clear enough for you to go right into making your own mini album. If not, please feel free to ask any question by leaving a comment.
Please share your creation with us by posting a link as a comment here or by adding a picture to the Creativity Prompt Flickr Group.
Enjoy!!!
Tags: album, creativity, creativity prompt, Tutorial


Hi, I tagged your blog in a post I wrote in my blog, I hope you’ll play the game (-: more details here http://www.tapuz.co.il/blog/ViewEntry.asp?EntryId=1344637 lucky for me you can read Hebrew so I didn’t have to translate it all to English (-:
Of course I’ll play along, but in English!!! I’m honored to be tagged by a talented woman like you 🙂
great tutorial! fabulous!
🙂
candy
This is hillarious- I just tagged you, and I didn’t notice that Anat did as well – so you’ve been tagged once more! 🙂
I guess it means I better get to work and find some random facts about me…
Came across your blog for the first time.
I like the way you detailed out every step so that even someone like me.. he he can try this out.
Thank you
Shamelle
Thanks for the feedback. I really appreciate it. You are very welcome to stay around and enjoy Creativity Prompt and I’d love it if you shared your creations with us.
These must be regrded as technology previews but also must be in very good shape and ve extremely easy to package. ,