I have a confession to make. (Actually two confessions…)
I am completely obsessed with washi tapes.
Although I do not have a huge selection (you can see all my ‘stash’ above),
I do seem to add a couple rolls to each purchase…
For good measure, right?
I am also trying out different brands for a future review (stay tuned).
Not all tapes are created equal…
There is something else I’m nuts about – berries and cherry tomatoes.
I eat about a package of tomatoes a day (!!!) and I also eat a ton of berries.
(Have you ever tried a wild berries smoothie with spinach, vanilla soy milk and ice-cream? Divine.)
Luckily, these two passions converge, as I use the cute little fruit and vegetables packages to store my washi tapes. (…and other bits and pieces.)
They are the perfect size and they are clear, which I love. Plus they are totally stackable.
My Storage System
All I do is: [1] give the tiny basket a good wash (NOT in the dish-washer, unless you want to see a molten basket…); [2] take off the label; and [3] adhere a cute piece of patterned paper on top.
Simplicity is key.
As it is important for me to keep track of the brand and product names, I also add a tiny label to the inside of each tape roll.
I use regular label stickers from an office supply store and write with a permanent pen to prevent smudging.
It’s super easy and totally optional.
Share
What is your favorite storage system for bits and pieces? Please leave a comment with your clever suggestions, I love reading them!
Back when we were kids creativity came naturally to us. Everything was possible and our prolific imagination was the only limit we knew.
Through the years we have grown apart from our inner creative child and along with that – have lost our pristine and utter joy of creation.
In this e-book I will pave your way back to your inner creative child, brick by brick.
“Unleashing The Creative Child Within You” will explain why you became distant from your core creativity and will reveal the secret to getting it back.
With exercises designed specifically to help you find the inner child within you, regain its confidence and unleash it – you are bound to get your mojo back faster than you think.
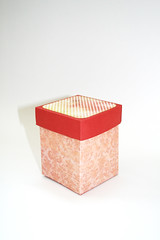
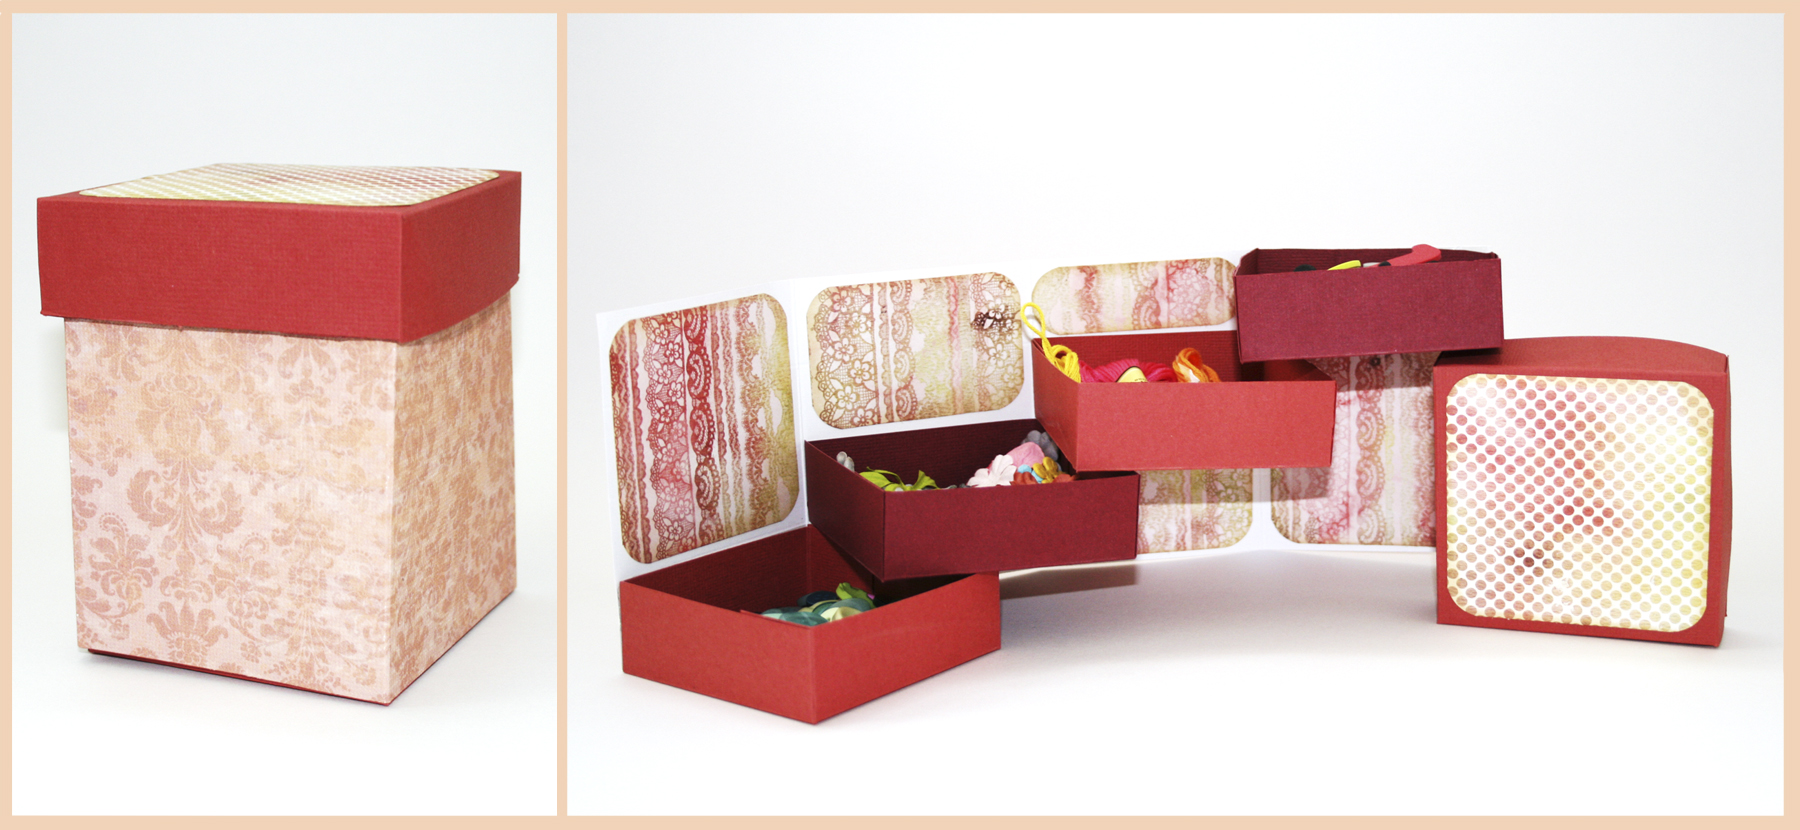
OK. I’ll admit it. I am addicted. Addicted to boxes… Luckily I have been moving a lot in the past years, so I got to buy boxes and treys over and over again. I just LOVE that everything has its place. Be it the tiniest of places, but a dedicated one.
Therefore when I saw this idea of a box of drawers online (in numerous places) I immediately knew that this project is right up my alley. So I whipped up my own version of this project with a couple quick sketches and voilà , in about 20 minutes I had one more box to add to my collection.
Usage Ideas for the Box of Drawers
Sewing kit – A place for your threads, threaders and needles.
Embellishments center (as shown above) – You can put your buttons, paper flowers, die cuts, eyelets and brads all in one place.
Office supply organizer – A chic way to camouflage your paper clips and staples stash…
Family “Mail-Box” – Attach a name tag to each drawer and leave heartfelt notes to each other. (This project can accommodate any family size, just alter the height of the drawers for a smaller family, or add more drawers and alter the height of the box for a bigger family).
I’d love to hear what ideas you come up with… so please do share!
So if you feel like making your own box of drawers keep on reading:
Score your cardstock at: 3″, 6″ & 9″ lengthwise and fold all your score lines with a bone folder.
Score LIGHTLY widthwise at each 1″ to draw some guidelines for the placement of the drawers.
Apply a strong double sided tape to each of the box’s walls in increments of 1″.
To embellish the inside of the boxes cut 6 pieces of patterned paper, as follows: 2 pieces at 2¾” by 2¾”, 2 pieces at 1¾” by 2¾” and 2 pieces at ¾” by 2¾” – Round their corners and ink the edges with distress ink. Then adhere to their respective place on the interior of the box.
Adhere the drawers to the box. Make sure not to place a drawer nor to apply adhesive on any of the score lines.
Lid –
Cut your cardstock at: 5¼” by 5¼”.
Score at 1″ all around. [Again you can align your cardstock with the paper trimmer’s 4¼” mark].
Cut a slit on each of the flaps up to the first score line.
To decorate the lid, cut a piece of 3″ by 3″ patterned paper. Round its edges and ink it up with distress ink, then adhere to the center of your cardstock.
Apply strong double-sided tape to the back of each of the flaps and adhere together, aligning edge with edge.
Share
If you have any question, suggestion or remark – don’t hesitate to contact me – either leave a comment here, use the contact form or start a new thread on the Creativity Prompt Flickr Group!!!
I would also be very happy to see your own creations, so don’t be shy and share 🙂


 OK. I’ll admit it. I am addicted. Addicted to boxes… Luckily I have been moving a lot in the past years, so I got to buy boxes and treys over and over again. I just LOVE that everything has its place. Be it the tiniest of places, but a dedicated one.