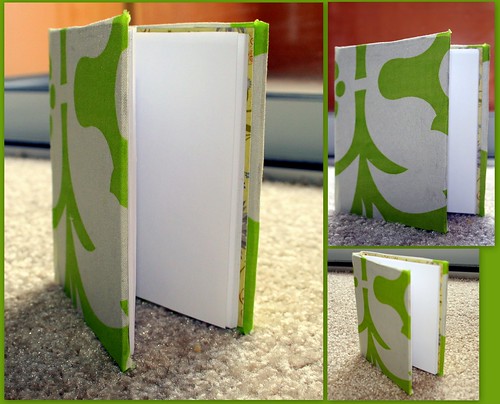
This week I want to suggest another quick and easy way for making an hardbound journal. Covering the thick chipboard with fabric adds additional appeal, the coveted and elusive “je ne sais quoi” 🙂 . Yet, it is soooooo easy to do (provided you did not cut your finger in the process).
Unfortunately, I DID cut my finger in the process, therefore my journal isn’t really as beautiful as I would like it to be (see the frayed edges in the corners)… So please ignore the imperfections and see the hidden potential in it… Considering you can see this raw potential read on for the full (video) tutorial.
Tools & Supply –

- Craft knife
- cutting mat
- Scissors
- Brayer
- Bone folder
- Styrofoam (Have you bought any furniture lately?)
- Grid ruler
- Stapler (A simple tiny one will do)
- Glue stick
- Double sided tape
- Fabric (I used a pillow cover…)
- Patterned cardstock (heavy weight)
- Heavy Weight chipboard
- Copier paper
Measurements –

[Click on the picture for a better view]
- Fabric – 12″ by 5.5″
- Patterned cardstock & copier paper – 7 1/2″ by 4 1/2″
- Chipboard: spine – 1/4″ by 4 5/8″ cover – 2 (3 7/8″ by 4 5/8″)
How To –
[Click twice on the video to get to You Tube and watch in high quality.
While you’re there, feel free to rate and comment 🙂 ]
Step By Step Instructions –
[I hope it is helpful for those of you who cannot watch the video]
- Adhere the chipboard pieces to the fabric with a glue-stick.
- Start at the middle with the spine. Then attach the cover pieces – one on each side of the spine. Use a brayer to insure a strong bond.
- Cut all 4 corners of the fabric in an angle. Leave a 1/8″ gap between the fabric and the chipboard edges.
- Adhere the fabric’s flaps with a glue stick. Tuck in the corners, for a nice fold.
- Fold the patterned paper (heavy weight) and copier paper stack in half. Crease well with the bone folder.
- Straighten up the copier paper stack with a sharp craft knife. To avoid falling finger tips… don’t press hard on your knife, but rather use repeated soft strokes.
- Lay your signature (patterned paper + copier paper stack) on a soft mat (I’m using salvaged styrofoam) and staple together. Use your bone folder to flatten the lil’ prongs.
- Cover the signature with strong double sided tape. Some added glue stick doesn’t hurt…
- Carefully adhere the signature to your chipboard cover.
- Voilà ! Enjoy!
Enjoy!!!
If you have any question, suggestion or remark – don’t hesitate to contact me – either leave a comment here, use the contact form or start a new thread on the Creativity Prompt Flickr Group!!!
I would also be very happy to see your own creations, so don’t be shy and share 🙂
In an effort to make you share more, I want to show you the FABULOUS notebooks the talented Robin Gibson made, following this notebook tutorial. [Click on the picture to go to her Flickr photo page]:

Aren’t her notebooks fantastic?
Tags: creativity, creativity prompt, journal tutorial, Tutorial, Video, Video Tutorial


This is great! Now instead of looking for small notebooks to buy and then cover tham to personalise I will make tham from scartch! It looks adorable. Can I link to it? So sorry about your finger.
Thank you! Of course you can link to it – it would be lovely to also include your own version of the journal in your post…
[…] Creativity Prompt – Make A Fabric Covered Hardbound Journal […]
LOVE this book! Will definitely need to make one for myself:) Great tutorial too, Thanks! I LOVE COMING HERE!!! Thanks for the inspiration!
Thank you. I love YOU coming here 🙂
how helpful! pretty pictures 🙂
Thanks! I looked in on your blog and I LOVE those shoes!!!
My friend on Facebook shared this link with me and I’m not dissapointed at all that I came here.
Kia Ora,
Thank you for sharing your easy to follow instructions for making a journal. It has sure come in handy.
Reg.
This is great! I homeschool and this would be a great activity!
Thanks!
You’re very welcome!
Hi! I LOOVE these!! They are so beautiful and easy!
Do you happened to have any other measurements for anything larger than this?
You can go through the different journal or mini book tutorials here but basically you can make it any size you want, just make the width and height of the cover 1/4″ larger than your signature, the spine, as high as the cover and as wide as the insert and make the fabric about an inch larger – widthwise and lengthwise – than both covers and spine put together next to each other. I hope that makes sense…