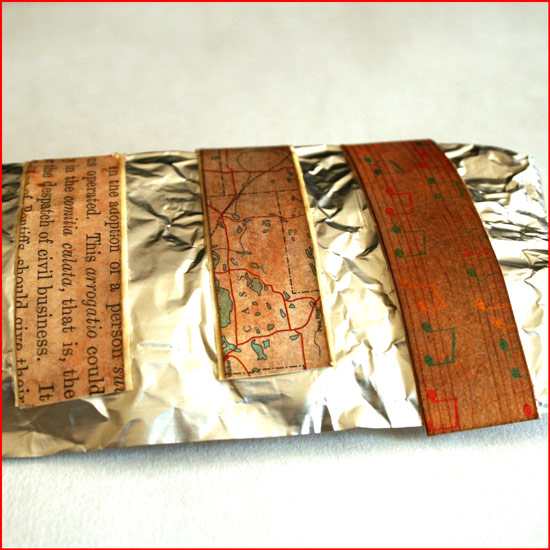
I always last after beautifully composed photos of beautiful tape.
But I don’t have any of them beauties.
I guess their price doesn’t translate well when I think of their utility…
Then, you can imagine my utter delight when I stumbled upon this DIY Deco Tape Tutorial by my favorite diy-er, Sara.
As my doodling skills are not as impressive as Sara’s, I immediately thought of using patterned paper strips with Mod Podge. It is so easy and the result is quite pleasing.
Although it doesn’t look exactly like “the real deal”, it is very close to it and much more affordable, not to mention – more flexible as for what colors/patterns you’ll be using.
Don’t stop there, you can also ink the tape, stamp on it or just leave it as is and boost its confidence with some pep talk… (Where am I going with that?)
[Go here to watch on YouTube and while there, please rate, comment and subscribe.]
Step by Step Instructions
Measure the width of the tape you’re using and cut paper strips, the same width as the tape.
Prepare the strips by inking them with distress ink (optional) and conditioning them with water. To do that saturate the strips with a couple spritzes of water using a mister. To add some sheen I added 2 tiny scoops of golden perfect pearl medium to the tap water, but that’s optional too. Blot the excess water with paper towels.
When the strips are completely dry, temporarily adhere the masking tape, in the length of your choice, to a non-stick mat.
Apply a layer of Mod Podge to the tape – not too thin and not too thick – and adhere the paper strips to it. Apply more glue, if necessary. Eliminate all air bubbles by applying pressure with your finger on top of the paper strips. Use your finger, as if it was a brayer. Then let it dry – COMPLETELY.
Apply a second, top layer, of Mod Podge. Apply it generously – it will be used as a sealer. Let it dry COMPLETELY.
Remove the excess glue by going over it with your fingers and peel off the tape from the non stick mat. Transfer the tape to a non stick sheet you use in the kitchen. You can also roll them against a round handle (the brush’s handle is perfect for that) to make your own tape-roll.
Share
Do you work with deco tape? What do you use it for? Please share by leaving a comment.
Check out Creativity Prompt’s new and unique self paced workshop: “Make Your Own Planner”. This workshop will show you how to make a beautiful handmade planner for the year 2012. Not only are you going to get the entire meticulously designed planner kit for instant download, but you will also get a high resolution video tutorial as well as step-by-step instructions to guide you on each step of the way. Either treat yourself with a fresh and creative start for the coming new year, or get it to create wonderful gifts for your family and friends. Join now
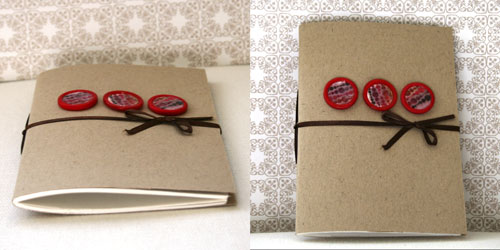
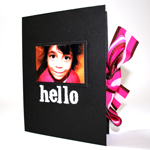
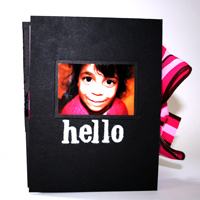
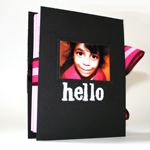
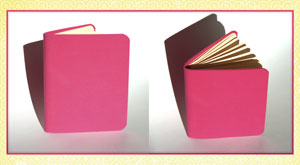
This project is also an easy one you can whip up in under 10 minutes. I love those type of projects and I can never have enough notebooks to sketch, doodle and write in. Can you?
I used the ribbon for the binding, as an alternative to the linen thread or embroidery floss I normally use for binding and as an added bonus, the ends of the ribbon also provide a nifty closure for the notebook.
If you are interested in making this sweet and simple notebook, then keep on reading for the supply, video how to and step-by-step instructions. Enjoy!
Tools & Supply
Plain white paper (I used 10 papers for a 40 pages notebook)
[Watch on YouTube. While you’re there, please comment, rate & subscribe]
Step-by-Step Instructions
Cut your papers 8″ wide and 5½” tall. Fold in half to 5½” by 4″.
Straighten the edges of the paper stack with a grid ruler, aligned with the edge of the paper and a craft knife.
Cut your cardstock 8½” wide and 5½” tall and wrap around the paper stack to adjust the spine.
Lay the paper stack over the cardstock cover and mark the piercing holes: one at the center and one to each side – 1″ apart.
Pierce the papers and cardstock following the marks you created before.
Thread the ribbon through the needle so both ends would meet and start the binding stitching from the inside out, through one of the outer holes.
Then go in through the opposite hole.
Tie the ends together in a double knot and thread the needle out through the center hole and in again through the same hole.
Thread the needle through the loop the tied ends create and then underneath the first stitch.
Thread the needle out through the center hole again.
Cut the ribbon off the needle and use the ends to close the notebook.
To embellish the notebook I adhered 3 buttons with a dab of Diamond Glaze to the center of the notebook’s cover and adhered three punched out circles of patterned paper to the button. I then secured the patterned paper with another layer of Diamond Glaze.
Share
If you have any question, suggestion or remark – don’t hesitate to contact me – either leave a comment here, use the contact form or start a new thread on the Creativity Prompt Flickr Group!!!
I would also be very happy to see your own creations, so don’t be shy and share 🙂
“Capture Your Dream” workshop is relaunching as a self-paced workshop. Isn’t this the perfect time for you to capture your dream and make it happen?
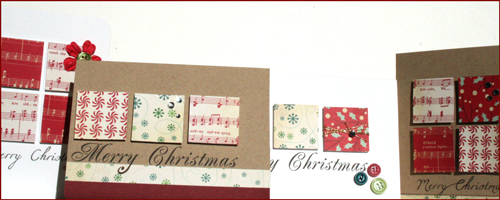
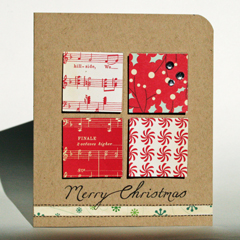
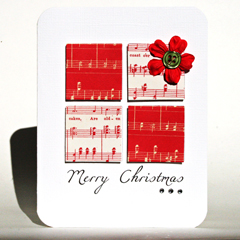
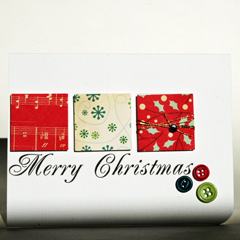
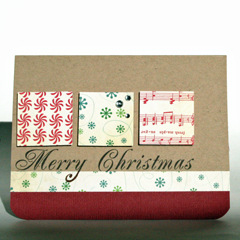
Sending handmade cards is a wonderful and well appreciated gesture, but with a recipients list as long as eternity, who has the time to make them?
What if most of the work was already done? The basic design has been laid down. The greeting has been “stamped” and all you had to do is cut, score, punch and paste? That would really give the push you need to accomplish your goal of sending handmade cards to all your acquaintances.
Search no more. I have sorted out your Christmas cards dilemma for this year.
Below you can find a printable template (PDF file format) that does most of the work for you. If you are interested, keep on reading.
Tools & Supply
Printable cards template. [Right-click on the link and opt for “save link as…” OR “Save target as…”]
Print the template on a cardstock of your choice (8½” by 11″). Make sure your printer’s setting is on “No scaling”.
Cut your cardstock at 5½” and score each half at 4¼”.
Cut 1¼” by 1¼” squares from the patterned paper of your choice. Use a punch to make this step super quick.
Adhere your patterned paper squares to the squares on the template, using dimensional foam adhesive.
Either stop here, right a personal greeting inside and send the card OR embellish some more.
Share
If you have any question, suggestion or remark – don’t hesitate to contact me – either leave a comment here, use the contact form or start a new thread on the Creativity Prompt Flickr Group!!!
I would also be very happy to see your own creations, so don’t be shy and share 🙂
Check out the new “Make Your Own Planner” workshop and you may solve this year’s holiday gift shopping problem. An affordable workshop that keeps on giving…
I have recently watched an eye opening video on You Tube that I want to share with you.
This video shows how many of the greatest minds, most talented artists and most imaginative inventors had been deemed as failing at something at a certain point in time.
Every beginning is dotted with misguided steps and awkward hand strokes, those dots are accumulating over time until they render a perfect line.
Don’t be distracted by the dots. In the end you will make a perfect line!
Have a great day!
Tomorrow I am celebrating my BIRTHDAY and I would like to send you some warm wishes 🙂
Share
Were you ever disappointed at not getting something right at the very first time, only to discover you are headed towards greater success? Share your thoughts by leaving a comment on this post.
This week’s project is also quick and easy to put together. You decide how much time you want to spend embellishing each page later on…
All you need is a bunch of envelopes, 2 pieces of chipboard and a long piece of ribbon. Pretty straightforward.
You can take your time and decorate each page individually, or just adhere a photo on the back of each envelope and insert your journaling in each corresponding envelope. The sky is the limit for you.
Cut 2 pieces of chipboard – ½” taller and wider than your envelopes.
Stick a strong double sided tape at the center of each chipboard piece. You can use the markings of your cutting mat for easy alignment.
Adhere your ribbon to both pieces of chipboard, while leaving a ½” gap between them.
Adhere each envelope to the next at the base with plain packaging/wrapping tape. Make sure you keep the orientation of the envelopes.
Cut the excess tape off the sides of the envelopes stack.
Adhere the envelopes stack to the chipboard with some more strong double sided tape.
Cut the envelope inserts out of cardstock. Make them ½” shorter and narrower than your envelopes.
Insert a piece of cardstock into each envelope.
Embellish and… Voilà !
Share
If you have any question, suggestion or remark – don’t hesitate to contact me – either leave a comment here, use the contact form or start a new thread on the Creativity Prompt Flickr Group!!!
I would also be very happy to see your own creations, so don’t be shy and share 🙂
I loverecycling and every time I manage to turn trash into treasure, I am happy. Maybe too happy, but that’s for the professionals to judge 🙂
If you are as jubilant about recycling as I am and would like to make a fat journal out of cardboard and packaging paper used for padding – then keep on scrolling.
I’ve got a video tutorial just for you.
Tools & Supply
Packaging material – cardboard and padding paper (or plain copier paper)
Cut cardboard at: 5½” by 4½” | 5½” by 4½” | 5½” by 1″.
Cut 2 pieces of patterned paper for the cover, at: 8″ by 6″.
Adhere the cover pieces to the center of the patterned paper with glue stick.
Cut the corners of the patterned paper and leave a gap from the cardboard corners – a gap as long as the cardboard is thick (between ½” to ¼” depending on the cardboard).
Fold the remaining patterned paper flaps over and adhere to the cardboard with glue stick.
To cover the spine, cut a 6″ by 6″ piece of patterned paper diagonally. Cut it 2″-1½” away from the corner on each side.
Fold and adhere the top patterned paper flaps to the cardboard spine with glue stick.
Apply strong double sided adhesive to both edges of the patterned paper and attach the cover pieces to it. Allow an 1/8″ gap between the spine and each of the cover pieces.
For the inside cover, cut your patterned paper at: 5¼” by 4¼” | 5¼” by 4¼” | 5¼” by 1″.
Adhere the patterned paper to the inside cover with glue stick. Optional – To secure the adhesion go over the cover with a brayer a few times in different directions.
Punch 2 holes in the spine using a Crop-a-Dile.
Cut the insert pages (from the packaging paper, or any other plain paper you have) at 8″ by 5″.
Fold the insert pages in half.
Optional – Use a T-Square ruler to straighten up the inserts (or leave them looking rustic).
Position your folded pages where they should lay inside the journal and mark the placement of the holes, then punch the inserts accordingly.
Thread your string through the inserts, from the inside – out.
Thread the ends of the string through the spine and secure in a knot or a double bow.
Write your secrets and deepest wishes in the pages of your new handmade journal.
Share
If you have any question, suggestion or remark – don’t hesitate to contact me – either leave a comment here, use the contact form or start a new thread on the Creativity Prompt Flickr Group!!!
I would also be very happy to see your own creations, so don’t be shy and share 🙂
A good quality art journal with sturdy signatures may burn a hole in our pocket. However, by using just 5 high quality cardstock pieces, you can make your own art journal for a fraction of the price – not to mention the cute foam cover you get…
If you are interested in watching how to make one of these cute art journals, than keep on scrolling…
Tools and Supply
Heavy weight cardstock (5 sheets of 8½” by 11″ will make 10 signatures = 20 pages)
Fold the signatures in half. For a sharp crease use a bone folder.
Poke holes along the crease line of each signature. Start at the center and then continue each inch below and above the center.
Sew your signatures together. Start at the top hole and go through each hole with a plain running stitch, after you went through the bottom hole go back through the top hole again.
When attaching the second signature (and the ones after it) secure each stitch by going through the stitches on the spine before threading the needle through the holes.
After you have made the last stitch on the last signature, secure the ends with a few knots.
Cut the fun foam at 9″ by 5¼” for the cover.
Attach the signatures to the fun foam with a generous layer of glue stick. Apply pressure on the journal for an hour or so to ensure good adhesion.
Start painting and sketching in your new art journal…
Share
If you have any question, suggestion or remark – don’t hesitate to contact me – either leave a comment here, use the contact form or start a new thread on the Creativity Prompt Flickr Group!!!
I would also be very happy to see your own creations, so don’t be shy and share 🙂
Oftentimes embarking on a new journey, especially when taking the road less traveled, incites apprehension and fear. After the first curve in the road when the start point is already hidden and the final destination is far from being seen the anxiety worsens and the tension increases.
With each hurdle a wee bit of the initial motivation gets lost and after a few more of these bumps-in-the-road the motivation may be decreased to a faint mumble.
This is when thoughts about quitting are starting to afloat.
In this week’s inspiration prompt I suggest instead that we stop, take a gulp of air and recall what was it that sent us running in the first place? What led us to the starting point? What made our heart pulse faster? What made us smile? What made us believe in our journey?
To inspire you to continue your journey I want to share a video by Anthony Fernando:
Share
Have you ever considered quitting a journey on the road less traveled? Share your thoughts and experience by leaving a comment on this post!
Reminder
Join Capture Your Dream workshop for a unique experience of
inspiration, journaling and creativity.
Learn valuable tips and techniques while making your dream come true!
I would like to share an inspiring video I’ve stumbled upon on You Tube. The video conveys the story of a kid who insisted on adopting an uplifting point of view despite what “the experts” and his “social environment” said. An excellent and inspiring story:
Are you as inspired as I was after watching it? I am sure you are!
Now, inspired by this wonderful video, grab your journal and portray an up-side-down point of view. The kind of view that sees a smiling face instead of a sad one. The kind of view that sees the little things and tries to ponder about how things miraculously work. The kind of view the boy had that made him so special – and so controversial.
Try to communicate the same point of view from behind the camera – Try new angles, new lighting, new settings, zooming in a bit more – try to view the world differently.
Share your thoughts, journaling and photos by leaving a comment on this post.
Reminder
Only one more week left for the early bird’s admission to “Capture Your Dream“. Don’t miss on the special offer of only $14.95 for 30 downloadable lessons!!! (LESS THAN 50 CENTS PER LESSON)
Every once in a while when I feel the muse is playing hide-and-seek I like to take a step backward, get rid of all the fluff and go back to the basics. The same applies to scrapbooking.
The industry is flooded with beautiful products and tools. Wonderful papers, inks, stamps, embellishments, die-cuts and so on and so forth. Design team members are making layouts that can be presented in art galleries. Little by little, the wonderful hobby of putting together a scrapbook to tell our stories is becoming a tedious chore with a lot of pressure involved.
I am sorry to say that I have heard many creative people deciding to give up scrapbooking altogether. Some did it knowingly and some just don’t get to it anymore because of all the work and pressure involved… Isn’t it a shame?
Pressure and high expectations are known foes of our inner creative child. They practically eliminate our creativity and drive our muse away.
Therefore for this week’s creativity prompt, I prod you to go back to scrapbooking basics. Make a layout with only your photos and cardstock and nothing else. Preferably without using any fancy tools as well.
Use the grid on your cutting mat and ruler to align and cut elements to size without measuring. Just align the edge with the marks on the grid for a fool-proof straight-cutting and even positioning.
You can also use the grid ruler to draw perfect frames around any element. Align the edge of your element with the grid and trace with a marker.
Emboss your journaling surface (either a tag or the background cardstock itself) to create subtle journaling guidelines.
Vary the tip size of the markers you use to add instant graphic interest to your journaling design.
DON’T FORGET THE STORY.
Most importantly – don’t fiddle with your layout. Know when to call it done and move forward to the next story. HINT – Perfection is NOT the criteria…
Share
How are you going back to scrapbooking basics? When was the last time you only pulled out your photos and cardstock?


 Oftentimes embarking on a new journey, especially when taking the road less traveled, incites apprehension and fear. After the first curve in the road when the start point is already hidden and the final destination is far from being seen the anxiety worsens and the tension increases.
 Every once in a while when I feel the muse is playing hide-and-seek I like to take a step backward, get rid of all the fluff and go back to the basics. The same applies to scrapbooking.


