This is post is the second in the series of Embellishing Embellishments. A couple weeks ago I suggested ways of embellishing paper flowers and this week we are going to embellish raw chipboard shapes.
Chipboard is a great way to add some dimension to your project, without adding too much bulk. Chipboard is basically a bunch of layers of paper, pressed firmly together, therefore it provides a slight raise, when adhered on regular cardstock or paper.
Saying that, chipboard, in its raw state, is rather… well… ugly. Many companies provide covered chipboard shapes but the price tag can rise up and you never get EXACTLY the color, texture, finish you want on your project.
There are many companies offering raw chipboard shapes. Usually the price does play a role in telling the quality of the chipboard. For the sake of this tutorial I was using Colorbok’s chipboard shapes, they retail for 1$ but they are very thin and the layers are easily separated (especially in techniques that requires gel medium). I do recommend Maya Road’s chipboard. It has high quality yet isn’t very expensive.
The techniques I am showing on this week’s video are:
- Painting with crackle paint.
- Flocking.
- Covering in glitter.
- Covering with cardstock/patterned paper.
- Stamping.
- Decoupage.
- Photo transfer.
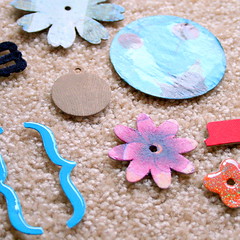
Each technique requires different tools and supply, and you may not want to experiment with all of the techniques, so I will list a separate supply and tools list for each technique below. I will also post a small picture of the chipboard, after the technique had been applied on it. You can click on each photo for a larger view.
How To –
Step By Step Instructions –
Painting with crackle paint


Tools and supply –
Instructions –
- Apply crackle paint to chipboard with the brush that comes with it. If you want, you can dilute the paint with a drop of water. Avoid bumps and clumps, but don’t apply it too thinly.
- Let dry completely.
- For an “epoxy” look, cover in Diamond Glaze and let dry for a few hours.
Flocking

Tools and supply –
- Flocking material.
- Glue stick.
- (Patience, it wouldn’t hurt.)
Instructions –
- Apply a generous layer of glue and cover with flocking material.
- Pat on flocking material with your finger. (Don’t press too hard).
- Let dry for a minute or so.
- Shake off excess flock.
- Repeat on “bald” areas (The step you will need patience for…).
Covering in glitter

Tools and supply –
- Glitter.
- Glue stick.
- Diamond Glaze.
Alternatively –
Instructions –
- Apply a generous layer of glue and cover with glitter.
- Pat on flocking material with your finger. (Don’t hesitate to apply pressure this time).
- Let dry for a minute or so.
- Shake off excess glitter.
- Cover in Diamond Glaze (avoid bubbles) and let dry for a few hours.
Alternatively –
Cover chipboard with colored glitter glue and let dry completely.
Covering with cardstock/patterned paper

Tools and supply –
- Liquid adhesive.
- File.
- Paper or cardstock you wish to cover the chipboard with. (I was using Bazzil textured cardstock)
- Craft knife.
- Cutting mat.
Instructions –
- Apply glue to the right side of the chipboard in a very thing layer.
- Adhere chipboard to cardstock or paper, while its right side is facing down.
- Let dry completely and then cut around with a sharp craft knife.
- File the excess off.
Stamping

Tools and supply –
You can use any stamp (rubber or photopolymer/clear) and any ink, I’ll list the ones I used on the video.
- Artistic Windows Special Edition Woodmounted Stamp Set By Hero Arts.
- Chocolate & Blueberries Stackable Colorbox Queue Chalk Ink By Hero Arts.
- Walnut Stain Tim Holtz Distress Ink By Ranger Industries
Instructions –
- Apply a base layer of ink to the chipboard. (I really like the smoothness of the chalk ink).
- Ink up the stamp well and stamp on the chipboard. Apply a good amount of pressure to make sure the image will transfer evenly and completely.
Decoupage

Tools and supply –
- Napkin.
- Gel medium.
- Brush.
- Micro-tip scissors.
Instructions –
- Apply gel medium to chipboard (you can put a base coat of ink before, if you want the final result to be tinted).
- Separate the top layer of the napkin and lay it on the chipboard – right side up.
- Apply a second coat of gel medium on top of napkin.
- Wait until it dries completely. I was impatient and it made everything more complicated than it should be, So LET IT DRY!!!
- Cut around the chipboard shape with micro-tip scissors. (you can poke them in any hole or cavity of the shape).
- Apply a thin layer of gel medium to the edges of the shape. It will straighten all stray pieces of napkin as well as prevent the chipboard from separating.
Photo Transfer


Tools and supply –
Instructions –
- Start by choosing your photos and printing them on transparency with an inkjet printer. I am using Canon MP620 Wireless All-in-One Photo Printer.
- Apply a base coat of ink to the chipboard.
- Apply gel medium to the chipboard and lay the printed transparency over it, inked side down.
- Apply pressure to the transparency with a brayer and rub the image off with a bone folder.
- Gently peel off the transparency and make sure the top layer of the chipboard isn’t stuck to the transparency. If it is stuck, peel it gently with the tip of your craft knife’s blade and adhere it back on with some more gel medium.
- Apply another coat of gel medium on top – but make sure it is completely dry first.
Share –
If you have any question, suggestion or remark – don’t hesitate to contact me – either leave a comment here, use the contact form or start a new thread on the Creativity Prompt Flickr Group!!!
Can you think of other ways to embellish chipboard? Which technique is your favorite? Which technique have you used before? Share your thoughts by leaving a comment on this post.
I would also be very happy to see your own creations, so don’t be shy and share a link 🙂
Tags: chipboard, creativity, creativity prompt, decoupage, embellishments, flocking, glitter, photo transfer, stamping, Tutorial, Video, Video Tutorial


ciao avital grazie per la risposta,questo tutorial è bellissimo,io e una mia cara amica(la mia insegnante di decorazionee e di pittura) facciamo ciondoli e spille in questo modo, ma con il legno perchè a scuola lo usiamo per fare i modellini di villette, sedie, tavoli ecc…….e quindi li tagliamo lì con il seghetto e poi si dipingono .
un bacio ciao
giovanna
Avital hello thanks for the reply, this tutorial is wonderful, I and my dear friend (my teacher decorazionee and painting) make pendants and pins in this way, but with the wood because the school we use to make the model houses, chairs, tables etc. ……. and then cut them there with a hacksaw and then paint.
a kiss hello
giovanna
Thank you!!!
I would love to see your work, if you had a picture of it online 🙂
Love these tips!!
Hello, that was without a doubt an interesting read. I had actually been looking for a photo printing related article for a while now. Appreciate it! I have a similar blog, how much do you charge for advertising? because I can’t seem to locate the information anywhere.
Thanks for these guides and tips. The video tutorials are really interesting.
Hello !
I’m new on this forum so I introduce me…
My name is Jason I’m 18 years old, I’m French.
I like: holdem poker and kitesurf…
Nice to meet you
It’s very exiting to find your http://www.creativityprompt.com blog.
You sure can write and teach and inspire. Keep writing – I’ll keep reading.
Thank you for this tutorial. I recently purchased some cute chipboard shapes from Michaels but was not sure how to dress them up ;0)
You are very welcome. I’m glad you liked it!