I am always looking for new ways to expand my creativity and try out different things, which is why I have recently purchased a simple sewing machine.
I never intended to use the sewing machine to make or amend clothes, nor did I intend to sew hand made dolls, home decor or bags (though I definitely do not rule out any of these).
My first intention for this sewing machine was to stitch papers with it.
I love the sewn look. It makes everything look better, well designed and finished.
So there is no surprise in me spending a whole weekend just fiddling with my new sewing machine, trying out different things and making about a gazillion cards, these are their stories…:
 Cast of Characters – American Crafts cardstock in “Earth Tones”; Cardboard; American Crafts white glitter button; Red embroidery floss; Patterned paper by Cosmo Crickt – “Jolly by Golly”; Handmade Mulberry paper; Papertrey Ink stamp “Messages”; Palette hybrid ink in “Dark Chocolate” .
Techniques – This one is pretty straightforward. I just ripped off a piece of cardboard and exposed the corrugated layer, then sewed it to the card over a couple of other patterned paper pieces, also sewn to the card base. Later I attached the button with a glue dot and stamped the greeting.
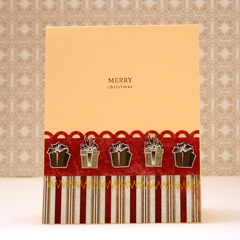 Cast of Characters – Wausau heavy-weight cardstock; Patterned paper by Basic Grey from last year’s “Wassail” collection; Fiskars “Apron Lace” border punch.
Techniques – First I sewed the patterned paper strips to the card base and then cut the gift images from the paper with precision scissors and adhered them with pop-dots.
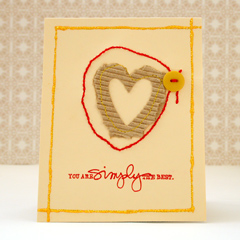 Cast of Characters – Wausau heavy-weight cardstock; Ali Edwards stamp “Simply You” by Technique Tuesday; Palette Hybrid ink in “Poppy Red”; Red embroidery floss; Yellow button; Thin corrugated cardboard; Cuttlebug heart shaped die; Rangers yellow Stickles.
Techniques – I used the negative of the die-cut corrugated cardboard and teared it around the shape, then sewed around it. After that I sewed around the shape with no thread and hand-stitched it with embroidery floss, using the holes the machine poked in the card base. I added a button with a glue dot and added a sewn frame that holds an inner lining paper which conceals the hand-sewn stitches inside. For a touch of glitter, I went over the sewn frame with yellow glitter glue.
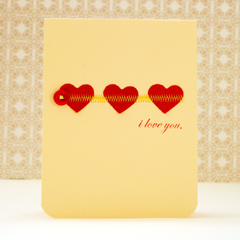 Cast of Characters – Wausau heavy-weight cardstock; Mulberry paper heart die cuts; Papertrey Ink vintage button in “Poppy Red”; Palette Hybrid ink in “Poppy Red”; Ali Edwards stamp “Simply You” by Technique Tuesday; Yellow embroidery floss; We Are Memory Keepers “Corner Chomper”.
Techniques – This is probably the simplest card, but the one I love the most… All I did was to temporarily adhere the heart die-cuts to the card base and go over them with a couple different stitches Then I attached the button with a glue dot, stamped the greeting (I cut the clear stamp because I didn’t want to use the first part of the greeting) and voilà …
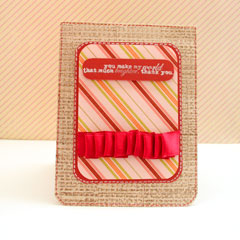
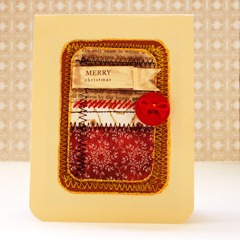 Cast of Characters – Wausau heavy-weight cardstock; American Crafts cardstock in “Earth Tones”; Rangers yellow Stickles; Papertrey Ink vintage button in “Poppy Red”; Palette Hybrid ink in “Dark Chocolate”; Papertrey Ink stamp “Messages”; Red embroidery floss; Small square punch; We Are Memory Keepers “Corner Chomper”; Patterned paper by Basic Grey from last year’s “Wassail” collection; Handmade paper; vintage textbook paper.
Techniques –In this card I made a collage of different paper strips, sewn both horizontally and vertically with different types of stitches as well as hand-sewn with red embroidery floss. Then I adhered the paper collage with pop dots on another piece of cardstock, also sewn to the card base. After that I added the finishing touches – a button adhered with a glue dot, glitter frames and distressing the text paper with a baby wipe dabbed in the “Dark Chocolate” ink.
The greeting banner: I stamped the greeting on cardstock and cut it into a small rectangle. Then I fed the end of the rectangle through the edge of the square punch and created the slotted end. The I curled it with the blade of my scissors, pleated it in one end, distressed it with the baby wipe stained with the ink and adhered it by applying glue-dots only to its ends.
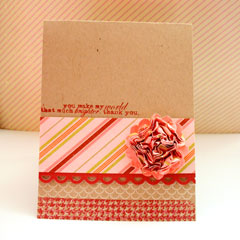
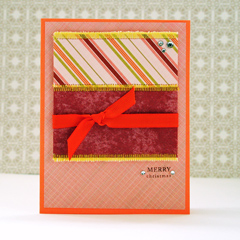 Cast of Characters – Bazzill textured cardstock in “Butterfly” ; Papertrey Ink stamp “Messages”; Palette Hybrid ink in “Dark Chocolate”; Orange grosgrain ribbon; Striped patterned Paper by chatterbox; Rhinestones; Patterned paper by Basic Grey from last year’s “Wassail” collection.
Techniques – Simple. Simple. Simple. I temporarily adhered the paper strips to a piece of cardstock and sewed them to it. The stitch is very dense, so it was easy to tear up the cardstock excess. After finishing the sewing part I tied a ribbon around the cardstock, then I attached it to the patterned paper with some pop-dots. I added the rhinestones and the stamped greeting and that’s it. Simple…
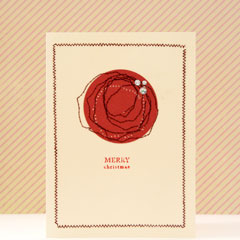
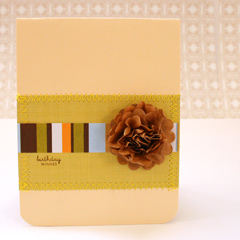 Cast of Characters – Wausau heavy-weight cardstock; We Are Memory Keepers “Corner Chomper”; Brown paper – recycled from a package filler; Striped patterned paper by Black River Designs (awesome papers, great quality, by the way…); Green patterned paper by Chatterbox; Papertrey Ink stamp “Messages”; Palette Hybrid ink in “Dark Chocolate”.
Techniques – I started by sewing the green paper to the card base with a zig-zag stitch. The I adhered the striped piece of patterned paper and attached the handmade flower with a few glue-dots.
The handmade flower: I punched 10 pieces of brown paper with a scallop circle punch by EK Success. Then I sewed all the pieces together in the center and crumpled all the layers, one after the other – starting with the top layer – until I achieved the look I was looking for.
Share
Do you own a sewing machine? Have you used a sewing machine for paper crafts? Share by leaving a comment on this post.

Check out “Make Your Own Planner” workshop for a fun, quick and affordable holiday gift – either for you or for a loved one.

“Capture Your Dream” workshop is relaunching as a self-paced workshop. Isn’t this the perfect time for you to capture your dream and make it happen?