/** Font types */

Posts Tagged ‘DIY’

Free Printable – DIY Dimensional Mini Envelopes

Monday, August 20th, 2012

Printable Mini Envelopes
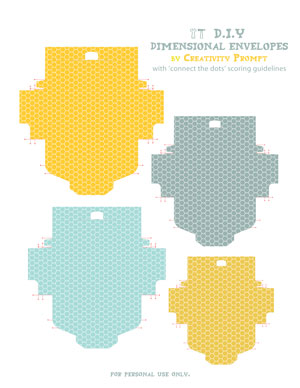
Today I am sharing a set of FREE DIY mini dimensional envelopes with you guys (for personal use only).

Assembly is super simple: (1) Print; (2) Score (by connecting the red dots); (3) cut; (4) fold; and (5) Adhere inner flaps.

To download it simply click on the image (or the link) and if it doesn’t work try to right-click on it and opt for the “save target as…” option (it may be phrased a bit differently on different operating systems – but do NOT opt for the “save image as” option, as you will get the low resolution tiny preview image).

I hope you like it and have lots and lots and lots of fun with it.

Make sure you didn’t miss the rest of the free printables on Creativity Prompt.

If you like it –

Share

How are you going to use these mini envelopes? Please leave a comment and share.

Unleashing The Creative Child Within You
Back when we were kids creativity came naturally to us. Everything was possible and our prolific imagination was the only limit we knew.
Through the years we have grown apart from our inner creative child and along with that – have lost our pristine and utter joy of creation.

In this e-book I will pave your way back to your inner creative child, brick by brick.

“Unleashing The Creative Child Within You” will explain why you became distant from your core creativity and will reveal the secret to getting it back.

With exercises designed specifically to help you find the inner child within you, regain its confidence and unleash it – you are bound to get your mojo back faster than you think.

Get “Unleashing The Creative Child Within You” for your Kindle
for only $4.99.

You can read the Kindle book on Kindle devices, on your smart phones or on your PC or MAC.

How To Make Your Own Deco Tape

Thursday, October 21st, 2010

Deco Tape

I LOVE deco tapes.

I always last after beautifully composed photos of beautiful tape.

But I don’t have any of them beauties.

I guess their price doesn’t translate well when I think of their utility…

Then, you can imagine my utter delight when I stumbled upon this DIY Deco Tape Tutorial by my favorite diy-er, Sara.

As my doodling skills are not as impressive as Sara’s, I immediately thought of using patterned paper strips with Mod Podge. It is so easy and the result is quite pleasing.

Although it doesn’t look exactly like “the real deal”, it is very close to it and much more affordable, not to mention – more flexible as for what colors/patterns you’ll be using.

Don’t stop there, you can also ink the tape, stamp on it or just leave it as is and boost its confidence with some pep talk… (Where am I going with that?)

Supply

How To


[Go here to watch on YouTube and while there, please rate, comment and subscribe.]

Step by Step Instructions

  1. Measure the width of the tape you’re using and cut paper strips, the same width as the tape.
  2. Prepare the strips by inking them with distress ink (optional) and conditioning them with water. To do that saturate the strips with a couple spritzes of water using a mister. To add some sheen I added 2 tiny scoops of golden perfect pearl medium to the tap water, but that’s optional too. Blot the excess water with paper towels.
  3. When the strips are completely dry, temporarily adhere the masking tape, in the length of your choice, to a non-stick mat.
  4. Apply a layer of Mod Podge to the tape – not too thin and not too thick – and adhere the paper strips to it. Apply more glue, if necessary. Eliminate all air bubbles by applying pressure with your finger on top of the paper strips. Use your finger, as if it was a brayer. Then let it dry – COMPLETELY.
  5. Apply a second, top layer, of Mod Podge. Apply it generously – it will be used as a sealer. Let it dry COMPLETELY.
  6. Remove the excess glue by going over it with your fingers and peel off the tape from the non stick mat. Transfer the tape to a non stick sheet you use in the kitchen. You can also roll them against a round handle (the brush’s handle is perfect for that) to make your own tape-roll.

Share

Do you work with deco tape? What do you use it for? Please share by leaving a comment.

Make Your Own Planner 2012
Check out Creativity Prompt’s new and unique self paced workshop: “Make Your Own Planner”.
This workshop will show you how to make a beautiful handmade planner for the year 2012. Not only are you going to get the entire meticulously designed planner kit for instant download, but you will also get a high resolution video tutorial as well as step-by-step instructions to guide you on each step of the way. Either treat yourself with a fresh and creative start for the coming new year, or get it to create wonderful gifts for your family and friends.
Join now

Creativity Prompt #14 – Making A Teeny-Tiny Journal

Friday, August 8th, 2008

This prompt is a variation of the hard-cover journal tutorial. This time the journal is teensy-weensy and can easily be carried around in your pocket or your handbag. As an added bonus, the cuteness factor makes you want to actually use it all the time 🙂

Supply –

Instructions –

  1. Cut 3 pieces of chipboard, measured: 3×3, 3×3 & ¼ x 3 inches.
  2. Repeat the same process of making the hard-cover journal tutorial for covering up the covers and the spine and then adhering them together.

  3. The picture features a different micro-journal, but the technique is the same. I made a bunch of these cute minis and didn’t take pictures of each one separately.

  4. Adhere a strip of double sided tape along the middle of the journal’s binding, widthwise, to secure the ribbon on it. Adhere the ribbon and make sure it is long enough to be wrapped around the journal several times, when it’s closed.
  5. Cut the handmade paper to size (10 pieces measured: 2¾x5½ and one piece measured 2¾x6½).
  6. Fold each of the 10 pieces of the handmade paper in half and burnish the fold with the bone folder.
  7. Score the longer strip of handmade paper at 2¾ on each side, to allow an ½ inch spine in the middle. Burnish the folds with the bone folder.
  8. Pierce each of the 10 pieces of the handmade paper at the middle of the score line (fold) and again 1 inch to the top and to the bottom of the middle hole. All together, each piece should be pierced three times along the middle fold.
  9. Pierce the spine of the longer strip of handmade paper, as follows:

                  Â°Â°Â°Â°Â°Â°Â°Â°Â°Â°
    « 1 inch »
    middle       Â°Â°Â°Â°Â°Â°Â°Â°Â°Â°

    « 1 inch »
                  Â°Â°Â°Â°Â°Â°Â°Â°Â°Â°

    Basically what you need to end up with is a corresponding hole to each of the signatures’ holes
  10. Use the needle and thread to sew each separate signature to the spine.
  11. Attach the bound signatures to the cover of the micro journal, using double sided tape


Voilà!
Now, don’t be surprised if the journal starts multiplying …
Consider yourself duly warned 😉


Please share your own micro journal creations with me and don’t hesitate to ask for more information, either by commenting or by using the contact form.