I try to come up with shapes and styles and then, by trial and error, I create these on photoshop with the shape tools and all the masks and filters Photoshop has to offer.
Then I add other layers with lines, graph paper, patterns and brushes…
Today I wanted to share how I make one of these brushes I am talking about – a doily brush.
The same technique works with any other flat object. Lace trimmings? Why, yes!
So, without further ado:
[Go here to watch on YouTube and while there, please rate, comment and subscribe.]
I hope it was helpful and that you’ve enjoyed my tutorial.
Check out Creativity Prompt’s unique self paced workshop: “Make Your Own Planner”. In this workshop you will make a beautiful handmade planner for 2012. Not only will you get the planner kit for instant download, but you will also get a high resolution video tutorial as well as printable instructions to guide you on each step of the way. Either treat yourself or get it to create wonderful gifts for your family and friends. Join now – for only $12
Back when we were kids creativity came naturally to us. Everything was possible and our prolific imagination was the only limit we knew.
Through the years we have grown apart from our inner creative child and along with that – have lost our pristine and utter joy of creation.
In this e-book I will pave your way back to your inner creative child, brick by brick.
“Unleashing The Creative Child Within You” will explain why you became distant from your core creativity and will reveal the secret to getting it back.
With exercises designed specifically to help you find the inner child within you, regain its confidence and unleash it – you are bound to get your mojo back faster than you think.
Many of you asked how to resize or recolor the printables I am sharing with you.
I have posted a written step-by-step tutorial before, but there’s nothing better than seeing what I actually do – I am a visual learner too…
So I have made a video tutorial for you guys and I hope that answers all your questions.
[Go here to watch on YouTube and while there, please rate, comment and subscribe.]
Check out Creativity Prompt’s unique self paced workshop: “Make Your Own Planner”. In this workshop you will make a beautiful handmade planner for 2012. Not only will you get the planner kit for instant download, but you will also get a high resolution video tutorial as well as printable instructions to guide you on each step of the way. Either treat yourself or get it to create wonderful gifts for your family and friends. Join now – for only $12
Back when we were kids creativity came naturally to us. Everything was possible and our prolific imagination was the only limit we knew.
Through the years we have grown apart from our inner creative child and along with that – have lost our pristine and utter joy of creation.
In this e-book I will pave your way back to your inner creative child, brick by brick.
“Unleashing The Creative Child Within You” will explain why you became distant from your core creativity and will reveal the secret to getting it back.
With exercises designed specifically to help you find the inner child within you, regain its confidence and unleash it – you are bound to get your mojo back faster than you think.
Today I just wanted to share my on-the-go travel journal for my next vacation in Hawaii.
The idea and the reason it came about were easier for me to explain on video, so here it is:
[Go here to watch on YouTube and while there, please rate, comment and subscribe.]
Feel free to download the travel journal page as well as the back page for your own personal use and enjoyment. [To download right-click on each link and opt for the “save target as” option.]
[P.S. You can find the flat package of mini glue dots here]
Share
Are you planing on going somewhere special soon? Do you travel for the holidays? How do you collect your travel memories?
Check out Creativity Prompt’s new and unique self paced workshop: “Make Your Own Planner”. This workshop will show you how to make a beautiful handmade planner for the year 2012. Not only are you going to get the entire meticulously designed planner kit for instant download, but you will also get a high resolution video tutorial as well as step-by-step instructions to guide you on each step of the way. Either treat yourself with a fresh and creative start for the coming new year, or get it to create wonderful gifts for your family and friends. Join now
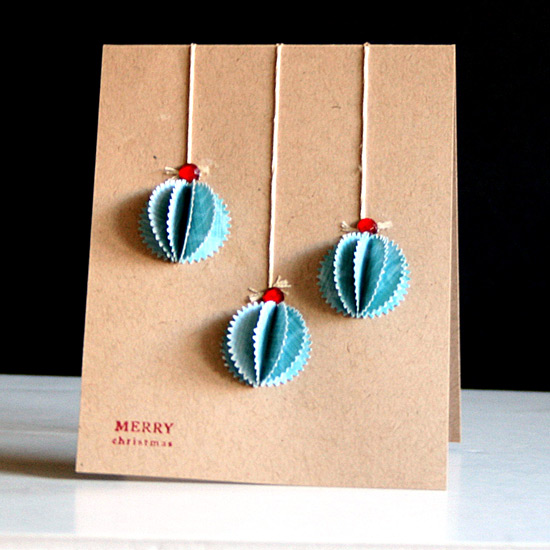
I wanted to share with you a quick and simple card I made. You can also use the same technique to create ornaments for your tree. You may use any symmetrical shape to make it.
Greeting stamp and ink [I used Mixed Messages and Pure Poppy inkpad by Papertrey Ink]
How To
[Go here to watch on YouTube and while there, please rate, comment and subscribe.]
Step by Step Instructions
Cut you cardstock at 4¼” lengthwise and fold in half to create your card base.
For each ornament, punch 5 punched pieces of patterned paper and fold each one in half.
Adhere only one half of the punched piece to the second one, making sure the edges are aligned and repeat on all five punched pieces.
Repeat for all the ornaments you want to add to your card.
Decide how you want to lay your ornaments on your card and pierce a hole on top of each ornament and another hole on the fold of the card in a straight line above each ornament.
Thread your embroidery floss through both pierced holes and tie at the bottom, close to the top of each ornament.
To secure the knot, apply a glob of a strong liquid glue on each knot and attach a gem to it, to conceal the glue.
Adhere the ornaments below each knot.
Stamp your greeting.
Share
What holidays are you celebrating in the next couple months? I am really excited about Hanukkah, the Festival of Lights. Share yours by leaving a comment below.
Check out Creativity Prompt’s new and unique self paced workshop: “Make Your Own Planner”. This workshop will show you how to make a beautiful handmade planner for the year 2012. Not only are you going to get the entire meticulously designed planner kit for instant download, but you will also get a high resolution video tutorial as well as step-by-step instructions to guide you on each step of the way. Either treat yourself with a fresh and creative start for the coming new year, or get it to create wonderful gifts for your family and friends. Join now
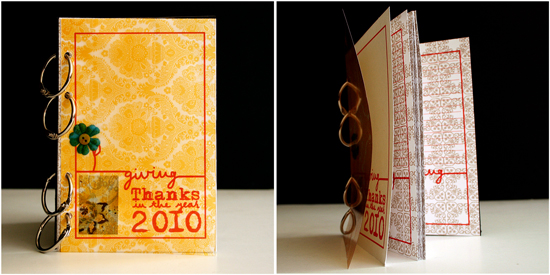
Thanksgiving Day is quickly approaching and I thought that a great way to give thanks is to collect all the things and all the people we are grateful for and write about them in a mini journal.
This Giving Thanks journal is what I came up with. It is 4″ by 6″ so it fits perfectly with 4″ by 6″ standard size photos and therefore quick and easy to put together.
I made the journal kit for you and created a video showing you how to put the journal together – in REAL TIME. You wouldn’t believe how easy it is to make.
Feel free to use it as many times you need, for personal use only and don’t forget to link back here, if you show your project online 🙂
The Journal Kit
To download each of the journal pages – right click on the link below and opt for “save target as”:
Cover page. [Print once on 4″ by 6″ piece of cardstock]
Insert page. [Print as many time as you want, on 4″ by 6″ paper. You can also use the backside of your photos to print on]
Supply
Cardstock – to print the journal pages on. You can also use patterned paper or the back side of your photos for the inner pages. Each sheet of 12″ by 12″ patterned paper yields 6 pieces of 4″ by 6″ paper.
[Go here to watch on YouTube and while there, please rate, comment and subscribe.]
Step by Step Instructions
Print the journal pages. You need 1 cover page and as many inserts as you please. It is simpler to first cut all the pages to 4″ by 6″ and then use them with your printer, the same way you would use photo paper.
Punch all the punching holes by aligning the black punching marks with your hole punch. Make sure both the mark and the hole punched are centered together – then punch.
To punch the chipboard piece (and your insert photos) align any of the punched pages with the chipboard piece and mark all the holes with a pencil. Then repeat the previous step with the chipboard.
Put together all your pages and bind with the binding rings.
Share
What are you thankful for this year?
If you enjoyed this workshop you would probably enjoy the more elaborate “print and assemble” workshops by creativity prompt.
Try “Welcome Little One” if you are expecting a new baby to enter your life or the life of a loved one and “Make Your Own Planner 2012” to create your very own industrial chic planner.
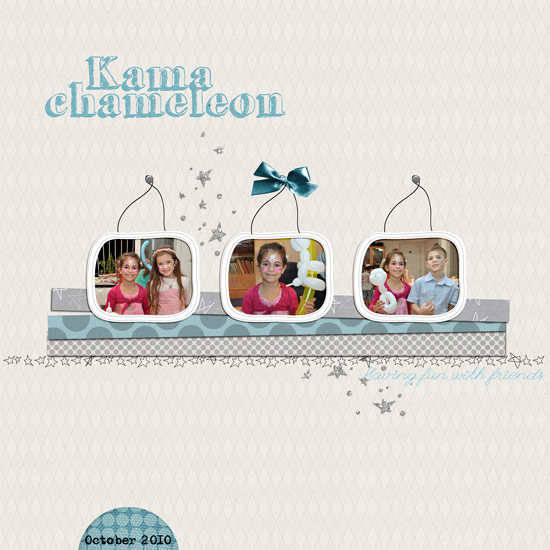
[Fonts: Adler, Grutch Shaded and League Script; Digital Kits: Wish by Karla Dudley.]
This layout is of my 7 year-old niece and her friends playing dress up.
These pictures remind me how every time I put on a costume (Halloween, anyone…) it makes me feel like I am also getting super powers.
By dressing up as a princess I can also call upon the stars and make a wish.
Have you ever felt that way too?
Anyhow, this is why I thought these photos will be perfect to be used in conjunction with Karla Dudley’s newest kit “Wish”. [UPDATE: Karla’s kit is no longer available, but she offers all the digital patterned papers from the kit as a FREE download on her blog.]
Have you made a wish lately?
If not, now is the perfect time to do so.
Just because.
I also wanted to show you how I used the transparent frames that came with the kit, and more precisely – how I fit the photos to the frames.
You can use the same technique to any transparent digital element that you want to use as an overlay.
How To
[Go here to watch on YouTube and while there, please rate, comment and subscribe.]
Check out Creativity Prompt’s new and unique self paced workshop: “Make Your Own Planner”. This workshop will show you how to make a beautiful handmade planner for the year 2012. Not only are you going to get the entire meticulously designed planner kit for instant download, but you will also get a high resolution video tutorial as well as step-by-step instructions to guide you on each step of the way. Either treat yourself with a fresh and creative start for the coming new year, or get it to create wonderful gifts for your family and friends. Join now
I always last after beautifully composed photos of beautiful tape.
But I don’t have any of them beauties.
I guess their price doesn’t translate well when I think of their utility…
Then, you can imagine my utter delight when I stumbled upon this DIY Deco Tape Tutorial by my favorite diy-er, Sara.
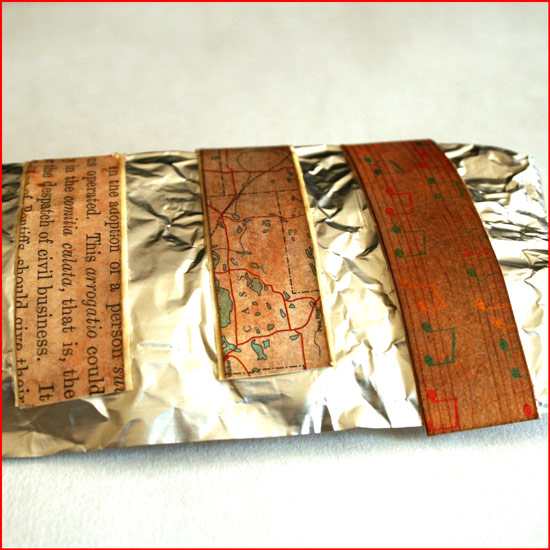
As my doodling skills are not as impressive as Sara’s, I immediately thought of using patterned paper strips with Mod Podge. It is so easy and the result is quite pleasing.
Although it doesn’t look exactly like “the real deal”, it is very close to it and much more affordable, not to mention – more flexible as for what colors/patterns you’ll be using.
Don’t stop there, you can also ink the tape, stamp on it or just leave it as is and boost its confidence with some pep talk… (Where am I going with that?)
[Go here to watch on YouTube and while there, please rate, comment and subscribe.]
Step by Step Instructions
Measure the width of the tape you’re using and cut paper strips, the same width as the tape.
Prepare the strips by inking them with distress ink (optional) and conditioning them with water. To do that saturate the strips with a couple spritzes of water using a mister. To add some sheen I added 2 tiny scoops of golden perfect pearl medium to the tap water, but that’s optional too. Blot the excess water with paper towels.
When the strips are completely dry, temporarily adhere the masking tape, in the length of your choice, to a non-stick mat.
Apply a layer of Mod Podge to the tape – not too thin and not too thick – and adhere the paper strips to it. Apply more glue, if necessary. Eliminate all air bubbles by applying pressure with your finger on top of the paper strips. Use your finger, as if it was a brayer. Then let it dry – COMPLETELY.
Apply a second, top layer, of Mod Podge. Apply it generously – it will be used as a sealer. Let it dry COMPLETELY.
Remove the excess glue by going over it with your fingers and peel off the tape from the non stick mat. Transfer the tape to a non stick sheet you use in the kitchen. You can also roll them against a round handle (the brush’s handle is perfect for that) to make your own tape-roll.
Share
Do you work with deco tape? What do you use it for? Please share by leaving a comment.
Check out Creativity Prompt’s new and unique self paced workshop: “Make Your Own Planner”. This workshop will show you how to make a beautiful handmade planner for the year 2012. Not only are you going to get the entire meticulously designed planner kit for instant download, but you will also get a high resolution video tutorial as well as step-by-step instructions to guide you on each step of the way. Either treat yourself with a fresh and creative start for the coming new year, or get it to create wonderful gifts for your family and friends. Join now
It didn’t take me long to come up with another carfty recycling project. After all, making mini books and albums is much more fun then carrying all the empty boxes that arrive each week from Amazon to the recycling bin, isn’t it? (I refuse to admit I have an ACOD – ‘Amazon Compulsive Ordering Disorder’… Plus one of them boxes must be my husband’s me thinks.)
Anyway…
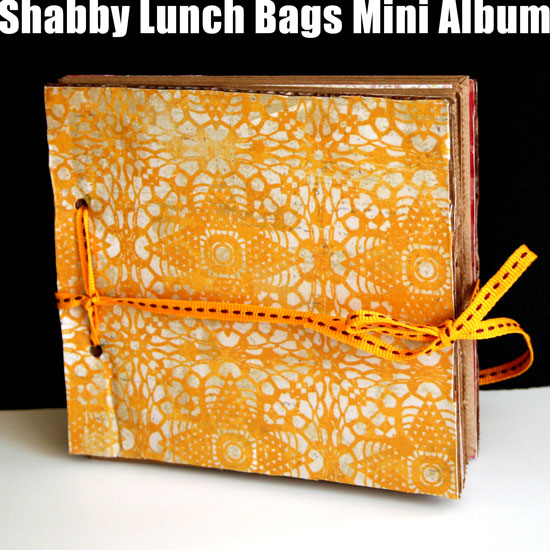
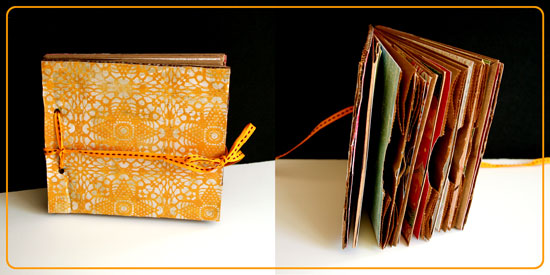
Here is another recycling project I share with you, in which I transform 5 small lunch bags and a small box into a super cute shabby mini album with room for memorabilia, ephemera, photos, hidden journaling and what not.
[Go here to watch on YouTube and while there, please rate, comment and subscribe.]
Step-By-Step Instructions
Adhere the flap of the lunch bag, inwards, by applying adhesive just to the edges of the flap, so you create a small pocket. Fold in half and repeat with all the bags.
Measure the height and width of the folded bag and cut the cover pieces to the same size out of the box, using a sharp craft knife. Don’t apply pressure on the knife, just use shallow back and forth movements with the knife until the cardboard is separated.
Cover the cover pieces with patterned paper – start by applying a thin but thorough layer of Mod Podge with a foam brush. Adhere the paper onto the cardboard. Flip the piece and cut off the excess paper by using the edges of the cardboard as a straight edge for your craft knife. Lastly, apply a thick layer of Mod Podge to seal it off. Repeat on both sides of both cover pieces.
Cover the inside pages of the lunch bag signatures with patterned paper, make sure you keep the flap pockets opened.
Measure 1 inch above and below the center point of the edge of the cover and mark it. Punch holes through these tick marks and repeat on all pages and the back cover.
Share
If you have any question, suggestion or remark – don’t hesitate to contact me – either leave a comment here, use the contact form or start a new thread on the Creativity Prompt Flickr Group!!!
I would also be very happy to see your own creations, so don’t be shy and share 🙂
Check out Creativity Prompt’s new and unique self paced workshop: “Make Your Own Planner”. This workshop will show you how to make a beautiful handmade planner for the year 2012. Not only are you going to get the entire meticulously designed planner kit for instant download, but you will also get a high resolution video tutorial as well as step-by-step instructions to guide you on each step of the way. Either treat yourself with a fresh and creative start for the coming new year, or get it to create wonderful gifts for your family and friends. Join now
You know how much I love recycling and turning my trash into treasure so it’s no surprise that I came up with this project after my bathroom got filled with empty boxes of soap.
When Amy from Mod Podge Rocks e-mailed me and asked if I wanted to use some of the Plaid products on my future projects I knew this mini book idea would be perfect for the test run. The funny thing is that just before Amy e-mailed me, I already bought a huge bottle of Mod Podge Gloss for paper just the week before so I had a chance to try out 2 other products that got sent to me by the company: Mod Podge Hard Coat and Mod Podge Sparkle.
I really, really, really loved the Mod Podge Hard Coat. I initially chose it for another project. I accidentally ruined a set of coasters I had and thought the Hard Coat formula will be perfect to restore them. However I used this as a top coat for the mini book and it is amazing. It is a bit thicker than the original formula and it dries clear into a hard coat (just as its name suggests…) that seals the cover and secure the binding of the book. I really recommend this for book makers.
The Sparkle formula has fine glitter in it and it adds a fun glittery top coat to any surface. What i like about it is that it adds the glitter without the mess that usually goes with it… You just need to apply it with a foam brush and the glittery particles doesn’t rub off of it after it dries up.
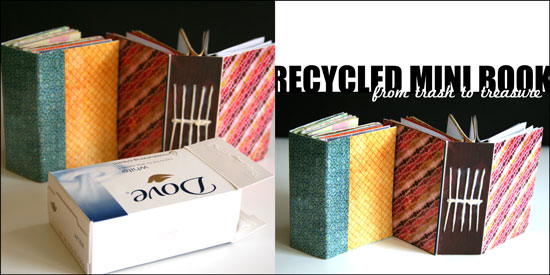
The recycled mini book can be made out of any box, of any size, so I purposefully left out exact measurement, so you can use the same technique on any empty box that comes your way.
So if you feel like playing along and learn how to make this recycled mini book, keep on reading.
Tools and Supply
This project uses MINIMAL supply, as it’s mostly recycled.
Empty cardstock or chipboard box.
Scraps of paper for the signatures (each insert much be double the width of the cover and the same height)
[Go here to watch on YouTube and while there, please rate, comment and subscribe.]
Step by Step Instructions
Flatten the box by carefully disconnecting the connecting flaps at the bottom and inside the box. You may also use a craft knife for that.
Use your scissors to cut off the flaps, as well as the inner flap and the short edge attached to it, so you are left with 3 sections: 2 cover sections and a spine, already creased for you…
Measure the width and height of the cover sections and the spine and cut pieces of patterned paper at the same size for the cover. If you want to conceal the binding you will need one piece the size of the cover section and the other size larger by the width of the spine plus an additional inch. If you choose to conceal the binding, adhere the outer cover papers at the end.
Apply a thin layer of Mod Podge to the cover section and the spine, lay the pattern paper on top of it and apply an additional layer of Mod Podge on top to seal it off. Put it aside to dry.
Take a plain copier paper, the same width and height of the spine and mark 3 horizontal lines on it – one at the center and two additional ones, about an inch apart. If you work on a larger box, you may want to add more lines, equally separated from each other.
Next mark equally separated vertical line, each line stands for one signature. I used 5 signatures, so I drew 5 vertical lines, one at the center and the rest in ¼” intervals.
Cut your signature inserts to double the width of the cover section and the same height and fold each signature of paper inserts in half.
Line up the paper guide with the inner crease of the signature and poke holes on the crease next to each of the 3 horizontal lines. these holes will help later with the binding process.
After the inner cover is layered with paper with a base and top coat of Mod Podge and completely dry, line up the paper guide with the inner spine and poke a hole at each of the intersections of the horizontal lines with the vertical lines.
Start binding the signatures together. Take the first one, insert the needle through the center hole and into the center hole of the signature, than to the upper hole and back from the bottom hole, into the center hole to the outer cover – repeat on all the signatures.
Once you finish binding all the signatures together, weave the thread through the center line of threads until it meets the initial loose end and tie them together in a tight knot. Cut the excess thread and tidy up the knot to look as smooth and straight as possible.
Lastly, apply a layer of Mod Podge Top Coat on top of the outer cover and the spine, it will secure the binding as well. You may also apply an additional layer of Sparkle Mod Podge if you want a fun glittery finish to your mini book.
Enjoy!!!
Share
If you have any question, suggestion or remark – don’t hesitate to contact me – either leave a comment here, use the contact form or start a new thread on the Creativity Prompt Flickr Group!!!
I would also be very happy to see your own creations, so don’t be shy and share 🙂
Check out Creativity Prompt’s new and unique self paced workshop: “Make Your Own Planner”. This workshop will show you how to make a beautiful handmade planner for the year 2012. Not only are you going to get the entire meticulously designed planner kit for instant download, but you will also get a high resolution video tutorial as well as step-by-step instructions to guide you on each step of the way. Either treat yourself with a fresh and creative start for the coming new year, or get it to create wonderful gifts for your family and friends. Join now
Check out Creativity Prompt’s self paced workshop: “Capture Your Dream”. In this workshop you will capture, follow and make your dream come true as well as document your journey in a fabulous mixed media mini album.
I love recycling. It is no news to you. What can I say, giving something a new lease of life just before it was about to be tossed away is magical to me.
Paper towels or a heat gun. (I actually prefer the paper towels for this purpose)
How To
[Watch on You Tube & while there, please rate, comment and subscribe]
Step-By-Step Instructions
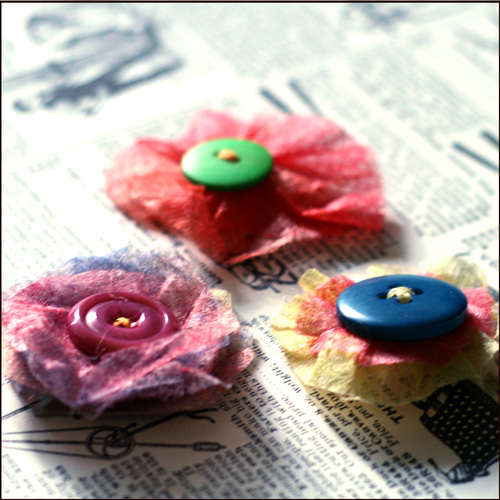
First Flower Style –
Cut your sheet into strips of about 1″ wide. It doesn’t have to be precise. The wider the strip, the larger the flower would be. For a Two layered flower, make 1 strip wider than the other.
Dye your strip with Glimmer Mists and Perfect Pearls mixed with water.
Dry your dryer sheet completely. You may use a heat gun to dry the strips, but be careful not to get too close and not to concentrate on one zone for too long, or the strip will rip from the heat. You may also use a paper towel to blot the excess liquids.
Pleat the strip around the button and make sure all the ends are tucked underneath the button. Secure all the pleats with a button and embroidery floss.
Tie both ends of the embroidery floss in a double knot and cut off the excess.
Second Flower Style –
Take a couple of sheets and lay them together. Fold them into thirds and cut out an imperfect circle to create a stack of dryer-sheet-circles.
Dye each circle with the mists. To make it more interesting, use different colors on each circle.
Let the circles dry completely.
Stack them together again in an order that appeals to you and secure them with a button and embroidery floss. Alternative: Sew them together with embroidery floss threaded with small beads.
Tie both ends of the embroidery floss in a double knot and cut off the excess.
Share
If you have any question, suggestion or remark – don’t hesitate to contact me – either leave a comment here, use the contact form or start a new thread on the Creativity Prompt Flickr Group!!!
I would also be very happy to see your own creations, so don’t be shy and share 🙂
This year you can really make your dream come true!
“Capture Your Dream” workshop is a self-paced, six weeks long workshop, that will walk you through a journey of capturing your biggest dream and making it come true.
In the process of making your dream happen – with lots of inspiration and guided self-exploration, you will also create a mixed media mini album from scratch and learn many tips and techniques – including some photography pointers that will add character to your photos and will help you take better pictures of your projects.
The workshop includes 30 printable PDF lessons with step-by-step pictures and instructions as well as several printable templates you may use in other projects too.
I am confident you will enjoy it and find it helpful so I also offer full money back guarantee while the workshop lasts.


