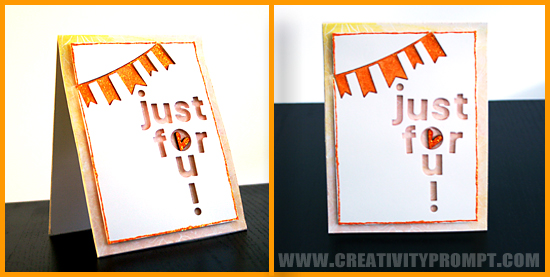
I really liked the look of the die-cut greeting on my ‘Absolutely wonderful’ card, so I decided to create another one.
This time I used a banner die from Simon Says Stamps as well as my trusted Papertrey Ink letter dies. I also made a watercolor background, to shine through the negative spaces.
How did I make this card:
I started out with the background, I stamped the background image with Versamark ink and white-embossed it with a heat gun.
Then I used inexpensive watercolor set, that I got at my local Michael’s, and simply added a wash of light peach, pink and yellow colors. I used a ton of water which caused some warping, so I doubled up the card base with another sheet of cardstock underneath. I really like the result and will definitely try that again.
Next, I cut a slightly smaller panel of cardstock and laid out the individual die-cuts on the panel, secured with some repositionable adhesive and ran it through my Cuttlebug.
I attached the die cut panel to my card base with foam adhesive. Note that the banner die-cut had cut my panel into two pieces, so I adhered each one individually.
Next I added a pop of color with a wood veneer heart by Studio Calico, which I dyed orange with the same watercolor set, then added some orange Stickles on top.
I decided that my card need some more color so I covered the banner ‘positive’ with the same orange Stickles and adhered it flat on the card base, right under the ‘negative’ impression.
I also ran a line of Stickles around the perimeter of my panel.
Luckily my parents had bought me that stamp set (along with a few other things). Thanks so much!
It took forever (well, a week and a half) to get them and in the meantime I saw this gorgeous card by Alexandra, made with that exact same stamp set. What a tease…
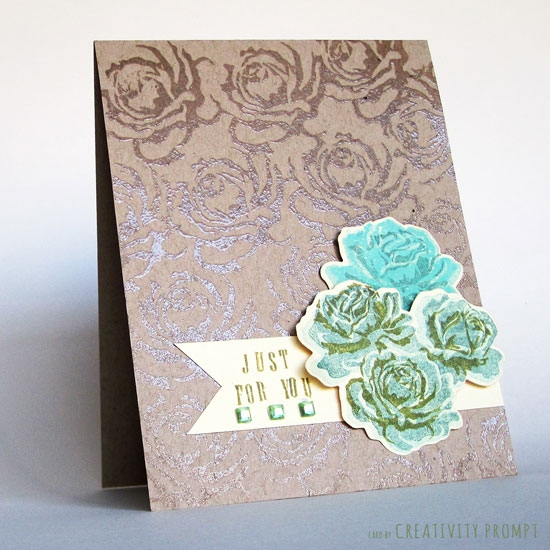
I finally received my Papertrey Ink order yesterday, and this is the first card I made with the stamps.
I used Papertrey Ink’s ink and I must say it isn’t my favorite. I find it a bit splotchy, even with a fresh new ink pad. What do you think about their ink?
To create the portrait card base I cut the kraft cardstock, widthwise, at 4¼” and folded at 5½”. I used Martha Stewart’s scoring board with a stylus but it isn’t necessary, just helpful.
Next I took the large detail rose stamp from Papertrey Ink’s set and repeatedly stamped it with the versamark ink, starting from the bottom left and making my way up.
Then I covered the stamped images with clear embossing powder and set it with a heat tool.
To create the accent flowers I used the three-steps stamps from the set and the matching dies (they went like butter through my ancient Cuttlebug machine). As the dies aren’t see-through I first cut the ivory cardstock and then temporarily adhered the ‘naked’ die-cuts to a scrap paper and stamped, starting from the least detailed stamp with the lightest ink color and moving on to the most detailed stamp with the darkest color.
Then I cut a 1″ strip of the Ivory cardstock and shaped its end into a banner shape, by cutting a slit in the middle and matching up the ends from each edge of the cardstock strip. I adhered it to the card with permanent tape adhesive and stamped the greeting with individual letter stamps (I actually did the stamping after adhering the accents, but this is not recommended…).
Next I adhered the flowers die cuts. I attached the bottoms with regular tape adhesive and the tops with pop dots to add interest.
To finish off the card I added some bling… How can I not, right!?
If you like it –
Back when we were kids creativity came naturally to us. Everything was possible and our prolific imagination was the only limit we knew.
Through the years we have grown apart from our inner creative child and along with that – have lost our pristine and utter joy of creation.
In this e-book I will pave your way back to your inner creative child, brick by brick.
“Unleashing The Creative Child Within You” will explain why you became distant from your core creativity and will reveal the secret to getting it back.
With exercises designed specifically to help you find the inner child within you, regain its confidence and unleash it – you are bound to get your mojo back faster than you think.
Embellishing embellishments? Have I gone crazy? No. Not really. I was just thinking how can I stretch my supply a little bit and get a personalized look and this is what I came up with.
Many crafters have heaps of plain paper flowers laying around, but only you will have the altered version of these flowers… Think about all the possibilities… Exciting, isn’t it? Some companies offer pre-embellished flowers, but embellishing them yourself isn’t only cheaper, but also more fun and creative.
In today’s video I suggest and show just a few options: sewing, adding bling, embossing, flocking, stamping and decoupaging – but the possibilities are really endless.
You can use the embellished flowers on cards, layouts as well as on wall art and other mixed-media projects.
How-To
[I apologize in advance for the quality of the editing. I am slowly learning to work with iMovie…]
[If you head over to YouTube, please rate, comment & subscribe]
On this video –
Stamping – Use pigment ink and press hard on the stamp, to get into all the folds and crevices.
Adding BLING – Apply some strong liquid adhesive that dries clear (like diamond glaze) and sprinkle beads, glitter or gemstones onto it. Allow it to dry and add a little bit of adhesive on top, to make sure it’ll stick.
Flocking – Similarly to adding bling, just apply some Diamond Glaze and pour in the flock. Tap on it gently with your finger to make sure the flock is applied evenly.
Decoupage – Choose a scrap of napkin or tissue paper that fits your flower. Use only the top layer of the napkin. Apply gel medium or Mod-Podge generously on the flower and adhere the napkin to it. Apply a second coat of gel medium on the covered flower. Allow it to dry and cut the excess with scissors.
Embroidery – Add some appeal to the flower with an embroidery floss. There are many options. On the video, I applied sequins to the flower, using a “French Knot“.
Embossing – Put the flower into an embossing folder and move it through a Cuttlebug machine (or another die-cutting & embossing machine). Make sure you pick an embossing design that fits in scale to the flower’s size.
More options –
Inking – change the color of the flowers with an ink pad or an even coat of acrylic paint.
Crackle Paint – Apply a thick layer of crackle paint on the flower and allow to dry.
Photo transfer – The idea is similar to decoupaging, but instead of napkins you use a photo, printed on transparency with an inkjet printer. Note that this technique isn’t as smooth as decoupaging and the printed design won’t be transferred as crisply. (Use a gel medium for this technique).
Take a closer look at the embellished flowers (click on the photo):
If you have any question, suggestion or remark – don’t hesitate to contact me – either leave a comment here, use the contact form or start a new thread on the Creativity Prompt Flickr Group!!!
I would also be very happy to see your own creations, so don’t be shy and share 🙂
Do you have more ideas for embellishing paper flowers? Please share!