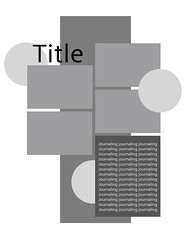
Last week we were using sketches to make handmade cards. This week we go back to our trusty Adobe Photoshop Elements 7.0 or handy-dandy grid paper and plan scrapbook layouts.
The idea is the same – planning the layout in advance helps in looking at the design as a whole, making sure it is harmonious, balanced and complete.
Also using a grid helps to figure out all the measurements for us and all we have left to do is to pull out our supply, cropped photos, paper trimmer and grid ruler and start playing.
In scrapbooking there is an additional advantage which is the ability to use the sketch as a layout template for digital scrapbooking. To learn how to use a digital layout template check out this nifty video by Jessica Sprague.
As a bonus to my fabulous readers I am making this week’s sketch available for a free download (for personal use only) both for digital and traditional scrapbookers. Just click on the right button below:


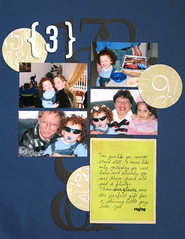
Translating the sketch into a layout –
[Music is by: Josh Woodward]
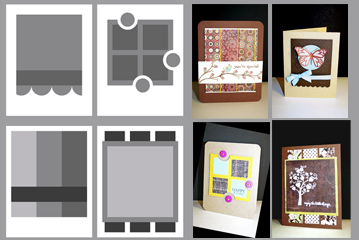
Some tips & techniques shared on the video
- Use the grid ruler to find the center of your cardstock (or any other element) easily. After finding the center, it’s really easy to figure out the right placement.
- Use the grid ruler to align your elements together. Just place the ruler on your element and make sure the grid line is aligned with the edge of your element and that the ruler protrudes from the edge at the exact size of your desired gap, then align the next element with the ruler’s edge.
- Use your paper trimmer together with a stylus to create straight journaling guides. Just score your journaling box or journaling tag at every ¼”.
- To create a perfect half circle notch, just temporary adhere your photos on a scrap piece of paper (junk mail will do just fine) with the same alignment as they are supposed to have on your layout. Then punch out your half circle, using an hand-held punch.
- When using a colorful and vibrant photos on top of a bright-colored background you can add interest without overwhelming the eye by using either lace cardstock or an overlay instead of regular patterned paper.
- Embossing adds texture and interest. To emphasize the embossing use a cardstock with a white core (or otherwise different colored core cardstock) and lightly sand it to reveal the core on the embossed image.
Share
If you have any question, suggestion or remark – don’t hesitate to contact me – either leave a comment here, use the contact form or start a new thread on the Creativity Prompt Flickr group!!!
I would be VERY happy to see your layouts based off of the sketch here, so don’t be shy and share – either leave a link at the comment section or share on the Creativity Prompt Flickr group‘s pool 🙂
 Whenever I feel uninspired I try to change the way I go about my work. Lately I have been feeling I am getting into a creative rut and just haven’t been feeling “in the zone”. That’s why I have decided to get out of my comfort zone (which is designing “as I go”) and try something I do not usually do – plan the project in advance…