I have a confession to make. (Actually two confessions…)
I am completely obsessed with washi tapes.
Although I do not have a huge selection (you can see all my ‘stash’ above),
I do seem to add a couple rolls to each purchase…
For good measure, right?
I am also trying out different brands for a future review (stay tuned).
Not all tapes are created equal…
There is something else I’m nuts about – berries and cherry tomatoes.
I eat about a package of tomatoes a day (!!!) and I also eat a ton of berries.
(Have you ever tried a wild berries smoothie with spinach, vanilla soy milk and ice-cream? Divine.)
Luckily, these two passions converge, as I use the cute little fruit and vegetables packages to store my washi tapes. (…and other bits and pieces.)
They are the perfect size and they are clear, which I love. Plus they are totally stackable.
My Storage System
All I do is: [1] give the tiny basket a good wash (NOT in the dish-washer, unless you want to see a molten basket…); [2] take off the label; and [3] adhere a cute piece of patterned paper on top.
Simplicity is key.
As it is important for me to keep track of the brand and product names, I also add a tiny label to the inside of each tape roll.
I use regular label stickers from an office supply store and write with a permanent pen to prevent smudging.
It’s super easy and totally optional.
Share
What is your favorite storage system for bits and pieces? Please leave a comment with your clever suggestions, I love reading them!
Back when we were kids creativity came naturally to us. Everything was possible and our prolific imagination was the only limit we knew.
Through the years we have grown apart from our inner creative child and along with that – have lost our pristine and utter joy of creation.
In this e-book I will pave your way back to your inner creative child, brick by brick.
“Unleashing The Creative Child Within You” will explain why you became distant from your core creativity and will reveal the secret to getting it back.
With exercises designed specifically to help you find the inner child within you, regain its confidence and unleash it – you are bound to get your mojo back faster than you think.
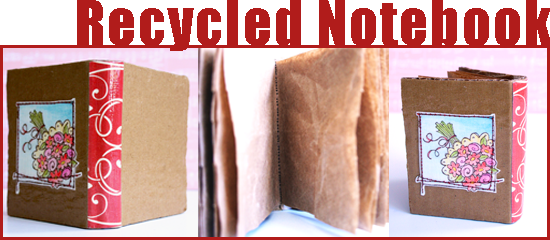
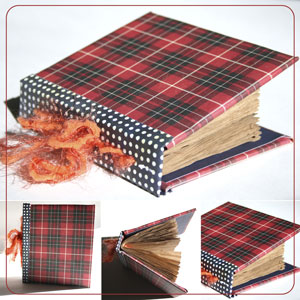
At first I just sewed [or tried to sew] scraps of papers together along with other stuff and created random stitched collages “to be used later on”. I have no idea when, where or what for, but I kept them all.
Then I pulled out an old watercolor paper I stamped on years ago and started stitching around the stamped and colored images and cut them off.
Then [and here is when that notebook started to emerge] I took an old cardboard cut out and a bunch of padding paper and sewed them together. You can see the sewn spine in the photo collage above, on the middle image.
Then I wanted to conceal the outer stitches [which were far from neat] and adhered a scrap of patterned paper I had left from an old Christmas collection pad.
After doing that I felt that something is missing and decided to adhere one of the stamped and sewn images I made before.
To hold everything together I added 2 layers of glossy Mod Podge.
Here is a glimpse of the notebook “in progress” [taken by my ancient phone cam…]:
That is all.
Check out Creativity Prompt’s new and unique self paced workshop: “Welcome Little One”. This workshop will provide you with everything you need, and then some, to make a fabulous handmade mini album to record the first moments of a new born baby.
It didn’t take me long to come up with another carfty recycling project. After all, making mini books and albums is much more fun then carrying all the empty boxes that arrive each week from Amazon to the recycling bin, isn’t it? (I refuse to admit I have an ACOD – ‘Amazon Compulsive Ordering Disorder’… Plus one of them boxes must be my husband’s me thinks.)
Anyway…
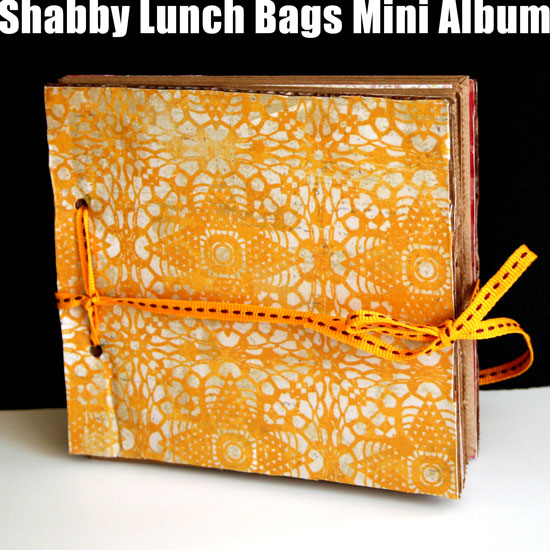
Here is another recycling project I share with you, in which I transform 5 small lunch bags and a small box into a super cute shabby mini album with room for memorabilia, ephemera, photos, hidden journaling and what not.
[Go here to watch on YouTube and while there, please rate, comment and subscribe.]
Step-By-Step Instructions
Adhere the flap of the lunch bag, inwards, by applying adhesive just to the edges of the flap, so you create a small pocket. Fold in half and repeat with all the bags.
Measure the height and width of the folded bag and cut the cover pieces to the same size out of the box, using a sharp craft knife. Don’t apply pressure on the knife, just use shallow back and forth movements with the knife until the cardboard is separated.
Cover the cover pieces with patterned paper – start by applying a thin but thorough layer of Mod Podge with a foam brush. Adhere the paper onto the cardboard. Flip the piece and cut off the excess paper by using the edges of the cardboard as a straight edge for your craft knife. Lastly, apply a thick layer of Mod Podge to seal it off. Repeat on both sides of both cover pieces.
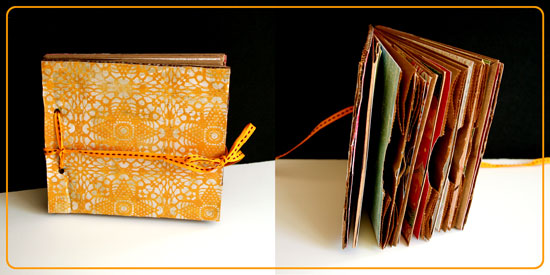
Cover the inside pages of the lunch bag signatures with patterned paper, make sure you keep the flap pockets opened.
Measure 1 inch above and below the center point of the edge of the cover and mark it. Punch holes through these tick marks and repeat on all pages and the back cover.
Share
If you have any question, suggestion or remark – don’t hesitate to contact me – either leave a comment here, use the contact form or start a new thread on the Creativity Prompt Flickr Group!!!
I would also be very happy to see your own creations, so don’t be shy and share 🙂
Check out Creativity Prompt’s new and unique self paced workshop: “Make Your Own Planner”. This workshop will show you how to make a beautiful handmade planner for the year 2012. Not only are you going to get the entire meticulously designed planner kit for instant download, but you will also get a high resolution video tutorial as well as step-by-step instructions to guide you on each step of the way. Either treat yourself with a fresh and creative start for the coming new year, or get it to create wonderful gifts for your family and friends. Join now
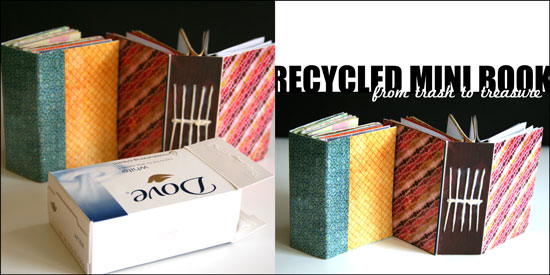
You know how much I love recycling and turning my trash into treasure so it’s no surprise that I came up with this project after my bathroom got filled with empty boxes of soap.
When Amy from Mod Podge Rocks e-mailed me and asked if I wanted to use some of the Plaid products on my future projects I knew this mini book idea would be perfect for the test run. The funny thing is that just before Amy e-mailed me, I already bought a huge bottle of Mod Podge Gloss for paper just the week before so I had a chance to try out 2 other products that got sent to me by the company: Mod Podge Hard Coat and Mod Podge Sparkle.
I really, really, really loved the Mod Podge Hard Coat. I initially chose it for another project. I accidentally ruined a set of coasters I had and thought the Hard Coat formula will be perfect to restore them. However I used this as a top coat for the mini book and it is amazing. It is a bit thicker than the original formula and it dries clear into a hard coat (just as its name suggests…) that seals the cover and secure the binding of the book. I really recommend this for book makers.
The Sparkle formula has fine glitter in it and it adds a fun glittery top coat to any surface. What i like about it is that it adds the glitter without the mess that usually goes with it… You just need to apply it with a foam brush and the glittery particles doesn’t rub off of it after it dries up.
The recycled mini book can be made out of any box, of any size, so I purposefully left out exact measurement, so you can use the same technique on any empty box that comes your way.
So if you feel like playing along and learn how to make this recycled mini book, keep on reading.
Tools and Supply
This project uses MINIMAL supply, as it’s mostly recycled.
Empty cardstock or chipboard box.
Scraps of paper for the signatures (each insert much be double the width of the cover and the same height)
[Go here to watch on YouTube and while there, please rate, comment and subscribe.]
Step by Step Instructions
Flatten the box by carefully disconnecting the connecting flaps at the bottom and inside the box. You may also use a craft knife for that.
Use your scissors to cut off the flaps, as well as the inner flap and the short edge attached to it, so you are left with 3 sections: 2 cover sections and a spine, already creased for you…
Measure the width and height of the cover sections and the spine and cut pieces of patterned paper at the same size for the cover. If you want to conceal the binding you will need one piece the size of the cover section and the other size larger by the width of the spine plus an additional inch. If you choose to conceal the binding, adhere the outer cover papers at the end.
Apply a thin layer of Mod Podge to the cover section and the spine, lay the pattern paper on top of it and apply an additional layer of Mod Podge on top to seal it off. Put it aside to dry.
Take a plain copier paper, the same width and height of the spine and mark 3 horizontal lines on it – one at the center and two additional ones, about an inch apart. If you work on a larger box, you may want to add more lines, equally separated from each other.
Next mark equally separated vertical line, each line stands for one signature. I used 5 signatures, so I drew 5 vertical lines, one at the center and the rest in ¼” intervals.
Cut your signature inserts to double the width of the cover section and the same height and fold each signature of paper inserts in half.
Line up the paper guide with the inner crease of the signature and poke holes on the crease next to each of the 3 horizontal lines. these holes will help later with the binding process.
After the inner cover is layered with paper with a base and top coat of Mod Podge and completely dry, line up the paper guide with the inner spine and poke a hole at each of the intersections of the horizontal lines with the vertical lines.
Start binding the signatures together. Take the first one, insert the needle through the center hole and into the center hole of the signature, than to the upper hole and back from the bottom hole, into the center hole to the outer cover – repeat on all the signatures.
Once you finish binding all the signatures together, weave the thread through the center line of threads until it meets the initial loose end and tie them together in a tight knot. Cut the excess thread and tidy up the knot to look as smooth and straight as possible.
Lastly, apply a layer of Mod Podge Top Coat on top of the outer cover and the spine, it will secure the binding as well. You may also apply an additional layer of Sparkle Mod Podge if you want a fun glittery finish to your mini book.
Enjoy!!!
Share
If you have any question, suggestion or remark – don’t hesitate to contact me – either leave a comment here, use the contact form or start a new thread on the Creativity Prompt Flickr Group!!!
I would also be very happy to see your own creations, so don’t be shy and share 🙂
Check out Creativity Prompt’s new and unique self paced workshop: “Make Your Own Planner”. This workshop will show you how to make a beautiful handmade planner for the year 2012. Not only are you going to get the entire meticulously designed planner kit for instant download, but you will also get a high resolution video tutorial as well as step-by-step instructions to guide you on each step of the way. Either treat yourself with a fresh and creative start for the coming new year, or get it to create wonderful gifts for your family and friends. Join now
Check out Creativity Prompt’s self paced workshop: “Capture Your Dream”. In this workshop you will capture, follow and make your dream come true as well as document your journey in a fabulous mixed media mini album.
I love recycling. It is no news to you. What can I say, giving something a new lease of life just before it was about to be tossed away is magical to me.
Paper towels or a heat gun. (I actually prefer the paper towels for this purpose)
How To
[Watch on You Tube & while there, please rate, comment and subscribe]
Step-By-Step Instructions
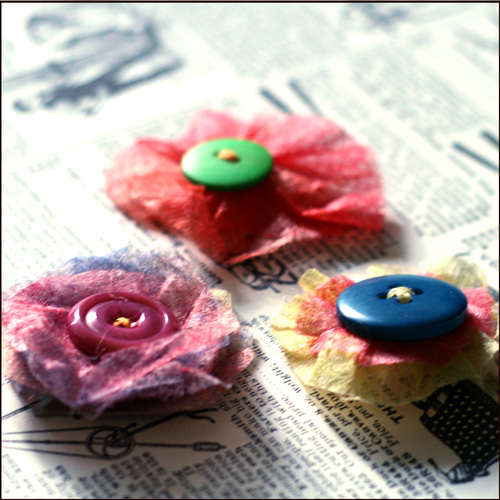
First Flower Style –
Cut your sheet into strips of about 1″ wide. It doesn’t have to be precise. The wider the strip, the larger the flower would be. For a Two layered flower, make 1 strip wider than the other.
Dye your strip with Glimmer Mists and Perfect Pearls mixed with water.
Dry your dryer sheet completely. You may use a heat gun to dry the strips, but be careful not to get too close and not to concentrate on one zone for too long, or the strip will rip from the heat. You may also use a paper towel to blot the excess liquids.
Pleat the strip around the button and make sure all the ends are tucked underneath the button. Secure all the pleats with a button and embroidery floss.
Tie both ends of the embroidery floss in a double knot and cut off the excess.
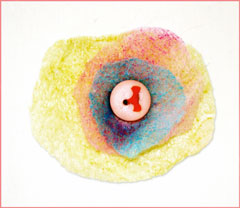
Second Flower Style –
Take a couple of sheets and lay them together. Fold them into thirds and cut out an imperfect circle to create a stack of dryer-sheet-circles.
Dye each circle with the mists. To make it more interesting, use different colors on each circle.
Let the circles dry completely.
Stack them together again in an order that appeals to you and secure them with a button and embroidery floss. Alternative: Sew them together with embroidery floss threaded with small beads.
Tie both ends of the embroidery floss in a double knot and cut off the excess.
Share
If you have any question, suggestion or remark – don’t hesitate to contact me – either leave a comment here, use the contact form or start a new thread on the Creativity Prompt Flickr Group!!!
I would also be very happy to see your own creations, so don’t be shy and share 🙂
This year you can really make your dream come true!
“Capture Your Dream” workshop is a self-paced, six weeks long workshop, that will walk you through a journey of capturing your biggest dream and making it come true.
In the process of making your dream happen – with lots of inspiration and guided self-exploration, you will also create a mixed media mini album from scratch and learn many tips and techniques – including some photography pointers that will add character to your photos and will help you take better pictures of your projects.
The workshop includes 30 printable PDF lessons with step-by-step pictures and instructions as well as several printable templates you may use in other projects too.
I am confident you will enjoy it and find it helpful so I also offer full money back guarantee while the workshop lasts.
In this week’s creativity prompt I am reusing bottle lids to create artistic patterned papers.
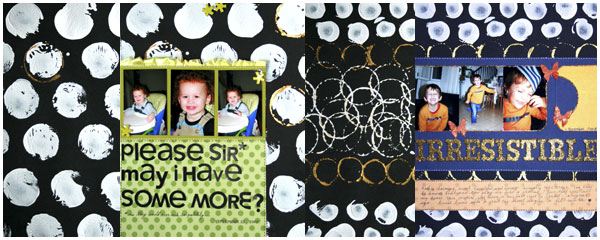
The polka-dot-circular-spotty look is extremely popular right now and almost ALL the patterned paper manufacturers have a few in their latest collections. Before you reach your hand to the wallet and buy some new papers why not stopping at the recycling bin and make your own ones?
If you are interested in some ideas, then keep on reading.
Watch on You Tube.
[I have had lots of comments requesting me to speak on my videos. I hate talking because my funny accent shines through. This time I took a deep breath and created a voice over – with my voice (I have to write it to believe it). Tell me the truth, don’t you want the fabulous music back?]
Step By Step Instructions
Dip the lid in a pool of acrylic paint and stamp over the cardstock. To get a good impression of the lid make sure its entire surface is covered with paint. You may also use a brush to apply the paint more evenly to the lid. Apply some pressure on the lid, but beware of the paint’s slipperiness. I was going for the artistic look so I didn’t mind the imperfect stamping.
You may use the opposite side of the lid to create a circular outline. Use it as a frame, or as an outline to the solid circle you stamped with the other side of the lid.
Experiment –
Create different patterns.
Use different sizes of lids.
Use other mediums (instead of acrylic paint):
Ink pads.
Embossing ink + embossing powder.
Glue + glitter/ flock/ foil.
Use different objects to stamp with:
Toilette paper rolls.
Paper swirls.
Cardstock/ corrugated cardstock.
Old credit or gift cards.
Vegetables (if they went bad…)
Share
If you have any question, suggestion or remark – don’t hesitate to contact me – either leave a comment here, use the contact form or start a new thread on the Creativity Prompt Flickr Group!!!
I would also be very happy to see your own creations, so don’t be shy and share 🙂
Check out the new “Make Your Own Planner” workshop and you may solve this year’s holiday gift shopping problem. An affordable workshop that keeps on giving…
I loverecycling and every time I manage to turn trash into treasure, I am happy. Maybe too happy, but that’s for the professionals to judge 🙂
If you are as jubilant about recycling as I am and would like to make a fat journal out of cardboard and packaging paper used for padding – then keep on scrolling.
I’ve got a video tutorial just for you.
Tools & Supply
Packaging material – cardboard and padding paper (or plain copier paper)
Cut cardboard at: 5½” by 4½” | 5½” by 4½” | 5½” by 1″.
Cut 2 pieces of patterned paper for the cover, at: 8″ by 6″.
Adhere the cover pieces to the center of the patterned paper with glue stick.
Cut the corners of the patterned paper and leave a gap from the cardboard corners – a gap as long as the cardboard is thick (between ½” to ¼” depending on the cardboard).
Fold the remaining patterned paper flaps over and adhere to the cardboard with glue stick.
To cover the spine, cut a 6″ by 6″ piece of patterned paper diagonally. Cut it 2″-1½” away from the corner on each side.
Fold and adhere the top patterned paper flaps to the cardboard spine with glue stick.
Apply strong double sided adhesive to both edges of the patterned paper and attach the cover pieces to it. Allow an 1/8″ gap between the spine and each of the cover pieces.
For the inside cover, cut your patterned paper at: 5¼” by 4¼” | 5¼” by 4¼” | 5¼” by 1″.
Adhere the patterned paper to the inside cover with glue stick. Optional – To secure the adhesion go over the cover with a brayer a few times in different directions.
Punch 2 holes in the spine using a Crop-a-Dile.
Cut the insert pages (from the packaging paper, or any other plain paper you have) at 8″ by 5″.
Fold the insert pages in half.
Optional – Use a T-Square ruler to straighten up the inserts (or leave them looking rustic).
Position your folded pages where they should lay inside the journal and mark the placement of the holes, then punch the inserts accordingly.
Thread your string through the inserts, from the inside – out.
Thread the ends of the string through the spine and secure in a knot or a double bow.
Write your secrets and deepest wishes in the pages of your new handmade journal.
Share
If you have any question, suggestion or remark – don’t hesitate to contact me – either leave a comment here, use the contact form or start a new thread on the Creativity Prompt Flickr Group!!!
I would also be very happy to see your own creations, so don’t be shy and share 🙂
This week’s creativity prompt is more of an idea on how to reuse drier sheets after they have made your laundry smell fresher and become softer. You know how much I love recycling, so this project is right up my alley.
It takes merely seconds to make this flower and it has a fabric-like texture. Think of it as a tissue paper that won’t rip.
The added bonus of the drier sheet is that even after it does its job inside the drier machine, it still holds its smell. That means that you are not only adding cuteness to the project but a scent too!
Add color by rubbing ink directly onto the circles. If the ink pad falls off, no worries. Stick it right back with a glob of Diamond Glaze.
Cluster the circles together and adhere with Diamond Glaze – a dot of glue will do. (dry adhesive, like a tape runner or glue dots will not work)
To finish off the look, thread an embroidery floss through a button and adhere to the top circle with another dab of Diamond Glaze.
Let dry. After the adhesive has dried up and hardened, you can go ahead and attach the flower to the project with a glue dot. (Position the glue dot directly on the hardened adhesive).
Share
Share your thoughts and your own drier-sheet creations by leaving a comment!
Being environmentally friendly is important to me. It is actually very selfish of me, as I want my posterity to enjoy mother earth as long as possible. Therefore on one of my very first creativity prompts I have shown you how to turn your trash into treasure.
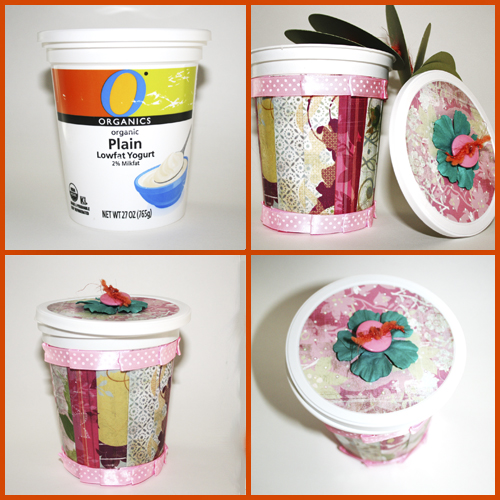
This week I am revisiting this idea and I am going to show you how you can upcycle an empty yogurt container, just before it hits the recycle bin, and make a beautiful surprise mini album with it. If you are not a big fan of mini albums in boxes, you can stop half way through and make a lovely pencil (or brushes…) holder from it.
So if you are interested in turning your trash into treasure too, keep on reading.
[The fabulous music is by Josh Woodward from his album: “Not Quite Connected”]
Step By Step Instructions
Measure the lid’s diameter with a ruler.
Cut a circle from your patterned paper in the same diameter.
Adhere the patterned paper circle to the lid with Mod-Podge and seal with another generous layer of Mod-Podge on top. Let dry completely.
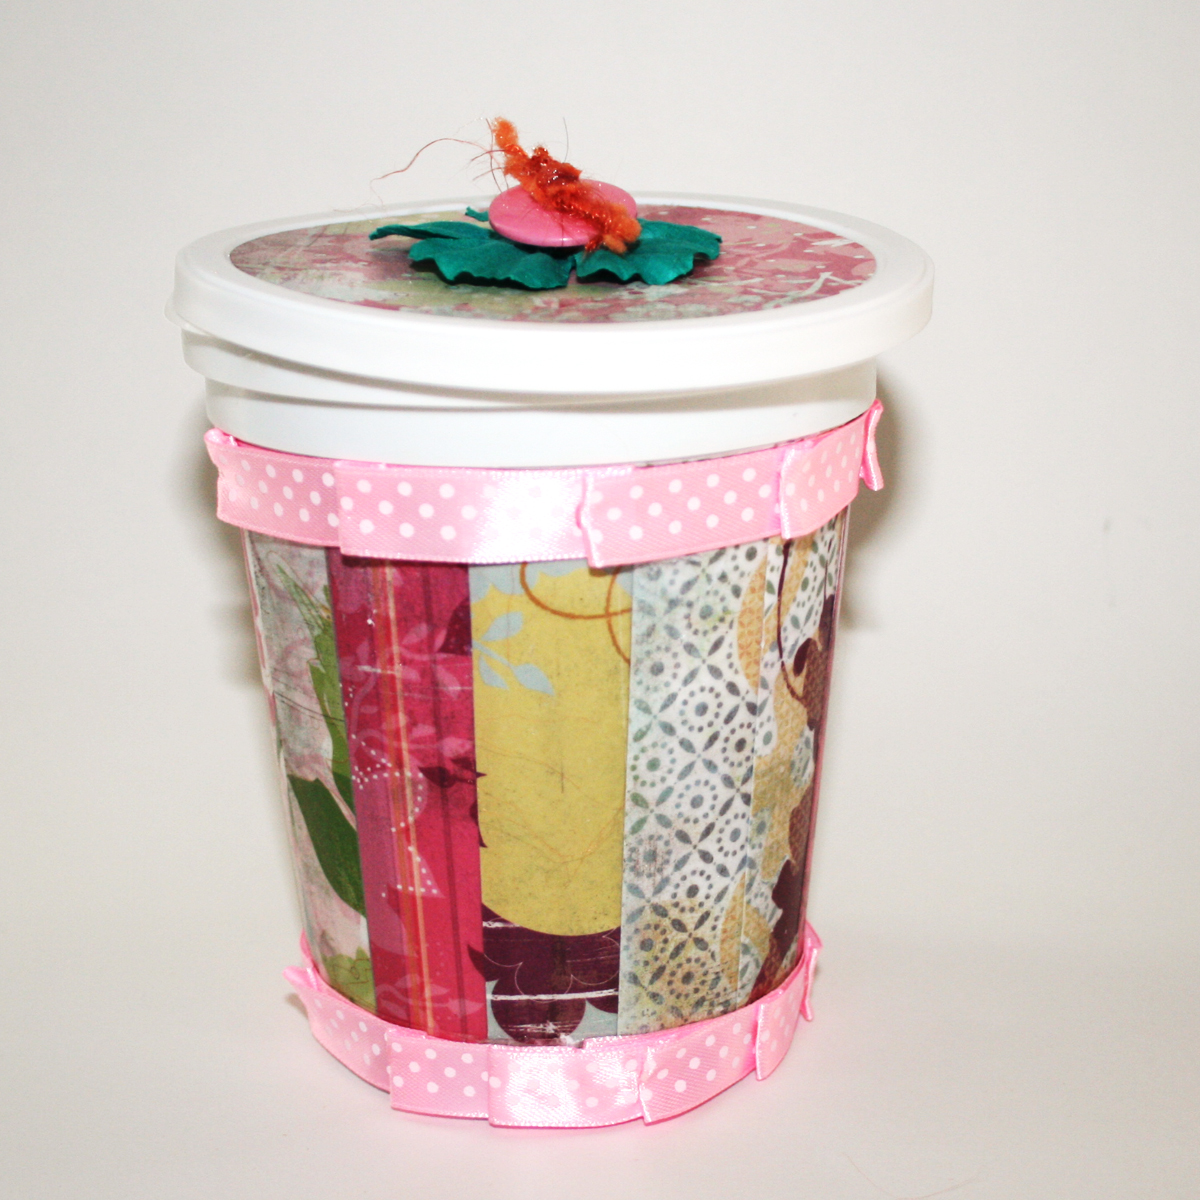
Cut a bunch of patterned papers to the same height as your container and a 1″ width. [mine are 4″ by 1″]
Adhere the strips to the container – one by one – using Mod Podge. To eliminate air bubbles, rub each stripe with your finger. It’s messy, but important to secure your paper strips to the plastic container.
Seal your strips of paper with another generous layer of Mod Podge and put aside until it dries completely.
Measure the diameter of the bottom of your container to figure out the smallest size of a circle that can fit into your container.
Cut as many cardstock circles as the number of pages you wish to have in your mini-album. The circles vary in size whilst the smallest has the same diameter as the container’s bottom and the largest has the same size as the container’s lid.
To find the center of the cardstock circles, cut some more circles from scrap paper, at the same size as your cardstock ones. Fold each scrap paper circle once vertically and once horizontally and mark the point of conjunction. This point is exactly at the center.
Use the scrap circles as a template and punch a hole at the center of each cardstock circle.
Cut a long strip of strong decorative string and fold in half.
Make a knot at the fold (with the two long string edges coming out of it).
Weave both edges of the string through the circles. Secure each circle with a knot and add another knot between each circle, at about 1″, as a spacer.
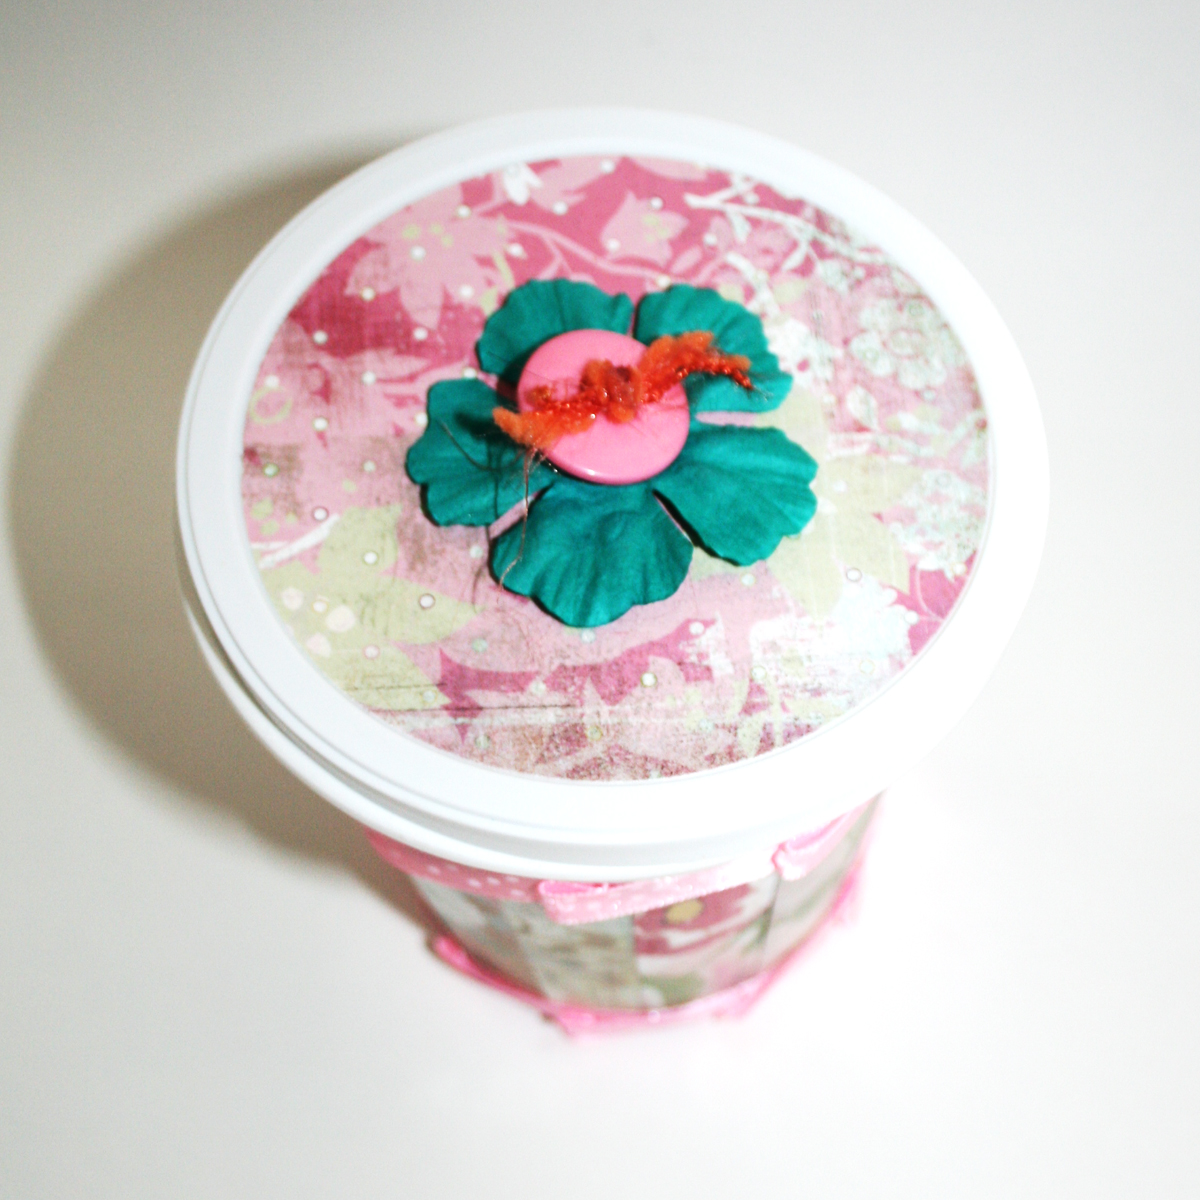
Punch a hole at the center of the lid and apply Diamond Glaze (or any other strong liquid adhesive) to the inside of the lid.
Thread the ends of the string through the hole and make sure the top cardstock circle gets stuck well to the inside of the lid.
To finish off the lid, thread the ends of the string through the paper flower and the button and secure in a knot. Dab some diamond Glaze on the knot to make sure it stays put.
Cut a piece of ribbon that circumscribes the top of your container. Apply a strong tape adhesive to the back of the ribbon and adhere to the top edge of your container. Repeat on the bottom of your container. This will finish off the edges.
For a more cohesive look, add a second strip of ribbon (about 1½ times the circumference of your container) and then adhere to the edges with glue dots, while pleating the ribbon at each 1″. Secure each pleat with a glue dot.
Variation – You can skip steps 1-3 & 7-16 and make a quick and easy pencil holder instead…
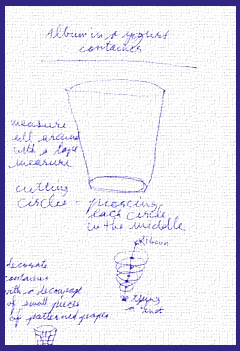
How Ideas Become Creativity Prompts…
A page torn from my bedside journal:
Share
If you have any question, suggestion or remark – don’t hesitate to contact me – either leave a comment here, use the contact form or start a new thread on the Creativity Prompt Flickr Group!!!
I would also be very happy to see your own creations, so don’t be shy and share 🙂
If you liked this post you may want to subscribe to my feed:
If you are anything like me then you probably have a ton of paper scraps. The scrapbooking industry keeps on wowing us with delicious patterned papers and I feel bad about throwing away any tiny little cut out… Not to mention the environmental repercussions of tossing all that paper (read: severed trees) away.
I have found a great “marriage” between my current stash of paper scrap and patterned paper which is still on my wish list. I have derived inspiration from the wonderful new collections from Sassafras Lass and recreated my own patterned paper design, while using only paper scraps.
[Go to YouTube to watch the video in HD and feel free to rate, comment and subscribe]
Step By Step Instructions –
Take a piece of scrap paper (I used recycled newsprint paper) and cut it to the size of your desired design. Mine is 8″ by 8″.
Cut a circle from your scrap piece of paper. It doesn’t have to be centered. Just position it whenever you’d like your focal picture to be.
With a pen and a ruler start drawing your design.
After you are pleased with your design, list all your individual shapes by number, this will make your life much easier later on.
Cut each individual shape with your scissors. Don’t worry about the curvy part, as your focal picture would lay over it.
Now it’s time to get all your paper scraps. Use as many or as little textures, colors and patterns as you like.
Adhere each individual shape to the back of your paper scrap. Make sure the number faces down (just apply your adhesive to the number itself, to avoid “mishaps“). Don’t forget to rewrite the number again at the back…
Using those numbers, reassemble your design and adhere all the individual shapes onto your background cardstock.
Adhere your focal picture with foam adhesive. The photo doesn’t have to be circular. I just think it adds some extra flair. (You can crop your photo with a photo editing software, such as Adobe Photoshop Elements, or you can use any circle cutting system you feel comfortable with).
Add your title and call it good (Well, except for some journaling).
Share –
If you have any question, suggestion or remark – don’t hesitate to contact me – either leave a comment here, use the contact form or start a new thread on the Creativity Prompt Flickr Group!!!
I would also be very happy to see your own paper-scraps creations, so don’t be shy and share 🙂


 This week’s creativity prompt is more of an idea on how to reuse drier sheets after they have made your laundry smell fresher and become softer. You know how much I love
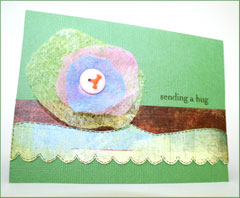

 Being environmentally friendly is important to me. It is actually very selfish of me, as I want my posterity to enjoy mother earth as long as possible. Therefore on one of my very first creativity prompts I have shown you how to
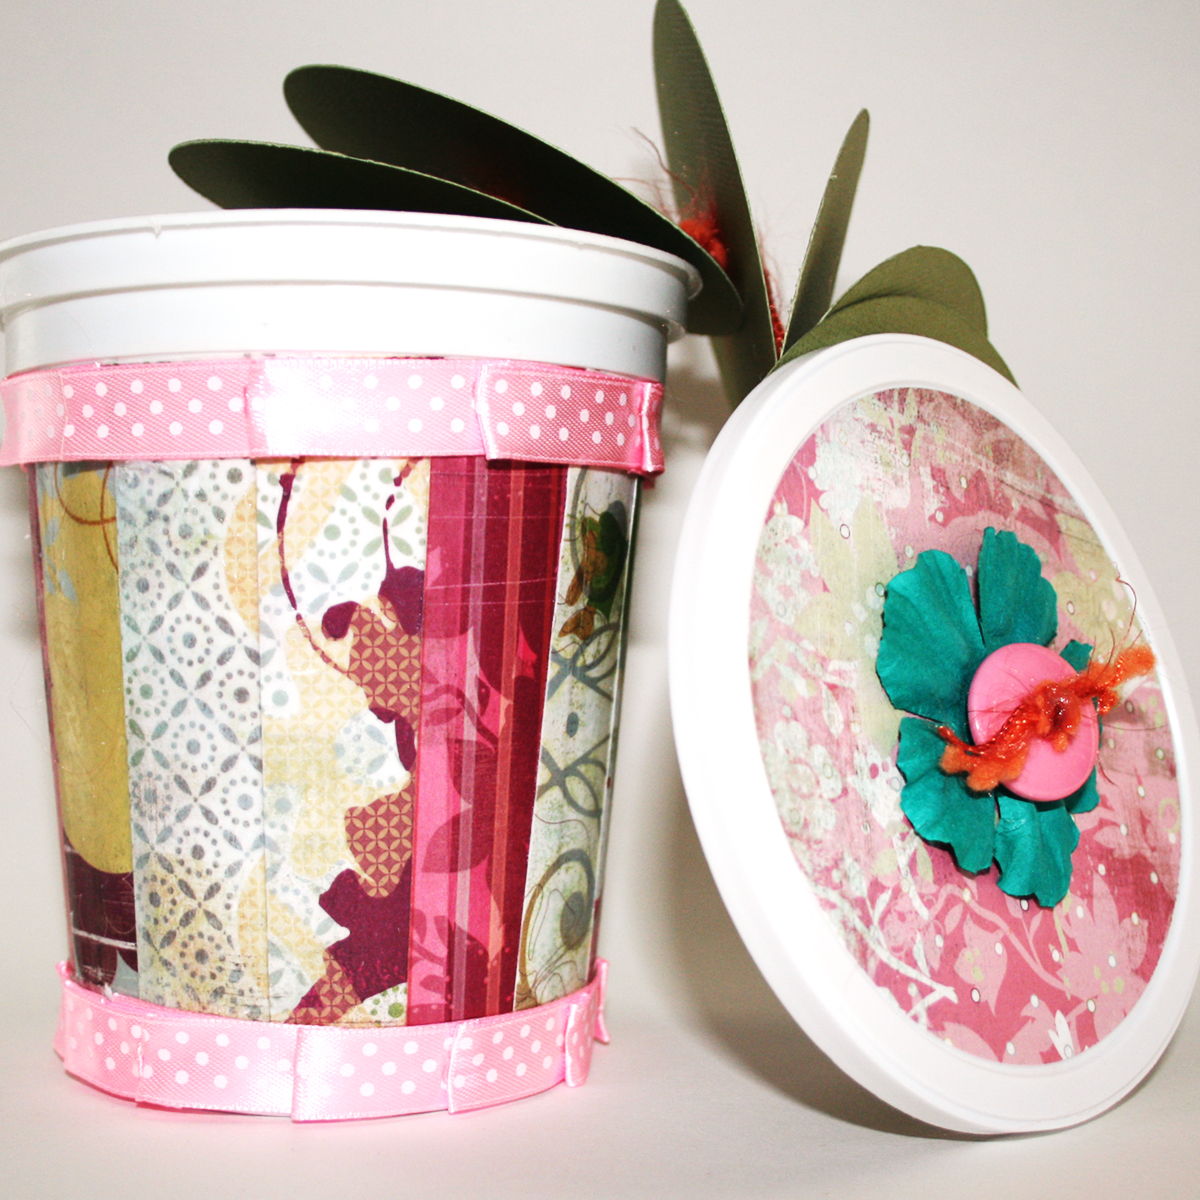
 Subscribe in a reader
 Subscribe by Email


