/** Font types */

Posts Tagged ‘Thanks’

Friday Freebie – So Thankful Journaling Cards

Friday, November 11th, 2011

Free Journaling cards
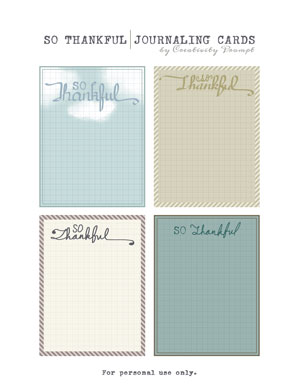
This week I am sharing a set of FREE so thankful journaling cards with you guys (for personal use only).

American Thanksgiving is getting closer but where ever you happen to live – it always helps to be grateful. So I hope you’d use these 3″ by 4″ cards to document everything that you are thankful for.

To download it simply click on the image (or the link) and if it doesn’t work try to right-click on it and opt for the “save target as…” option (it may be phrased a bit differently on different operating systems – but do NOT opt for the “save image as” option, as you will get the low resolution tiny preview image).

I hope you like it and have lots and lots and lots of fun with it.

Make sure you didn’t miss the rest of the free printables on Creativity Prompt.

In case you are wondering, I used the font Sears Tower for 2 of the ‘so’s (and the title) and the font Meddon for the words ‘by Creativity Prompt, but the rest is my own digital “calligraphy”.

Share

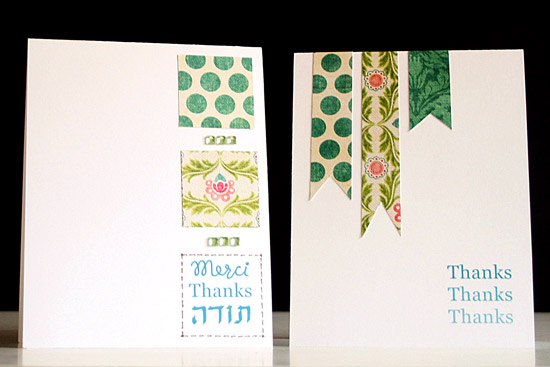
How are you going to use these labels? Please leave a comment and share.

Make Your Own Planner 2012
Check out Creativity Prompt’s new and unique self paced workshop: “Make Your Own Planner”.
This workshop will show you how to make a beautiful handmade planner for the year 2012. Not only are you going to get the entire meticulously designed planner kit for instant download, but you will also get a high resolution video tutorial as well as step-by-step instructions to guide you on each step of the way. Either treat yourself with a fresh and creative start for the coming new year, or get it to create wonderful gifts for your family and friends.
Join now

Special Freebie – Printable Thank You Cards

Monday, November 22nd, 2010

Thanks Cards

[Cardstock – Wausau, Patterned paper – My Mind’s Eye, Gems – Hero Arts]

Free Journaling LabelsIn the spirit of Thanksgiving which is celebrated here this Thursday I want to share a set of printable thank you cards (for personal use only).

To download it simply click on the image (or the link) and if it doesn’t work try to right-click on it and opt for the “save target as…” option (it may be phrased a bit differently on different operating systems – but do NOT opt for the “save image as” option, as you will get the low resolution tiny preview image).

This print, cut and fold cards are perfect for last minute thanks giving… (please excuse my dorky pun). As a quick reminder, cut lengthwise at 4¼” and fold each piece in half.

I hope you like it and make use of the cards by spreading your love and letting people know you appreciate them.

Make sure you didn’t miss the rest of the free printables, especially the printable holiday card set.

Share

Will you be giving thank you cards in the spirit of the holiday? Please leave a comment and share.

Make Your Own Planner 2012
Check out Creativity Prompt’s new and unique self paced workshop: “Make Your Own Planner”.
This workshop will show you how to make a beautiful handmade planner for the year 2012. Not only are you going to get the entire meticulously designed planner kit for instant download, but you will also get a high resolution video tutorial as well as step-by-step instructions to guide you on each step of the way. Either treat yourself with a fresh and creative start for the coming new year, or get it to create wonderful gifts for your family and friends.
Join now

Free Workshop – Giving Thanks Journal

Tuesday, November 2nd, 2010

Thanksgiving Journal

Thanksgiving Day is quickly approaching and I thought that a great way to give thanks is to collect all the things and all the people we are grateful for and write about them in a mini journal.

This Giving Thanks journal is what I came up with. It is 4″ by 6″ so it fits perfectly with 4″ by 6″ standard size photos and therefore quick and easy to put together.

I made the journal kit for you and created a video showing you how to put the journal together – in REAL TIME. You wouldn’t believe how easy it is to make.

Feel free to use it as many times you need, for personal use only and don’t forget to link back here, if you show your project online 🙂

The Journal Kit

To download each of the journal pages – right click on the link below and opt for “save target as”:

  1. Cover page. [Print once on 4″ by 6″ piece of cardstock]
  2. Insert page. [Print as many time as you want, on 4″ by 6″ paper. You can also use the backside of your photos to print on]

Supply

  • Cardstock – to print the journal pages on. You can also use patterned paper or the back side of your photos for the inner pages. Each sheet of 12″ by 12″ patterned paper yields 6 pieces of 4″ by 6″ paper.
  • Cover pieces – I used 4″ by 6″ transparency and 4″ by 6″ piece of chipboard.
  • Hole punch
  • Small binding rings (or ribbon, twine, etc.)
  • Pencil

How To


[Go here to watch on YouTube and while there, please rate, comment and subscribe.]

Step by Step Instructions

  1. Print the journal pages. You need 1 cover page and as many inserts as you please. It is simpler to first cut all the pages to 4″ by 6″ and then use them with your printer, the same way you would use photo paper.
  2. Punch all the punching holes by aligning the black punching marks with your hole punch. Make sure both the mark and the hole punched are centered together – then punch.
  3. To punch the chipboard piece (and your insert photos) align any of the punched pages with the chipboard piece and mark all the holes with a pencil. Then repeat the previous step with the chipboard.
  4. Put together all your pages and bind with the binding rings.

Share

What are you thankful for this year?

If you enjoyed this workshop you would probably enjoy the more elaborate “print and assemble” workshops by creativity prompt.

Try “Welcome Little One” if you are expecting a new baby to enter your life or the life of a loved one and “Make Your Own Planner 2012” to create your very own industrial chic planner.

Gate Fold Thank You Card – Because You Care

Wednesday, March 24th, 2010

Thank You Card

I caved in. I admit it.

I thought a scoring board is redundant. Unnecessary.

But I bought one anyway…

…and i LOVE it!!!

When I buy new patterned paper, I usually store it immediately in my very own papers’ necropolis. However, when I buy new tools – I usually try them right away (sometimes they’re getting buried too). Same happened here, as soon as I got Martha Stewart’s scoring board I had an urge to score me some cards – it was so easy, so addictive.

So here I am, living with a small stack of blank, prescored cards and not doing anything with them. For a couple day. Then came the epiphany – use a journaling label for the greeting!

Simple. Easy. Striking. (If you don’t mind me sayin’…)

Thank You Card

Step By Step Instructions

  1. Cut your cardstock base at 8½” by 5½”. Score at 2 1/8″ and at 6 3/8″.
  2. Cut 2 panels of patterned paper, 5½” by 2 1/8″ each. I used Cosmo Crickt’s 6″ by 6″ Material Girl paper pad.
  3. Adhere the above panels to the panels at the front of the card.
  4. To print on the journaling label, I first printed the greeting on a plain paper (Erika Ormig font, 60Pt.) Then I adhered the label with removable adhesive to the plain paper, on top of the greeting and ran it through the printer again. [This specific labels set will be posted on the blog on Friday, so stay tuned]
  5. I adhered the printed label on another piece of patterned paper from the same pad and cut around it, leaving a nice fat gap. I used Fiskars spring-action scissors for that. They are very easy to manipulate around the curves.
  6. I applied adhesive to only half of the greeting “tag” and adhered it to the left panel – centering it between the two panels.
  7. Then I stuck on a Prima flower and a pearl and called it a happy day.

Share

Have you bought a cool tool lately? What is your favorite tool? Please share – I want to know 🙂

Make Your Own Planner Workshop
Check out Creativity Prompt’s self paced workshop: “Capture Your Dream”. In this workshop you will capture, follow and make your dream come true as well as document your journey in a mixed media mini album.