/** Font types */

Posts Tagged ‘fun foam’

Creativity Prompt – How To make A Double Accordion Brag Book

Friday, June 26th, 2009

How To make An Accordion Brag Book
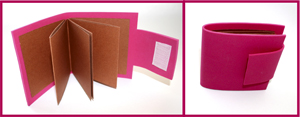
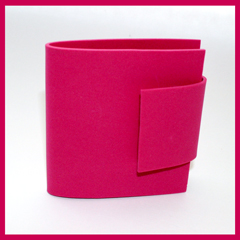
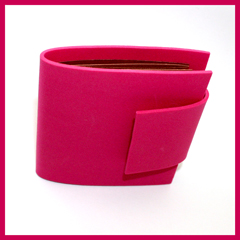
For this week I have a 5-minute-project for you. An adorable little brag book with a fun foam cover that makes it extra “snugglable”.

It is cute. It is easy. It is super, light-speed, quick and it is made with very inexpensive materials. The perfect project.

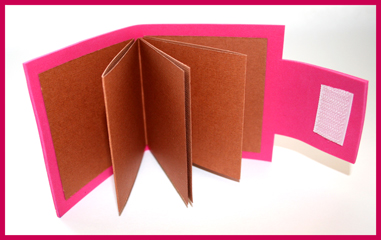
Put a 2″ by 3″ photo with a 1″ by 3″ piece of patterned paper or journaling strip on each page for the quickest scrapbook ever.

Tools & Supply

How To

Step by Step Instructions

  1. Cut fun foam to 3½” by 9½”.
  2. Cut 2 cardstock strips of 3″ by 12″ each.
  3. Score each strip at 3″, 6″ & 9″. You can just align your score lines with the 3″ mark on your paper trimmer.
  4. Fold your score lines – once up and once down – to create an accordion fold.
  5. Adhere the folded cardstock strips to the fun foam with a double sided adhesive. Optional – Before attaching each cardstock strip, you can add a strip of ribbon to it – just align the middle of the ribbon with the center point of the back of the cardstock and adhere to the fun foam. Tie the ends of the ribbon in a bow to make sure your accordion fold stays put.
  6. Find the center of the fun-foam cover’s flap with the grid ruler and mark 1″ on each side. Cut along these marks all the way to the bottom of the flap and snip off the ends.
  7. Adhere the velcro or magnetic snaps to the flap. To make sure the aligning is perfect, adhere both parts of the velcro while they’re attached together and then peel off the backing and close the flap. To allow some room for bulky embellishments, make sure you don’t close the flap too snag.

Accordion Brag Book Accordion Brag Book Accordion Brag Book

Share

If you have any question, suggestion or remark – don’t hesitate to contact me – either leave a comment here, use the contact form or start a new thread on the Creativity Prompt Flickr Group!!!

I would also be very happy to see your own creations, so don’t be shy and share 🙂

Reminder

Only a few more days left for the early bird’s admission to “Capture Your Dream“. Don’t miss the special offer of only $14.95 for 30 downloadable lessons!!! (LESS THAN 50 CENTS PER LESSON)

Workshop - Capture your Dream

Creativity Prompt – How To Make An Accordion Fold Mini Album

Friday, May 1st, 2009

Accordion Fold Mini AlbumThere are days in which I want to color the world around me in the colors of the rainbow. Days in which some “pick me up” color treatment wouldn’t hurt. Do you also have days like these sometimes? If so, then I have the perfect project: A rainbow colored mini album with an accordion fold spine and to finish things off, it is covered in a soft fun foam. (Is it wrong to cuddle with your mini-album? I am not sure I want to hear the answer…)

So if you want to learn how I made this cutie, stay tuned and keep on reading:

Tools and Supply

how To


[Music by Josh woodward]

Step By Step Instructions

  1. To make your spine, cut your cardstock at: 4″ by 8″.
  2. Score the cardstock at 1½” on each side and then every ½” in between the initial score lines.
  3. Fold all your score lines in an accordion fold. That means a “mountain” fold (folding down) is followed by a “valley” fold (folding up). Make sure your creases are sharp by burnishing them well with the bone folder.
  4. Cut the 5 cardstock signatures – 4″ by 8″ each. Score them at 4″ and fold in half.
  5. Attach the signatures by applying a strong double-sided tape adhesive to each of the ½” folds. Apply the adhesive as close as possible to the crease but not directly on it. Apply some additional tape adhesive runner to all 4 inside edges of the signatures and attach to the spine. “Hug” each “mountain” fold in the spine with 1 signature.
  6. For the cover cut your fun foam at 4½” by 12″.
  7. Lay down your signatures on the fun foam and make sure you have enough room to cover them and then start marking the remaining flap, as follows:
    • Find the middle (lengthwise) and make two pencil marks – ½” downward and upward from the middle [That is going to help us create a 1″ flap in the middle].
    • With a T-Square ruler, draw lines that connect the edges with your tick marks – both lengthwise and widthwise.
    • Cut out the outer rectangles with your scissors.
  8. Attach the signatures to the cover with a strong double-sided tape adhesive.
  9. Attach your Velcro to the flap. I always attach the corresponding Velcro pieces together and remove the backing from both of them. Adhere one side to the flap and then close it – that adheres the corresponding piece of Velcro at the perfect spot on the cover.

Accordion Fold Mini Album Accordion Fold Mini Album

Share

If you have any question, suggestion or remark – don’t hesitate to contact me – either leave a comment here, use the contact form or start a new thread on the Creativity Prompt Flickr Group!!!

I would also be very happy to see your own creations, so don’t be shy and share 🙂

More Creativity Prompts You Might Like: