I love recycling and every time I manage to turn trash into treasure, I am happy. Maybe too happy, but that’s for the professionals to judge 🙂
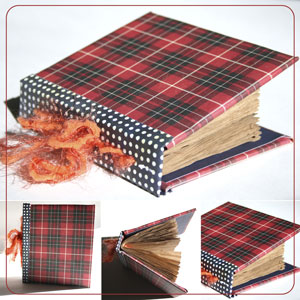
If you are as jubilant about recycling as I am and would like to make a fat journal out of cardboard and packaging paper used for padding – then keep on scrolling.
I’ve got a video tutorial just for you.
Tools & Supply
- Packaging material – cardboard and padding paper (or plain copier paper)
- Craft knife + cutting mat
- T-square ruler
- Glue stick
- Strong double sided tape
- Bone folder
- Brayer
- Patterned paper – (8″ by 6″| 8″ by 6″| 5½” by 4½”| 5½” by 4½”| 5½” by 1″| 5¼” by 4¼”| 5¼” by 4¼”| 5¼” by 1″)
- Thick thread
- Scissors
- Crop-a-Dile
- Pencil
How To
[Music by Josh Woodward, with permission]
Step-By-Step Instructions
- Cut cardboard at: 5½” by 4½” | 5½” by 4½” | 5½” by 1″.
- Cut 2 pieces of patterned paper for the cover, at: 8″ by 6″.
- Adhere the cover pieces to the center of the patterned paper with glue stick.
- Cut the corners of the patterned paper and leave a gap from the cardboard corners – a gap as long as the cardboard is thick (between ½” to ¼” depending on the cardboard).
- Fold the remaining patterned paper flaps over and adhere to the cardboard with glue stick.
- To cover the spine, cut a 6″ by 6″ piece of patterned paper diagonally. Cut it 2″-1½” away from the corner on each side.
- Fold and adhere the top patterned paper flaps to the cardboard spine with glue stick.
- Apply strong double sided adhesive to both edges of the patterned paper and attach the cover pieces to it. Allow an 1/8″ gap between the spine and each of the cover pieces.
- For the inside cover, cut your patterned paper at: 5¼” by 4¼” | 5¼” by 4¼” | 5¼” by 1″.
- Adhere the patterned paper to the inside cover with glue stick. Optional – To secure the adhesion go over the cover with a brayer a few times in different directions.
- Punch 2 holes in the spine using a Crop-a-Dile.
- Cut the insert pages (from the packaging paper, or any other plain paper you have) at 8″ by 5″.
- Fold the insert pages in half.
- Optional – Use a T-Square ruler to straighten up the inserts (or leave them looking rustic).
- Position your folded pages where they should lay inside the journal and mark the placement of the holes, then punch the inserts accordingly.
- Thread your string through the inserts, from the inside – out.
- Thread the ends of the string through the spine and secure in a knot or a double bow.
- Write your secrets and deepest wishes in the pages of your new handmade journal.
Share
If you have any question, suggestion or remark – don’t hesitate to contact me – either leave a comment here, use the contact form or start a new thread on the Creativity Prompt Flickr Group!!!
I would also be very happy to see your own creations, so don’t be shy and share 🙂


