/** Font types */

Posts Tagged ‘Hero Arts’

Build A Scene OR Paper Piecing Card – Creativity Prompt

Saturday, February 27th, 2010

Paper Piecing Card

Way back, when I was a wee kid, my sister used to tell me the most wonderful made-up stories. I was completely mesmerized by her stories, not to mention extremely gullible…

My favorite stroy was about a magic typewriter, hidden in a secret compartment inside the wall (I used to spend HOURS looking for it). Everything you type on it with the words: “I wish” at the beginning, comes true. You could write short sentences such as ‘I wish I had ice-cream with hot chocolate sauce…‘ and immediately enjoy the treat, or you may materialize imaginary worlds, built from scratch with the power of your words (These were my favorite types of stories).

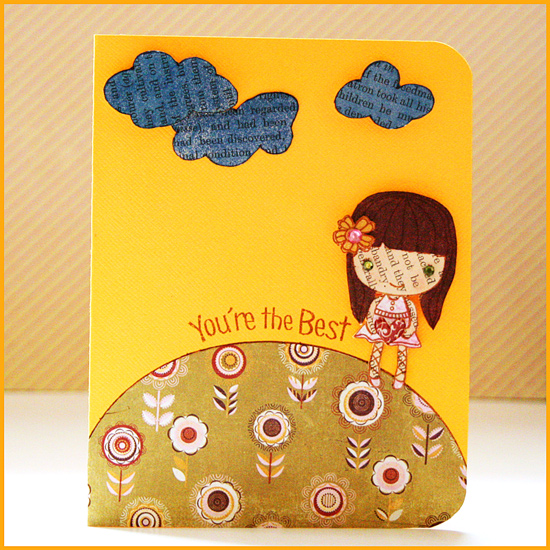
In crafts, as in creative writing or story telling, you may build imaginary worlds from scratch and go as far as your imagination and creativity go.

Go ahead and build a scene. Let your inner creative child guide you through the labyrinth of your vast imagination.

Step by Step Instructions

  1. Adhere a vintage text paper onto a plain, non-textured cardstock using glue stick.
  2. Stamp your image a few times on different patterned papers, including on the vintage text paper. Use as many patterned papers as the number of pieces you want to combine together.
  3. Cut each piece of your image with precision scissors.
  4. Start assembling the “scene”: Adhere the “flat” pieces with a glue pen and the dimensional pieces with foam dots.
  5. For the “hill” – cut a piece of patterned paper in a curve.
  6. Draw some freehand clouds on your leftover text paper and cut the out with precision scissors.
  7. Spritz your “clouds” with Glimmer Mist.
  8. Stamp or punch the little heart on a reddish patterned paper. Apply some Glossy Accent. Let dry and cut out. Adhere to the image with a foam dot.
  9. Stamp the greeting in a curve, by laying it that way on the acrylic block.
  10. Add some gems for the finishing touches.

Share

If you have any question, suggestion or remark – don’t hesitate to contact me – either leave a comment here, use the contact form or start a new thread on the Creativity Prompt Flickr Group!!!

I would also be very happy to see your own creations, so don’t be shy and share 🙂

Make Your Own Planner Workshop
Check out Creativity Prompt’s self paced workshop: “Capture Your Dream”. In this workshop you will capture, follow and make your dream come true as well as document your journey in a mixed media mini album.
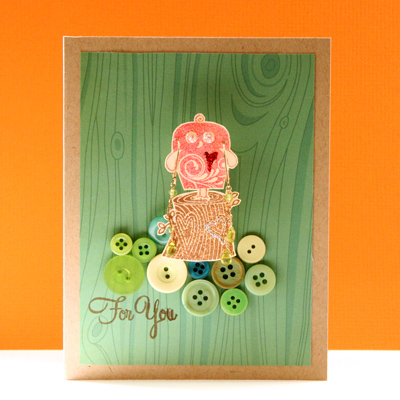
How To Make A Gift Card (pun intended) – Creativity Prompt

Friday, December 18th, 2009

Gift Card

The Hero Arts blog has sparked this idea in my head when they came up with a gift card challenge. I’m always up for a challenge and instead of thinking about a fun way to incorporate money or a store gift card in the card, I thought why not incorporating the gift itself and the idea for this card emerged.

Another fun idea is to stamp and cut a tree image and to wrap a necklace around it, like a twinkling ornament chain.

Tools & Supply

How To


[Watch on You Tube – while there, please rate, comment & subscribe]

Step-by-Step Instructions

  1. Stamp the images over a smooth light cardstock.
  2. Cut around the images with precision scissors, while rotating the cardstock and leaving the scissors at the same position.
  3. Adhere the background piece of the patterned paper centered on the card base with permanent tape adhesive.
  4. Temporarily lay the tree image on the background paper and arrange green buttons around it to simulate a grassy hill. When you are pleased with the buttons’ arrangement – adhere them with glue dots.
  5. Adhere the tree image in its place on top of the buttons with a thick foam adhesive. Either use a ½” thick piece of foam adhesive or layer a few thinner foam adhesive pieces together.
  6. Pierce holes in the owl “ears” and put on the earing. Then adhere the owl on top of the tree with another piece of thick foam adhesive. The thickness of the foam gives room to the earing’s stubs.
  7. Add some more interest and texture with a few touches of glitter glue here and there.
  8. Stamp your greeting with brown ink. Attach the stamp to the left side of the acrylic block, so the buttons won’t stand in your way.
  9. Give the gift card to someone you love and get a smile in return.

Share

If you have any question, suggestion or remark – don’t hesitate to contact me – either leave a comment here, use the contact form or start a new thread on the Creativity Prompt Flickr Group!!!

I would also be very happy to see your own creations, so don’t be shy and share 🙂

Make Your Own Planner Workshop
Jump start your creativity for 2010 and Make Your Own Planner with an affordable workshop that keeps on giving with an unlimited personal use license…

Make Your Own Planner Workshop
“Capture Your Dream” workshop is relaunching as a self-paced workshop. Isn’t this the perfect time for you to capture your dream and make it happen?

Creativity Prompt – Make an Artist Trading Card (ATC)

Friday, October 23rd, 2009

Artist Trading Card (ATC)
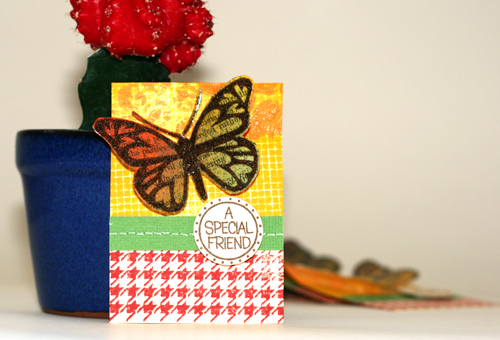
An Artist Trading Card (aka: ATC) is basically a 2½” by 3½” piece of original artwork which is traded among artists.

Participating in an ATC swap is a great way to express yourself creatively without being overwhelmed with a huge blank canvas. It is also a great way to get to know other artists and expand your artistic world.

As soon as I heard that Hero Arts is arranging an ATC swap I knew I had to participate.

On this week’s creativity prompt I want to walk you through the process of creating my ATC for the swap.

If you want to find out how I made this ATC (plus learn some valuable tips and tricks) then keep on reading:

Step by Step Instructions

  1. Cut your cardstock to the traditional 2½” by 3½” size. To make the most out of an 8½” by 11″ sheet of cardstock, start by cutting it at 2½” lengthwise twice and then you’ll end up with a 3½” strip.
  2. Adhere a vintage text paper (from an old book. I used an old text book about Roman Law…) to another piece of non-textured cardstock with a glue stick.
  3. Color the vintage paper with distress ink using the foam applicator with a swirling motion, from the outside in. Blend a few colors together. I used: Broken China, Fired Brick, Peeled Paint and Mustard Seed.
  4. Stamp the heart winged butterfly image in dark brown ink over the colored vintage background. Try to stamp the images as close as possible, but leave a small gap between them. Let the ink dry completely.
  5. Mask off 2/3 of the ATC with a post-it note and stamp the houndstooth background stamp using one of the distress inks.
  6. Take off the post it and use it again, masking the part you’ve just stamped. Then stamp over it with the screen shadow stamp.
  7. Take a small piece of bubble wrap and apply a layer of distress crackle paint over it. Use the wet bubble wrap to “stamp” with it over the screen shadow background. Let dry.
  8. After the crackle paint is completely dry cover it with a thin layer of clear glue or glaze to prevent the paint from breaking and falling off.
  9. In the meantime stamp the circular greeting on another piece of non textured cardstock using the same dark brown ink (I used the Clear Design: Who Loves You – CL309 – stamp set by Hero Arts, but it is no longer available). Punch the greetings out with a 1″ circle punch.
  10. Cut a green textured cardstock to 2½” by ½” strips. Poke a line of holes, 1/8″ apart from each other, along the middle of the strip and “connect the dots” with a white gel pen. Adhere the strip to the border where the two different background patterns meet.
  11. Cut the butterfly images with precision scissors. I am using Fiskars spring action micro tip scissors and I absolutely love them.
  12. Cover the butterfly images with an embossing ink and dip it into a mix of 1 part glitter to 3 parts clear embossing powder. Set with a heat gun.
  13. Attach the circular greeting to the cardstock strip with a foam dot.
  14. Attach the butterfly above the strip in an angle using some mini glue dots behind its body and some pop up glue dots behind its wings.
  15. Don’t forget to add your name, date and signature on the back!

Artist Trading Card (ATC)

Share

Have you ever participated in an ATC swap? Are you interested in assembling an ATC swap group here on creativity prompt? If you are, please leave a comment and show your interest.

If you have any question, suggestion or remark – don’t hesitate to contact me – either leave a comment here, use the contact form or start a new thread on the Creativity Prompt Flickr Group!!!

I would also be very happy to see your own creations, so don’t be shy and share 🙂

Hero Arts: A Place To Visit. A Company To Love

Monday, July 13th, 2009

Hero Arts: A Plcae To Visit. A Company To Love

Hero Arts is debuting its new web design this week as well as some of its new stamps design. This is a fabulous opportunity to say a few words about Hero Arts. (Unsolicited!)

Why I love Hero Arts?

  • High quality products.
  • Fabulous, innovative designs.
  • Environmentally conscious company.
  • Great source for learning new techniques and coming up with new ideas.
  • Wonderful, friendly and encouraging community.
  • Generous and humble people.

Why would you love Hero Arts

For the past year (probably more than a year) there hasn’t been one week without hundreds of dollars worth of fabulous giveaways… Need I say more?!

show your support

Check out the Hero Arts blog.
Follow Hero Arts on twitter.
Become an Hero Art fan on Facebook.

REMINDER

In the coming week I will be concentrating on the finishing touches for my upcoming workshop: “Capture Your Dream” so I will not be posting any prompts.

Feel free to browse the archives for Inspiration Prompts, Journaling Prompts and Creativity Prompts. There are TONS.

If you are registered to the workshop – make sure to confirm your e-mail address (contact me if you haven’t confirmed it already).
If you are not yet registered to the workshop – be sure to check it out and join – spots are going fast.