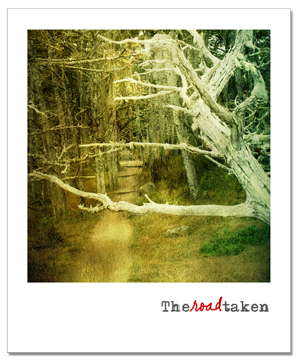
/** Font types */

Posts Tagged ‘PSE’

The Marvelous World Of Textures

Monday, October 4th, 2010

The Road Taken

The Road Taken
Somewhere, in the woods,
there lies an enchanted trail.
It loops and curls voluptuously,
seducing people’s feet.
The trees protect it with their shadow,
but the sultry sun shall never cry defeat.
Place one foot and make a step forward.
A second step shall follow.
Think but one thought.
Aspire to achieve but one goal.
Make a third step.
A fourth step shall follow.
Keep on walking,
step by step
and old faithful trail
shall take you there.

See The Beauty In The Ordinary

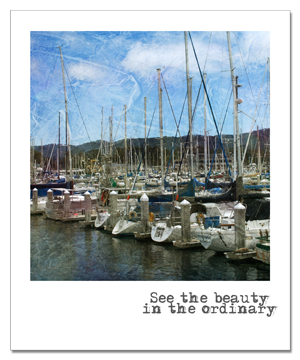
The Beauty Is In The Ordinary

The beauty is
in the wondering eyes of a child.
The beauty is
in the dreamy eyes of a lady
waiting for her lover.
The beauty is
in the blooming flower.
The beauty is
in the harmonious chirping
of the mockingbird.
The beauty is
in sapphire sky and emerald sea.
The beauty is not in the extravagant.
The beauty is in the ordinary.
This is where beauty is in.

The World of Textures

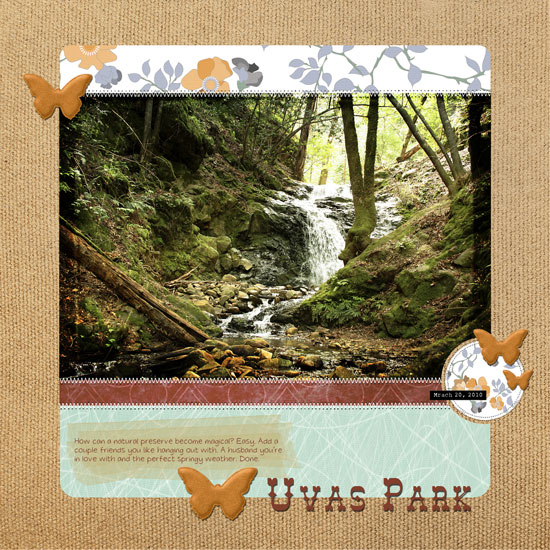
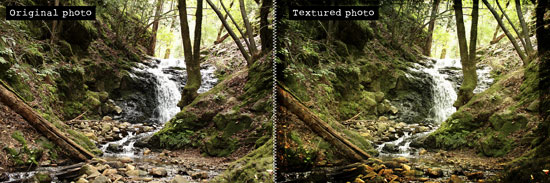
It is no wonder that these visual prompts has made me quite poetic. These are two ordinary photos I took on a recent trip to Monterey, CA. I loved the image of the boats docking and the trail hugged by the trees, but what really transformed those photos from ordinary to magical has been the use of textures.

Textures are basically images of textured objects in high resolution. These objects may be real or computer generated.

In a way digital textures are mimicking the laborious job of a mixed media artist, who lays layer upon layer of different mediums to create depth and interest.

The textures are layered upon the layer of the original photo, using Adobe Photoshop or Photoshop Elements. Then the texture’s layer is blended in by using different blending modes and playing with the layer’s opacity setting. The best way to go about it is just to play around and experiment.

On each picture I used several textures. I used different blending mode and different opacity settings on each texture layer.

All the textures I used are generously offered for free (for everyone) by Shadowhouse Creations.

How Can You Use Textures

To transform your own picture from ordinary to magical and dreamy, just download a few of the textures and layer them on top of your photo. (Which means that the texture layer is above the layer with your original photo).

Then change the blending mode (it is located on top of the layers ruler and is by default on ‘Normal’).

Also change the opacity settings of the layer with the texture (the opacity spectrum is located on the left of the layers ruler and by default set to ‘100%’).

P.S.

You may download the digital polaroid frame here.

Share

If you go ahead and try textures, please share by leaving a link at the comments section.
I would also love it if you share poems you came out with after observing a photo you liked.

Welcome Little One Workshop
Check out Creativity Prompt’s new and unique self paced workshop: “Welcome Little One”. This workshop will provide you with everything you need, and then some, to make a fabulous handmade mini album to record the first moments of a new born baby.

How To Change the Color of the Journaling Tags

Wednesday, August 4th, 2010

I have been posting a lot of free printable journaling tags.

I have been asked several times how can you change the color of these tags with a photo editing software, such as Photoshop or Photoshop Elements and each time I answered individually.

It took me a while to figure out that my answer may interest many of you too, so here it goes:

  1. Open the pdf file with photoshop.
  2. Open a new layer underneath the file layer.
  3. Make sure your file layer is highlighted and pick the white in the file, using the magic wand tool.
  4. Press delete.
  5. From the menu bar choose “Edit” =>”Fill in layer” => choose “color” and change it to any color you want.
  6. Fill in the “preserve transparency” check box and click “apply” or “ok”.
  7. If the last 2 steps don’t work for you, try to press CTR+U or CMD+U and change the hue and saturation settings.

I hope that helps you guys 🙂

Have a great day.

Think Outside the Box – Literally + Selective Coloring With Photoshop Elements

Thursday, May 6th, 2010

One way to get out of a creative rut is to use our stash – not as intended…

Use a “girly” collection for a boy’s layout or vice versa [as I did below].
Use a Christmas collection for a 4th of July layout.
Use a travel collection for a wedding.
Use patterned paper as a background and plain cardstock as an accent.
Use paper flowers as journaling blocks.
Use a winter themed paper for a summary layout.

Just ignore what the “box” says and create.
Free your mind.

In this layout I used Karla Dudley’s new kit KD Fly Girl for a manly layout of my husband shooting hoops at the beach:

i Heart you

[Fonts: Marketing Script, VTPortableRemington; Digital Kits: KD Fly Girl by Karla Dudley.]

And in this layout I used Karla’s KD Fly Boy kit to create a girlie-girl layout featuring my princess niece:

Believe

[Font: Rough Typewriter; Digital Kits: KD Fly Boy by Karla Dudley.]

Photoshop Elements Tip – Selective Coloring

On my “I heart You” layout I turned my photos to black and white (by de-saturating them) and kept just the vibrant yellow color of the ball.

The azure sky and turquoise ocean are beautiful, but they are distracting from the story I want to tell.

By removing the color of everything but the ball – I am drawing attention to it and hinting that the focus of my story is there.

There are 3 ways to get that look – choose the one most comfortable to you:

Method 1

  1. Duplicate the photo’s layer (press CTRL+J on a PC or CMD+J on a MAC).
  2. Make sure your upper layer is highlighted and de-saturate the colors all the way to the left (press CTRL+U on a PC or CMD+U on a MAC).
  3. Make sure your upper layer is highlighted and choose the eraser tool (work with the default circular brush). Lightly erase just the object whose color you’d like to retain.
  4. Merge both layers when you’re done.
  5. [P.S. This is also how I “colored” the heart red on the kit’s PNG file.]

Method 2

  1. Duplicate the photo’s layer (press CTRL+J on a PC or CMD+J on a MAC).
  2. Make sure your upper layer is highlighted and de-saturate the colors all the way to the left (press CTRL+U on a PC or CMD+U on a MAC).
  3. Make sure your upper layer is highlighted and choose the Quick Selection Tool. Click on the object whose color you wish to retain until it is highlighted completely by the marching ants. If you “slip” just unselect by pressing ALT on a PC or OPT on a MAC while simultaneously clicking on the part you don’t want selected.
  4. Press delete.
  5. Merge both layers together.

Method 3

  1. Choose the Quick Selection Tool. Click on the object whose color you wish to retain until it is highlighted completely by the marching ants. If you “slip” just unselect by pressing ALT on a PC or OPT on a MAC while simultaneously clicking on the part you don’t want selected and duplicate your selection (press CTRL+J on a PC or CMD+J on a MAC).
  2. Deselect (press CTRL+D on a PC or CMD+D on a MAC)
  3. Make sure your lower layer is highlighted and de-saturate the colors all the way to the left (press CTRL+U on a PC or CMD+U on a MAC).
  4. Merge both layers together.

Share

Are you using your stash in an untraditional way? Please share your ideas/ projects with us.

What Makes Anything Magical – Journaling Prompt

Wednesday, April 14th, 2010

Uvas Park Layout

[Fonts: Jesse James, Tidy Hand, rough_typewriter; Textures: Shadowhouse Creations; Digital Kits: KD Artist In Me (background paper), KD Blakely (patterned paper – floral), KD Sylvy (patterned paper – aqua), KD Trina (patterned paper – dark red), KD Digi Essentials (stitches + masking tape), KD Digi Essentials 2 (butterflies) – all kits by Karla Dudley.]

As a child I could look at my parents’ modest living room and see a palace. I looked at my red shoes and imagined how they transport me to Oz. I saw a smiling face in the sun and I swear I could see a caring bear resting on a cloud… Everything seemed magical when I was a child.

Sometimes I try to dig deep and find that ability to make the ordinary seem (and actually be) magical.

Journaling Prompt

What is it that makes the ordinary special and the plain magical? Write it down.

My journaling reads:

How can a natural preserve become magical?
Easy.
Add a couple friends you like hanging out with.
A husband you’re in love with and the perfect springy weather.
Done.

I also added character to my photo, by applying texture digitally. As you can see below, the changes are very subtle but add to the general ambiance:

Preview - original and textured

Digital Tip – How To Add Magic With Texture Using Photoshop Elements

To add texture to your photo, all you need to do is to add layers and play with the blending modes.

  • Download the high definition texture files (or take pictures of textured materials yourself). In this photo I used a few texture files by Shadowhouse Creations.
  • Open the texture photos and with the selection tool picked, drag them over to your original photo (make sure you save it under a different name). The textured file should appear as a layer above your original picture’s layer.
  • Resize the texture file so it covers your photo, by dragging the bounding box to place.
  • The texture should now cover your entire document.
  • Next, go to the blending modes drop menu. It is placed right above your layers view, left to the opacity levels and is ‘Normal’ by default.
    Play with the mode. Start with ‘Overlay’ or ‘Soft Light’ modes. See what happens…
  • Play with the opacity.
  • Add a solid color layer by clicking on the ‘adjustment level’ button and choosing ‘solid color’. Lower the opacity and see what happens.
  • Explore and have fun!

Are you feeling the magic yet?

Share

How are you transforming the plain into magical? Share your thoughts by leaving a message.
Have you tried the texture technique? How did it work for you? Please let me know 🙂

Unleashing The Creative Child Within You