/** Font types */

Posts Tagged ‘template’

You Must Be Really Really Happy To Have Me – Playing With Templates

Monday, March 19th, 2012

scrapbook layout

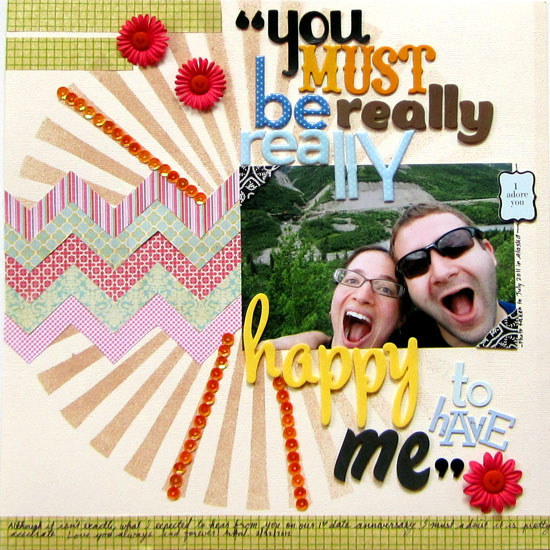
Admittedly, that was not what I expected to hear from my husband on our first-date anniversary but this witty, sarcastic and very vulnerable remark is extremely characteristic of him.

Truth be told, this blurb is pretty accurate – I am thrilled to have him in my life.

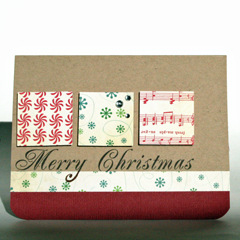
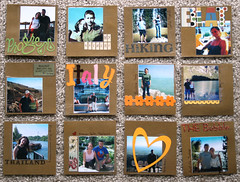
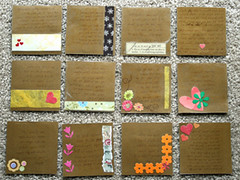
So I decided to dedicate a full 12″ by 12″ layout for it 🙂

Supply

How To

  1. First I laid out the large Starburst template so that the left edge of the pattern is aligned with the left edge of the background cardstock and sprayed on it, concentrating the mist to the left side. In retrospective, I should have protected the right and bottom exposed edges with some scratch paper…
  2. Then I took a few coordinating patterned papers and outlined the top 1 and 3 lines in the Mini Chevron template with a pencil, on the back of the patterned paper. Next I cut the pattern off – it’s all straight lines so no major scissor-cutting-deftness is required. Perfect for me.
  3. I then adhered the chevron strips, one by one, aligned to the left edge of the cardstock and placed the photo in a way that would conceal the mini starburst shape in the middle of the template.
  4. Next, I adhered the title with a bunch of different letter stickers, all vary in size/font/texture.
  5. I added a strip of washi tape for the journaling and to conceal the spray on the bottom of the page and added 2 more strips at the top left to balance it out.
  6. I then added three flowers and embellished them with a threaded button.
  7. For the finishing touches and to bring the yellowish orange color from the title I added 3 stripes of sequins. All I did was to put a line of liquid adhesive in the middle of 3 of the ‘rays’ and assemble the sequins in a line on it… Again, Pretty straightforward – just for me.


Unleashing The Creative Child Within You
Back when we were kids creativity came naturally to us. Everything was possible and our prolific imagination was the only limit we knew.
Through the years we have grown apart from our inner creative child and along with that – have lost our pristine and utter joy of creation.

In this e-book I will pave your way back to your inner creative child, brick by brick.

“Unleashing The Creative Child Within You” will explain why you became distant from your core creativity and will reveal the secret to getting it back.

With exercises designed specifically to help you find the inner child within you, regain its confidence and unleash it – you are bound to get your mojo back faster than you think.

Get “Unleashing The Creative Child Within You” for your Kindle
for only $4.99.

You can read the Kindle book on Kindle devices, on your smart phones or on your PC or MAC.

Super Quick Holidays Cards + Free Template (Update)

Saturday, November 21st, 2009

Super Quick Christmas Cards

Yesterday I posted a video tutorial and a free template on making super quick handmade cards for Christmas.

A reader has reminded me that some people may want to make handmade cards for other holidays, or for non-religious holidays, which is so true. I celebrate Hanukkah, for instance. Though I do send Christmas cards for my close Christian friends.

So I decided to make 2 more templates – one for Hanukkah and one for general holidays greetings for all of you to enjoy:

Enjoy!

I’d love to see the cards you’ve created, so please share.

Make Your Own Planner Workshop
Check out the new “Make Your Own Planner” workshop and you may solve this year’s holiday gift shopping problem. An affordable workshop that keeps on giving…

Creativiy Prompt – Super Quick Christmas Cards + Free Template

Friday, November 20th, 2009

Super Quick Christmas Cards

Sending handmade cards is a wonderful and well appreciated gesture, but with a recipients list as long as eternity, who has the time to make them?

What if most of the work was already done? The basic design has been laid down. The greeting has been “stamped” and all you had to do is cut, score, punch and paste? That would really give the push you need to accomplish your goal of sending handmade cards to all your acquaintances.

Search no more. I have sorted out your Christmas cards dilemma for this year.

Below you can find a printable template (PDF file format) that does most of the work for you. If you are interested, keep on reading.

Tools & Supply

How To


[Watch on You Tube]

Step-By-Step Instructions

  1. Print the template on a cardstock of your choice (8½” by 11″). Make sure your printer’s setting is on “No scaling”.
  2. Cut your cardstock at 5½” and score each half at 4¼”.
  3. Cut 1¼” by 1¼” squares from the patterned paper of your choice. Use a punch to make this step super quick.
  4. Adhere your patterned paper squares to the squares on the template, using dimensional foam adhesive.
  5. Either stop here, right a personal greeting inside and send the card OR embellish some more.

Quick Christmas CardsQuick Christmas Cards

Quick Christmas CardsQuick Christmas Cards

Share

If you have any question, suggestion or remark – don’t hesitate to contact me – either leave a comment here, use the contact form or start a new thread on the Creativity Prompt Flickr Group!!!

I would also be very happy to see your own creations, so don’t be shy and share 🙂

Make Your Own Planner Workshop
Check out the new “Make Your Own Planner” workshop and you may solve this year’s holiday gift shopping problem. An affordable workshop that keeps on giving…

Creativity Prompt – How To Make a Mini Album Case

Friday, April 10th, 2009

Mini Album Case It has been a while since I last designed a free template for you guys. Now it’s time to hone my limited Photoshop and reverse engineering skills and provide you with another free template. This time a template for a mini album case.

This case is perfect for a 3″ by 3″ album, for those important pictures you want to always carry with you in your bag…

I created an album, made out of 3″ by 3″ laminated cards, featuring the early days with Nadav – long before we even thought about getting married 🙂

If you feel like making a similar mini-album, or you have some other ideas for this cute little case, then stay tuned and keep on reading.

Tools & Supply

How To


[You can watch the video in HD on YouTube. While you’re there please rate & comment 🙂 ]

Step by Step Instructions

  1. Download the templates by clicking on the link at the supply list above and print the case template on cardstock and the lining template on a patterned paper. Make sure the printer’s settings are set to a letter size (8½” by 11″) and to borderless printing. Print on the back side (the smooth side of a textured cardstock and the wrong side of your patterned paper), so the lines won’t show on your finished project.
  2. Cut along all the solid lines with a craft knife and a ruler. Be careful not to cut any of the dashed lines. Finish off the curved parts with scissors, it’ll make a smoother cut along the curve.
  3. Score all the dashed lines with a stylus and a ruler.
  4. Fold all your score lines (You can use a bone folder for that).
  5. Cut along the solid lines of the lining template. You can use either scissors or a craft knife, whatever is closer you feel more comfortable with.
  6. Score along the dashed lines on the lining template and fold your score lines.
  7. Adhere your lining to the case template – make sure you are concealing the printer’s lines, which means your positioning is correct. Don’t be shy with your adhesive and apply a generous layer, especially on the edges and the score lines.
  8. Apply a strong adhesive tape to the small flaps and on the long flaps, on the right side of the template.
  9. Assemble the case and voila, it’s too easy 🙂

Few pointers regarding the mini album –

  1. Cut your cardstock to 3″ by 3″ squares (1 sheet of cardstock makes 16 squares).
  2. Adhere your photos and journal on the back.
  3. Laminate all your squares and cut the excess laminating material off.

    • Usually this type of albums gets handled often, not to mention it’s tossing and turning in your bag all the time. The laminating helps to keep the album more durable.
    • Use only flat elements on your cards so the lamination goes smoothly.

Different Views on the Project

Mini Album Case Mini Album Case

Mini Album Case Mini Album Case Mini Album Case
Mini Album Case Mini Album Case

[You can find all the photos on Flickr]

Share

If you have any question, suggestion or remark – don’t hesitate to contact me – either leave a comment here, use the contact form or start a new thread on the Creativity Prompt Flickr Group!!!

I would also be very happy to see your own creations, so don’t be shy and share 🙂

Giveaway reminder

You still have a chance to enter the drawing on Creativity Prompt for a $50 GIFT CERTIFICATE to Scrapbook.com. For more details on the giveaway click here.

Update

The contest is closed!

Creativity Prompt #23 – Cards & Envelopes Set

Friday, October 31st, 2008

Cards & Envelopes Set

Many of my most cherished creations are a result of a blunder of some sort. After I pass the self bashing stage I try to make something out of the error and sometimes the result is far better than what I have originally planned to do.

Last week I have posted a tutorial on making a mini album out of a single sheet of cardstock. The process of making this mini album involves alternating cutting lines. I was trying to use the paper trimmer for the cutting and got confused and mistakenly cut the cardstock in the same direction.

Following my mistake the muse came to visit… I decided to make a bunch of 3″ by 3″ cards instead and also created a matching Envelope Template.

So, without further ado, here is the tutorial:

Supply –

Instructions –

  1. Cut the cardstock into 4 strips of 3″ by 12″ and then cut each strip in half to two pieces of 3″ by 6″ cardstock. Fold each piece in half, lengthwise, to create a cute 3″ by 3″ card. You will end up with 8 cards from the single sheet of cardstock.
  2. Use a craft knife to cut a ¾” slit into each card’s spine and weave the ribbon through. Tie the ribbon into a square knot and repeat on each card. [You are completely free to embellish the card in whichever way you wish… Don’t feel obligated to the ribbon, it won’t be offended – neither will I 😉 ]
    Making the card
  3. Download the free envelope template and print it on a letter size paper (8.5″ by 11″). Cut the outline of the template. [You can either print it directly on the backside of the patterned paper or on a copy paper, which you can then cut and trace over the patterned paper – your choice].
    Cutting the patterned paper for the envelopes
  4. Score along all the dashed lines of the template and fold. Adhere the long flap to the small side-flaps with a tape runner (or a glue stick, if you prefer…).
    The completed envelopes

Easy, fun and adorable – my kind of a craft project 🙂

Enjoy!!!

If you have any question, suggestion or remark – don’t hesitate to contact me – either leave a comment, use the contact form or start a new thread on the Creativity Prompt Flickr Group!!!

I would also be very happy to see your own creations, so don’t be shy and share 🙂