/** Font types */

Posts Tagged ‘Digital Scrapbooking’

Holiday Greetings

Thursday, December 24th, 2009

To all my dear readers who celebrate Christmas today I wish a very merry Christmas. May your home be filled with joy and your day be merry and bright!

Let me share a layout I made with Shimelle Laine’s new digital kits, she has some fabulous new Christmas kits available at Two Peas In A Bucket:

At the Kitchen Table

[Font: Gulim; Shimelle kits: Penned Words: Dates; Wrap It Up Christmas Papers; Other kits: House of 3 – Heidi Swapp definitions + Rhonna Botanical Swirls]

Journaling Prompt – How Do You Tackle Everyday Chores?

Thursday, December 10th, 2009

How Do You Tackle Everyday Chores? Divide and conquer

[Digital products used: Fonts: Impact, Porcelain, Arial Rounded; Digital Kits: Shimelle Laine’s: Long and winding road and Starburst solids.]

Everyday chores – everyone has them and every person handles them differently.

Some hire help (which is what I used to do while I was working as a lawyer).

Some ignore them altogether until reality knocks on their heads (Been there. Done that).

Some tend to their household chores as a second nature (This is Martha Stewart’s group, if you’re intrigued…).

Some approach their chores in a declaration of war – I am on that group and I have a very rigid policy on the subject matter: Divide & Conquer!

Share

How do you tackle your daily chores? Leave a comment and share your trusted methods.

Make Your Own Planner Workshop
Do you have last minute gift giving challenges?

Check out the new “Make Your Own Planner” workshop and you may solve them…

For This I Am Thankful…

Thursday, November 26th, 2009

I am dedicating this post to you, my dear readers. I am grateful for you!

I am thankful for you following my blog.

I am thankful for you leaving heartfelt comments and messages – encouraging me and sharing your stories, your thoughts and sometimes even your struggles.

I am thankful for you spreading out the word through your personal blogs, Twitter and Facebook and sharing posts and ideas you like with your friends and followers.

I am thankful for your patience on weeks in which life happens.

I am thankful for your participation in my workshops and the lovely feedback you are leaving and warming my heart with.

I am thankful for your support in Creativity Prompt via buying the products you need through the links I provide.

I am thankful for you!

Thank you so much!

As a token of my appreciation I am giving you two printable files with labels and journaling tags (you can punch out the tags with a 2″ circle punch):

  1. Lables
  2. Circular Journaling Tags

[To download the files: either click on the links above OR right-click and opt for “Save Target as…” or “Save Link as…”; Print with no scaling on a letter-size cardstock or sticker sheet]

Photoshop Elements Tip – Adding A Hand Drawn Element

Here is how I added the hand-drawn flowers to my tags:

  1. Draw your elements with a black marker on a plain white paper.
  2. Scan your element in high resolution.
  3. Open the scanned file in Photoshop Elements.
  4. Press Ctrl+L or Command+L and tweak your levels, so the white is bright white and the black is pitch black.
  5. You can also use the eye-drop tool on the Levels Menu.
  6. Open a new layer beneath your scanned elements.
  7. With the Quick Selection tool select all the white areas and press Delete. Make sure you are working on the scanned elements’ layer. The checkerboard pattern means this part is transparent.
  8. Save the file as a PNG file – that will keep the transparency attributes.
  9. With the rectangle selection tool select the element you want to use and then press on the Move tool.
  10. Open the file you wish to insert the hand drawn element to, drag and drop your hand drawn element into the file you have just opened. Re-size as needed.

Happy Thanksgiving!

[Due to the holiday – and my limited access to my husband’s MAC… – there will not be a Creativity Prompt this week, but I have included the tutorial above, enjoy! ๐Ÿ™‚ ]

Make Your Own Planner Workshop
“Capture Your Dream” workshop is relaunching as a self-paced workshop. Isn’t it the perfect time for you to capture your dream and make it happen?


Make Your Own Planner Workshop
Check out the new “Make Your Own Planner” workshop and you may solve this year’s holiday gift shopping problem. An affordable workshop that keeps on giving…

Things I have Been Up To Lately…

Tuesday, November 24th, 2009

I want to share with you some things I have been up to lately.

  1. Make Your Own Planner WorkshopRelaunching. After receiving many requests from my readers I have finally set up a self-paced version of the popular workshop “Capture Your Dream“. That means that you can take the workshop at any time and start instantly. But isn’t this time of year the perfect time to make your biggest dream come true? I think so too.
  2. Creating. I have been busy making stuff, which means I have been busy being way too happy ๐Ÿ™‚ “Making Stuff” and “Happy” are synonyms in my book.

    I have been scrapooking:

    Autumn in Mountain view Digital Layout

    [Supply: Penned Words: Autumn By Shimelle Laine; Autumn Apples Polka Dot Papers by Shimelle Laine]

    and I have been making cards:

    handmade cardshandmade cards

    [Supply: Bazzill Kraft cardstock, Basic Grey patterned paper, Hero Arts Heart Winged Butterfly, Artistic Windows & Woodgrain Pattern; Glitz Designs Distress Kit 2 stamp set; Papertrey Ink Polka Dot Basics stamp set; Gems; Ribbon; Crop-a-dile; Eyelets; Corner Chomper; Versamark ink; Clear embossing powder; Heat gun; Rock Candy crackle paint; Pink + Aqua gel pen; Colored pencils; Blender pen; Palette Hybrid ink in Vintage Cream]

Share

What have you been up to lately? Leave a comment and share.

Make Your Own Planner Workshop
Check out the new “Make Your Own Planner” workshop and you may solve this year’s holiday gift shopping problem. An affordable workshop that keeps on giving…

Creativity Prompt – Make a Hybrid Board Book

Friday, November 13th, 2009

Hybrid Board Book
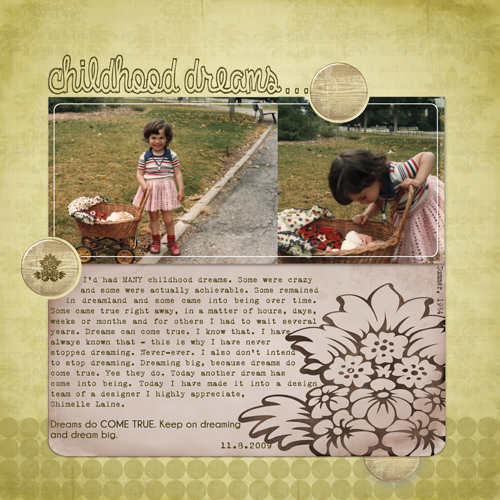
This time I revisit an oldie, but a goodie – the altered board book.

This week there is a twist – I am going hybrid.

That means that part of the book is designed digitally and part of it – traditionally. Together it’s a great mix of new & old.

Using digital elements, such as patterned papers, word art and other digital embellishments helps in keeping a theme and a color scheme for the book. If you want to make this book as a gift, in multiples, then starting on your computer also allows you to include all your journaling on the pages and then printing them either once or a million times, with no extra effort.

Cool, huh?

Tools & Supply

How To


[Watch on You Tube]

Step-by-Step Instructions

  1. Start this project on the computer. Open your photo editing software and either crop or resize the digital patterned papers to the same width and height of your board book.

    Don’t forget to count the spine while making the pages for the cover, leave a gap the same width as your spine between them.

  2. Print your pages on cardstock. Plain paper won’t be opaque over the altered pages of the board book.

    Use the borderless printing setting, otherwise the printer will scale down your images to allow a white border around them and it’ll distort your measurement.

  3. Start working on the cover – trim off the excess paper and score your spine’s fold lines to get crisp creases. You may also go over the folds again with the bone folder, for an even crisper look.
  4. Adhere the cover by applying a generous layer of glue stick on the board book cover and burnish with a brayer. Let dry.
  5. In the meantime, start cutting the pages and your photos and any other digital element you have printed (word art, embellishments, journaling tags, etc.)
  6. Once the glue has dried, turn your page around and cut off the excess with a very sharp craft knife. If you get uneven edges, you can file them down with sand paper.
  7. Repeat the same process with the rest of the pages: adhere, go over it with a brayer, let dry and trim off the excess.

    Make sure you trim off the edges of a page before adhering the printed cardstock to the other side.

  8. Some ideas for embellishing your mini altered book:

    • Adhere your titles with foam pop-dots to give some extra dimension.
    • Stick to one type of embellishment (buttons in my case) to maintain cohesion.
    • Use different sizes of pen tips to create interesting handmade word art.
    • Outline your pictures, letter stickers and other elements with your journaling pen to anchor them to the page and add dimension.
    • Using 3D embellishments can make dents in your photos, so make sure both pages have the same “elevation” so the elements won’t touch the pictures themselves.
    • Have fun!!!

Hybrid Board BookHybrid Board BookHybrid Board BookHybrid Board Book
Hybrid Board BookHybrid Board BookHybrid Board Book

Share

If you have any question, suggestion or remark – don’t hesitate to contact me – either leave a comment here, use the contact form or start a new thread on the Creativity Prompt Flickr Group!!!

I would also be very happy to see your own creations, so don’t be shy and share ๐Ÿ™‚

Make Your Own Planner Workshop
Check out the new “Make Your Own Planner” workshop and you may solve this year’s holiday gift shopping problem. An affordable workshop that keeps on giving…

Sweet Announcement – I Am On Shimelle Digitals Design Team

Thursday, November 12th, 2009

Shimelle Digitals - CupcakesI have no idea how I was able to contain myself until now, but I’ve made it somehow and now I can finally tell: I have joined Shimelle Laine‘s Design Team.

I will be doing both digital and hybrid projects, using Shimelle Digitals kits.

I love Shimelle. I have been a loyal follower ever since I took my first workshop with her: “Home Sweet Home” which was so awesome it almost immediately followed by another one: “My Freedom”.

I am thrilled to work with Shimelle’s fabulous kits alongside the extremely talented Baker’s Dozen, my teammates:

  1. Allison
  2. Anso
  3. Avital [Hey, it’s me…]
  4. Dolly
  5. Elisa
  6. Helen
  7. Karen c.
  8. Karen m.
  9. Kate
  10. Nadine
  11. Rani
  12. Sheri
  13. Yvonne

This is my first layout for Shimelle Digitals:

Childhood Dream Layout

In this layout I used only the Long and Winding Road Kit and Free Long and Winding Road Add On. Fonts: Clementine Script, VT Portable Remington and Berlin Sans FB; all available at Dafont.com.

Take a look at my teammates layouts (click on the links above) to see how they came up with 12 completely different and totally amazing layouts, all using the same kit!

I guess the possibilities are truly endless…

Keep your eyes open, I will be posting tutorials for some great hybrid projects using Shimelle Digitals kits.

Make Your Own Planner Workshop
Check out the new “Make Your Own Planner” workshop and you may solve this year’s holiday gift shopping problem. An affordable workshop that keeps on giving…