/** Font types */

Posts Tagged ‘Digital Scrapbooking’

Finally, A Breath Of Fresh Air And A New Layout

Saturday, July 31st, 2010

Celebrate Every Day

[Fonts: Helvetica, Adler; Digital Kits: Bazinga by Shimelle Laine and Digi Essentials by Karla Dudley.]

I took a personal challenge which took me away from my blog for a while. I had no time. No weekends. Almost no summer – but worse than all of that – absolutely no time, not even a few stolen minutes, to create.

Now I finally got my “freedom” and with it more time and a layout…

After a long pause in creating anything I feel rusty. I am not pleased with my layout but I am always giving myself permission to let go. Creating should be fun and not frustrating, so all the pressure gets tossed out and only the beautiful stories and enjoyment of the hobby get to stay in.

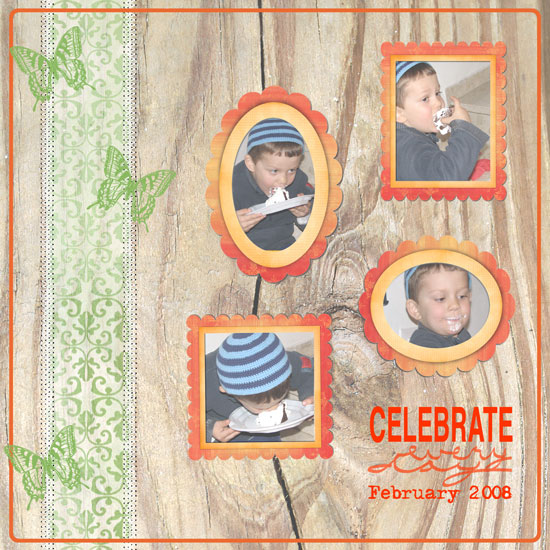
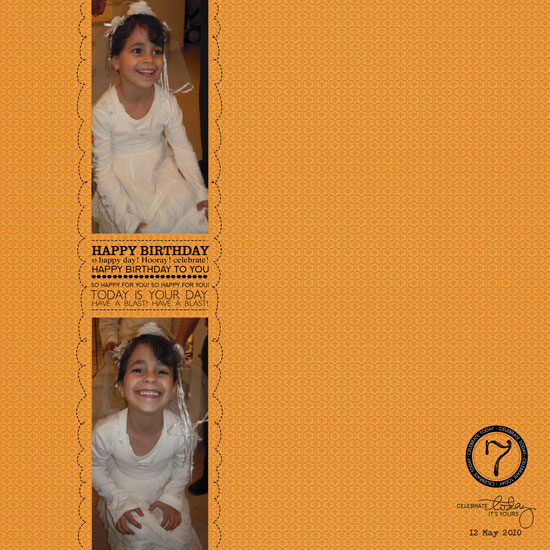
The important thing, in my opinion, is showcasing my nephew’s series of pictures that tells a story I remember fondly. The pictures remind me of that evening, celebrating his birthday on our first visit home after we have moved far away. I remember how he ravished the cake and enjoyed every little piece of it. A joy so pure, only a child knows how to experience it.

I don’t mind if the layout isn’t the prettiest of them all (what an understatement…) – at least I had a chance of playing with Shimelle’s fresh and summary kit, Bazinga.

Having said that, in a week and a half, my parents will cross the ocean and two continents to visit us here for the first time. They will stay with us for three weeks of much anticipated together time. Therefore I am not sure how steady will my posting schedule be, but I have so much planned. So many new tutorials, giveaways and a couple new workshops – so please be patient with me – I am sure you will be rewarded for that.

See you all real soon 🙂

Make A Wish – Journaling Prompt

Thursday, July 1st, 2010

Somewhere

[Fonts: Adler & FFF Tusj; Digital Kits:Bazinga by Shimelle Laine for Two Peas In A Bucket.]

Who said you can only journal about the past or only tell stories that actually happen…?

Try a different approach.

Make a layout which is all about what you WISH would have happened or will happen.

Make it as probable or as far fetched as you wish – as long as you are setting your wish-bone free…

My journaling reads:

Somewhere in a place far far away dreams come true. Somewhere up up in the sky there is a truth only the purest people can observe. Somewhere your look can be deciphered and your wishes are loud and clear. Somewhere. I wish it was here…

Share

To jump start your wishing process, share one wish with me?
What is the first wish that comes to your mind right now? Leave a comment and wish along with me.

Make Your Own Planner Workshop
Check out Creativity Prompt’s self paced workshop: “Capture Your Dream”. In this workshop you will capture, follow and make your dream come true as well as document your journey in a fabulous mixed media mini album.

Employ Your Sense of Humor – Journaling Prompt

Monday, June 14th, 2010

My Shoes Addiction

[Font: VT Portable Remington; Digital Kits: KD Sun Kissed (background paper + frame), KD Handwritten Summer (accent brush), KD Stamp Alpha (title), KD Digi Essentials (stitches) – all by Karla Dudley.]

As far as journaling is concerned stop being so serious about it. Not every story has to be a masterpiece worthy of a Pulitzer prize.

Your sense of humor is also a part you would probably like to preserve for posterity.

Humor is especially called for in layouts featuring photos you took to capture a moment in life, rather than an actual story, a piece rather than the whole. When you look at your layouts you can remind yourself of that humorous moment or silly piece of life and read your journaling and have a good laugh.

After all, what more can you ask from a layout than making you feel better at time of distress?

My journaling reads:

The first step to a successful recovery is admitting you have a problem. I admit no such thing! I have absolutely no problem. It is completely reasonable to have a shoe to match every piece of clothing you own. It is totally natural to covet each shoe you see and do not already possess. It is purely logical to assume that painting your toe nails and wearing high heal studded shoes is enough to be considered fully clothed. It is customary to wear red open toe 5 inch heal and a patent leather flower to go grocery shopping, oh and it is totally acceptable to wear flip flops to negotiation meetings. All shoes are created equal. Yes. I do not have any problem!
April 2010

Digi Tip

To create the “stitched” strike-through line over the word ‘addiction’ in my title I used various pieces of the stitches image. All I did was to select a piece of the image with the rectangular selection tool and than with the move tool, to pick up the selected piece and lay it down on the title, next to the original image, slightly down. Than I used the move tool to nudge it sideways and repeated the process with another piece of the image. That gives the illusion of the sewing machine running back and forth. Sort of…

Share

Do you use humor or sarcasm in your layouts? How? Please share with me and leave a comment.


Make Your Own Planner Workshop
Check out Creativity Prompt’s self paced workshop: “Capture Your Dream”. In this workshop you will capture, follow and make your dream come true as well as document your journey in a fabulous mixed media mini album.

Give Yourself Permission To Live Out Loud

Thursday, June 10th, 2010

Living Out Loud

[Font:Adler; Digital Kits: KD Sun Kissed (patterned paper and accent flowers), KD Digi Essentials (stitches), KD Digi Essentials (alpha brushes) – all by Karla Dudley.]

Today I ask you to please:

Give yourself permission to reach for the rainbow.
Give yourself permission to dream big and aspire to make all your dreams come true.
Give yourself permission to climb mountains and run marathons and lie by the beach with a book.
Give yourself permission to love truly and unconditionally and utterly.
Give yourself permission to be loved, appreciated and even admired.
Give yourself permission to laugh until you are in tears.
Give yourself permission to cry your heart out and go through an entire box of tissues.
Give yourself permission to wear nice clothes, wear make up and do your hair, even if you stay at home.
Give yourself permission to go to work in your flip flops, no make up and feel beautiful.
Give yourself permission to make silly faces.
Give yourself permission to express your thoughts and ideas.

Give yourself permission to live out loud.

Because any other way of living is a waste of time.

Share

What are you going to give yourself permission to do today? I urge you to share and hold yourself accountable to at least one token of loud living.

Unleashing The Creative Child Within You
Back when we were kids creativity came naturally to us. Everything was possible and our prolific imagination was the only limit we knew.
Through the years we have grown apart from our inner creative child and along with that – have lost our pristine and utter joy of creation.

In this e-book I will pave your way back to your inner creative child, brick by brick.

“Unleashing The Creative Child Within You” will explain why you became distant from your core creativity and will reveal the secret to getting it back.
With exercises designed specifically to help you find the inner child within you, regain its confidence and unleash it – you are bound to get your mojo back faster than you think.

Your inner creative child wants to come out and play, so don’t disappoint it and get “Unleashing The Creative Child Within You“.

Nip and Tuck Your Digital Brushes

Thursday, June 3rd, 2010

Celebrate Seven

[Font: Adler; Digital Kits: KD Happy Day & KD Digi Essentials 5 (the number 7) – all by Karla Dudley.]

I may be prejudiced but I think my niece has the brightest, most beautiful smile I have ever seen.

I’d send some celebrities over for a red carpet seminar if I could. I really would.

Anyways…

This is the third birthday that I have missed and I am forever grateful that my sister takes the time to take the pictures as well as send them my way. I value these pictures so much, in fact, that I always immediately try to put together layouts with the stories behind the photos. As I only live vicariously through these photos, the stories I can tell aren’t so long and detail oriented. I mostly just try to capture the moment visually – as I imagine it had been.

In this layout I used Karla Dudley’s new kit: KD Happy Day, almost exclusively (minus the digit ‘7’). On the right corner of my layout you may find a word-art image: “Celebrate today, it’s yours”. If you take a moment and look at the kit, you won’t find this image as it shows on my layout. Why? Because I had engaged myself in a minor digital surgery… Nipping the second part of the sentence and tucking it underneath.

Rearranging a digital image is basically the same as snipping a clear stamp off and repositioning its parts to conform to your design and needs (or inking up a different part of the stamp each time). Here is how to do that:

How To

  1. Open your image on Photoshop Elements. (If you are concerned about writing over your original image, use the ‘open as’ option.)
  2. Pick the rectangle selection tool and by clicking and dragging, choose the part you wish to sever. When you are done you will see the marching ants sign around the outline of the image. Make sure you haven’t accidentally picked any other part of the image. If you did – just choose it, while clicking the ALT/OPT key, to deselect.
  3. Make sure the layer of the image is selected – it will be highlighted if so.
  4. Pick the move tool and click and drag the part you have selected to its new place – it’s that easy. (You may also delete it altogether by clicking the DELETE key while it’s selected).
  5. Be careful not to get addicted and makeover your entire stash of digital images.

Share

Have you ever tried to alter your digital stash (or your traditional stash…)? Please, do share. Just leave a message and brag.

Make Your Own Planner Workshop
Check out Creativity Prompt’s self paced workshop: “Capture Your Dream”. In this workshop you will capture, follow and make your dream come true as well as document your journey in a fabulous mixed media mini album.

New Release – You Are Amazing by Shimelle Laine

Tuesday, June 1st, 2010

You are amazing

[Font: Adler; Digital Kits: You Are Amazing & Trip To Nature Papers – both by Shimelle Laine for Two Peas In A Bucket.]

Shimelle has released another fabulous page template with a matching woodgrain alpha set. I love this new kit, it’s funky, but still very linear and clean.

I made this page for my parents who keep living their lives for us and almost never taking time for themselves.
This photo was taken in one of the rare occasions they actually took the time…

I love them so much 🙂

Make Your Own Planner Workshop
Check out Creativity Prompt’s self paced workshop: “Capture Your Dream”. In this workshop you will capture, follow and make your dream come true as well as document your journey in a fabulous mixed media mini album.

Creativity Prompt – Flip Your Template

Thursday, May 27th, 2010

Mommy's Girl

[Font: Adler; Digital Kit: Count To Four by Shimelle Laine for Two Peas In A Bucket.]

Count To Four Kit Last week I used the Count To Four template and alpha kit as is, just tweaking the colors, adding a background paper and some accent flourishes.

This week I wanted to use the exact same template, which I really like, but to make it look completely different. I also had no more than a few minutes available to make it happen… Busy times.

Well, easy.

All I had to do was to flip the template [“image” => “rotate” => “90 degrees to the right”]. I also moved the text box and title around and ended up with a completely different layout with the same 2 Dollars template… Completed in about 15 minutes.

Does it get any easier than that?

It is really important to get the stories down before they are forgotten, but many times we just do not have the time to reinvent the wheel, come up with a great design and start from scratch. Using a template (or a sketch) is a great way to go about it, but there’s a limit to how many templates we can go out and buy, isn’t it?

So here’s a good way to utilize the template you already have (or the layouts you’ve already designed) – just flip them. Vertically, horizontally, sideways. Tweak them a bit here and there and get a fabulous completely new, well designed layout in a snap.

Share

Do you reuse loved layout designs? Please share your thoughts by leaving a comment.

My Little Princess Niece Is Seven

Tuesday, May 18th, 2010

Seven

[Fonts: Adler; Digital Kits: Count To Four (alpha and template) by Shimelle Laine, Color My World by Rhonna Farrer, KD Capture and Record by Karla Dudley.]

Shimelle has released a gorgeous new digital kit which includes a template, on which the layout is based on, and a set of pink alphas. So cute.

A template is just perfect when you have absolutely no time and you want to make a winning page. Just clip your photos in place, resize, perhaps recolor. Add your journaling, title and a couple elements to add a bit of yourself and voilà.

I really love this template because it looks like a layout I would have designed myself. The rectangles, the typewriter font, the accents. I love it. (I admit, if it was my layout it would probably align in a straight line – but that’s the beauty of working with templates. I try something new and fall in love with it).

Can you believe my niece is seven already??? She’s growing fast!

Share

Have you used a template or made a layout based on a sketch before? Please share by leaving a comment.

My Wedding Photo Book

Monday, May 10th, 2010

In less than a month, on June 4th to be exact, my husband and I will be celebrating our three year anniversary.

We got married in a Kibbutz in Israel, in a gorgeous garden in the woods and we also took some picture just before the ceremony at the village where Nadav’s parents are living – Addi.

I made a photo album just after the wedding, the day we got our photos from the photographer. I used a “custom made” program (the only one available at the time) where they offered pre-made templates and I just dragged the photos in and added the journaling.

When we moved to Dublin, Ireland – just a few months after our wedding, I left the photo book at my parents house. I didn’t want to ship it with all our belongings. Time have passed and in the meantime my parents got attached to the book and are treasuring it.

Just now, I finally took the time to make another photo album. This time I went for the “Digital Scrapbooking” option at Shutterfly, where you can design your own layouts with a photo editing software and control every single element that goes into your photo book. I love that idea.

I was working on my album for 20 hours in total (9 of which – sitting straight in front of the computer without getting up). Most of the time went for picking photos and writing all the journaling in reverse because Photoshop doesn’t handle Hebrew.

For a cohesive look I chose a color palette: Gray (#333333), Orange (#FF6600) & Kraft (from KD Capture and Record kit). I chose a bunch of digital kits that match the color palette and the idea behind the book (For instance, the stitching represents the connection between my husband and i). Clearly I went for Karla Dudley’s kits. I used: KD Digi Essentials, KD Digi Essentials 2, KD Jillian, KD Spring 10, KD Chesca, KD Blakely, KD Tweet, KD Capture and Record and KD Fly Girl.

If you want to take a peek at my finished book, you can do it here.

Have you used the Digital Scrapbooking option on Shutterfly? Have you used another service? Please share.

Think Outside the Box – Literally + Selective Coloring With Photoshop Elements

Thursday, May 6th, 2010

One way to get out of a creative rut is to use our stash – not as intended…

Use a “girly” collection for a boy’s layout or vice versa [as I did below].
Use a Christmas collection for a 4th of July layout.
Use a travel collection for a wedding.
Use patterned paper as a background and plain cardstock as an accent.
Use paper flowers as journaling blocks.
Use a winter themed paper for a summary layout.

Just ignore what the “box” says and create.
Free your mind.

In this layout I used Karla Dudley’s new kit KD Fly Girl for a manly layout of my husband shooting hoops at the beach:

i Heart you

[Fonts: Marketing Script, VTPortableRemington; Digital Kits: KD Fly Girl by Karla Dudley.]

And in this layout I used Karla’s KD Fly Boy kit to create a girlie-girl layout featuring my princess niece:

Believe

[Font: Rough Typewriter; Digital Kits: KD Fly Boy by Karla Dudley.]

Photoshop Elements Tip – Selective Coloring

On my “I heart You” layout I turned my photos to black and white (by de-saturating them) and kept just the vibrant yellow color of the ball.

The azure sky and turquoise ocean are beautiful, but they are distracting from the story I want to tell.

By removing the color of everything but the ball – I am drawing attention to it and hinting that the focus of my story is there.

There are 3 ways to get that look – choose the one most comfortable to you:

Method 1

  1. Duplicate the photo’s layer (press CTRL+J on a PC or CMD+J on a MAC).
  2. Make sure your upper layer is highlighted and de-saturate the colors all the way to the left (press CTRL+U on a PC or CMD+U on a MAC).
  3. Make sure your upper layer is highlighted and choose the eraser tool (work with the default circular brush). Lightly erase just the object whose color you’d like to retain.
  4. Merge both layers when you’re done.
  5. [P.S. This is also how I “colored” the heart red on the kit’s PNG file.]

Method 2

  1. Duplicate the photo’s layer (press CTRL+J on a PC or CMD+J on a MAC).
  2. Make sure your upper layer is highlighted and de-saturate the colors all the way to the left (press CTRL+U on a PC or CMD+U on a MAC).
  3. Make sure your upper layer is highlighted and choose the Quick Selection Tool. Click on the object whose color you wish to retain until it is highlighted completely by the marching ants. If you “slip” just unselect by pressing ALT on a PC or OPT on a MAC while simultaneously clicking on the part you don’t want selected.
  4. Press delete.
  5. Merge both layers together.

Method 3

  1. Choose the Quick Selection Tool. Click on the object whose color you wish to retain until it is highlighted completely by the marching ants. If you “slip” just unselect by pressing ALT on a PC or OPT on a MAC while simultaneously clicking on the part you don’t want selected and duplicate your selection (press CTRL+J on a PC or CMD+J on a MAC).
  2. Deselect (press CTRL+D on a PC or CMD+D on a MAC)
  3. Make sure your lower layer is highlighted and de-saturate the colors all the way to the left (press CTRL+U on a PC or CMD+U on a MAC).
  4. Merge both layers together.

Share

Are you using your stash in an untraditional way? Please share your ideas/ projects with us.