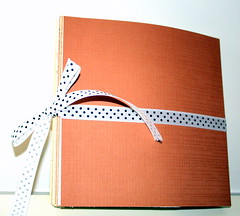
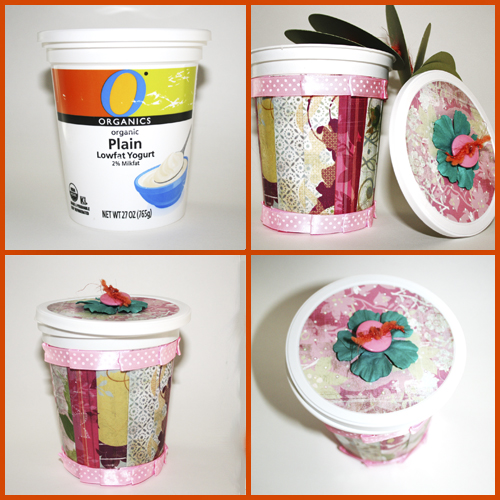
Being environmentally friendly is important to me. It is actually very selfish of me, as I want my posterity to enjoy mother earth as long as possible. Therefore on one of my very first creativity prompts I have shown you how to turn your trash into treasure.
This week I am revisiting this idea and I am going to show you how you can upcycle an empty yogurt container, just before it hits the recycle bin, and make a beautiful surprise mini album with it. If you are not a big fan of mini albums in boxes, you can stop half way through and make a lovely pencil (or brushes…) holder from it.
So if you are interested in turning your trash into treasure too, keep on reading.
[The fabulous music is by Josh Woodward from his album: “Not Quite Connected”]
Step By Step Instructions
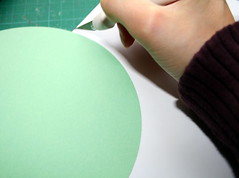
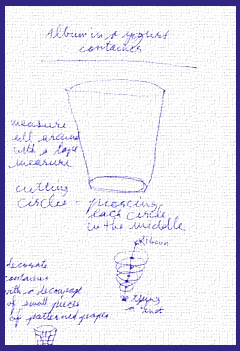
Measure the lid’s diameter with a ruler.
Cut a circle from your patterned paper in the same diameter.
Adhere the patterned paper circle to the lid with Mod-Podge and seal with another generous layer of Mod-Podge on top. Let dry completely.
Cut a bunch of patterned papers to the same height as your container and a 1″ width. [mine are 4″ by 1″]
Adhere the strips to the container – one by one – using Mod Podge. To eliminate air bubbles, rub each stripe with your finger. It’s messy, but important to secure your paper strips to the plastic container.
Seal your strips of paper with another generous layer of Mod Podge and put aside until it dries completely.
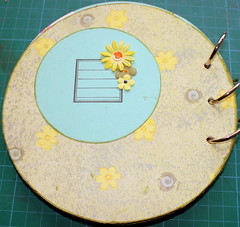
Measure the diameter of the bottom of your container to figure out the smallest size of a circle that can fit into your container.
Cut as many cardstock circles as the number of pages you wish to have in your mini-album. The circles vary in size whilst the smallest has the same diameter as the container’s bottom and the largest has the same size as the container’s lid.
To find the center of the cardstock circles, cut some more circles from scrap paper, at the same size as your cardstock ones. Fold each scrap paper circle once vertically and once horizontally and mark the point of conjunction. This point is exactly at the center.
Use the scrap circles as a template and punch a hole at the center of each cardstock circle.
Cut a long strip of strong decorative string and fold in half.
Make a knot at the fold (with the two long string edges coming out of it).
Weave both edges of the string through the circles. Secure each circle with a knot and add another knot between each circle, at about 1″, as a spacer.
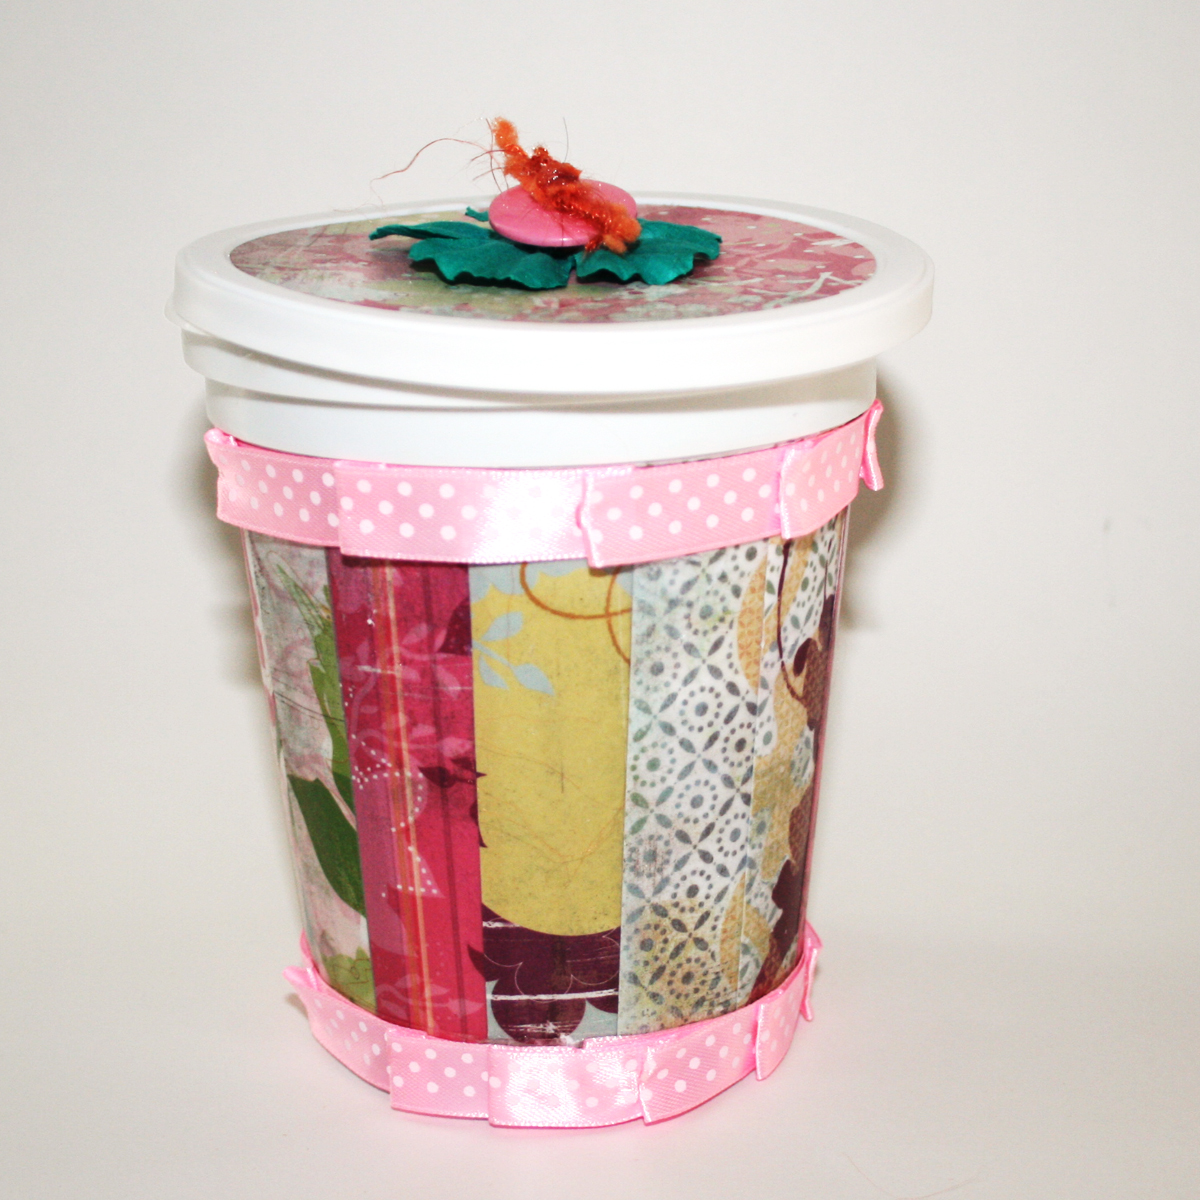
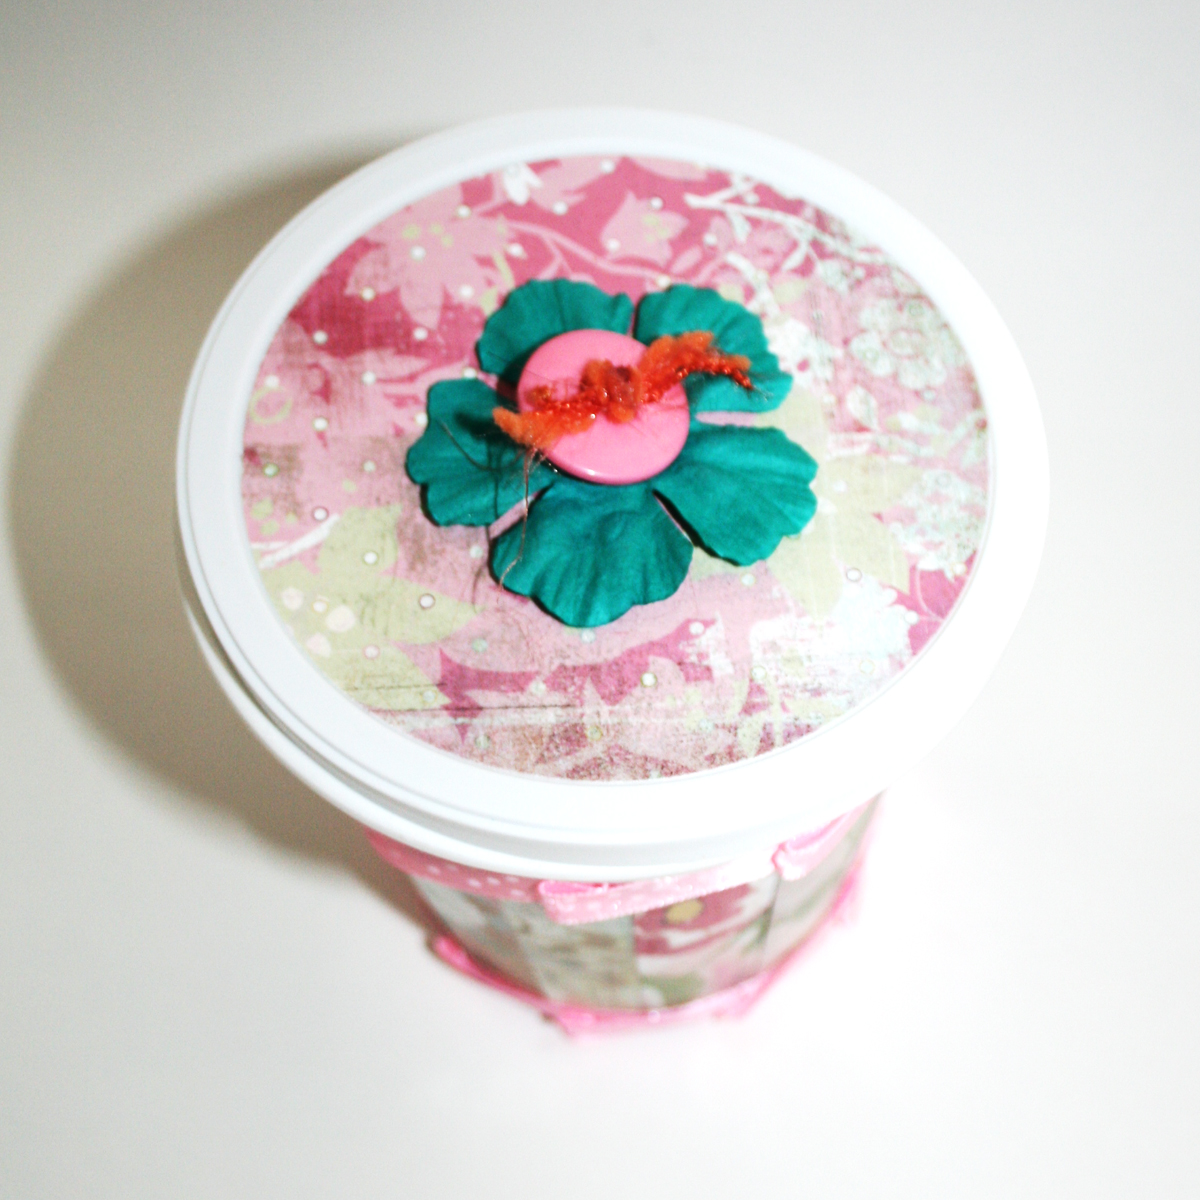
Punch a hole at the center of the lid and apply Diamond Glaze (or any other strong liquid adhesive) to the inside of the lid.
Thread the ends of the string through the hole and make sure the top cardstock circle gets stuck well to the inside of the lid.
To finish off the lid, thread the ends of the string through the paper flower and the button and secure in a knot. Dab some diamond Glaze on the knot to make sure it stays put.
Cut a piece of ribbon that circumscribes the top of your container. Apply a strong tape adhesive to the back of the ribbon and adhere to the top edge of your container. Repeat on the bottom of your container. This will finish off the edges.
For a more cohesive look, add a second strip of ribbon (about 1½ times the circumference of your container) and then adhere to the edges with glue dots, while pleating the ribbon at each 1″. Secure each pleat with a glue dot.
Variation – You can skip steps 1-3 & 7-16 and make a quick and easy pencil holder instead…
How Ideas Become Creativity Prompts…
A page torn from my bedside journal:
Share
If you have any question, suggestion or remark – don’t hesitate to contact me – either leave a comment here, use the contact form or start a new thread on the Creativity Prompt Flickr Group!!!
I would also be very happy to see your own creations, so don’t be shy and share 🙂
If you liked this post you may want to subscribe to my feed:
There are days in which I want to color the world around me in the colors of the rainbow. Days in which some “pick me up” color treatment wouldn’t hurt. Do you also have days like these sometimes? If so, then I have the perfect project: A rainbow colored mini album with an accordion fold spine and to finish things off, it is covered in a soft fun foam. (Is it wrong to cuddle with your mini-album? I am not sure I want to hear the answer…)
So if you want to learn how I made this cutie, stay tuned and keep on reading:
Cardstock. [You will need a total of five 4″ by 8″ pieces. A sheet of 12″ by 12″ yields 4, but in order to make this mini colorful, you’ll need 5 different colors – your choice].
To make your spine, cut your cardstock at: 4″ by 8″.
Score the cardstock at 1½” on each side and then every ½” in between the initial score lines.
Fold all your score lines in an accordion fold. That means a “mountain” fold (folding down) is followed by a “valley” fold (folding up). Make sure your creases are sharp by burnishing them well with the bone folder.
Cut the 5 cardstock signatures – 4″ by 8″ each. Score them at 4″ and fold in half.
Attach the signatures by applying a strong double-sided tape adhesive to each of the ½” folds. Apply the adhesive as close as possible to the crease but not directly on it. Apply some additional tape adhesive runner to all 4 inside edges of the signatures and attach to the spine. “Hug” each “mountain” fold in the spine with 1 signature.
For the cover cut your fun foam at 4½” by 12″.
Lay down your signatures on the fun foam and make sure you have enough room to cover them and then start marking the remaining flap, as follows:
Find the middle (lengthwise) and make two pencil marks – ½” downward and upward from the middle [That is going to help us create a 1″ flap in the middle].
With a T-Square ruler, draw lines that connect the edges with your tick marks – both lengthwise and widthwise.
Cut out the outer rectangles with your scissors.
Attach the signatures to the cover with a strong double-sided tape adhesive.
Attach your Velcro to the flap. I always attach the corresponding Velcro pieces together and remove the backing from both of them. Adhere one side to the flap and then close it – that adheres the corresponding piece of Velcro at the perfect spot on the cover.
Share
If you have any question, suggestion or remark – don’t hesitate to contact me – either leave a comment here, use the contact form or start a new thread on the Creativity Prompt Flickr Group!!!
I would also be very happy to see your own creations, so don’t be shy and share 🙂
Surprisingly felt costs less than cardstock. How strange is that? Michael’s offers letter size pieces of felt in many vibrant colors for only 30 cents a piece. Regardless of its price, felt adds so much more to a project than a simple piece of cardstock. It adds softness, texture, cuteness and a dash of “je ne sais quoi” that makes everything better.
For this week’s creativity prompt I teach you how to make this cutest little felt mini album. If you feel like making one, stay tuned and keep on reading.
Cut from your cardstock 1 big oval and 5 ovals which are ¼” smaller then the first one. The big oval will be used as a template for your felt pages and the smaller ones will be used to support the felt pages and make them more durable.
Take your largest oval and lay it down on your felt. Trace around it with a marker. You will need 10 felt ovals for a 5-pages album.
Cut your felt ovals out.
Note: for the sake of this tutorial, I have skipped this step – which is the main one => Now it’s time for you to create your beautiful felt album pages. Make use of the felt’s special qualities. Embroider on it. Sew your pictures and patterned paper onto it (just pierce them first with an awl). Add buttons, flowers and other pieces of fabric with a needle and a thread. Be creative!!! All the back stitches will be covered in the next step.
“Sandwich” each 2 felt pages with 1 cardstock “core”. Adhere the felt pages temporarily with a tape runner.
Sew all around the edges of the felt “sandwich”. Make sure you don’t sew through the cardstock.
As you will not be able to conceal the edges of your embroidery floss, thread them through a button and tie in a knot. this way you can secure your stitching and add a decorative finishing touch at the same time. (Tip: Add a tiny bead of diamond Glaze to your knot to prevent it from fraying later on.)
Punch a hole at the top of each oval “sandwich” and set an eyelet in it. The crop-a-dile works the best. (as you can see on the video, I was trying to use a Provo Craft’s eyelet setter too and it was too hard to poke through the 3 layers of felt and cardstock).
Thread your ribbon (or book binding ring) through the eyelets (Tip: Cut the ends of the ribbon in a sharp angle to make the threading easier), make a cute knot and enjoy your fuzzy mini-album.
Share
If you have any question, suggestion or remark – don’t hesitate to contact me – either leave a comment here, use the contact form or start a new thread on the Creativity Prompt Flickr Group!!!
I would also be very happy to see your own creations, so don’t be shy and share 🙂
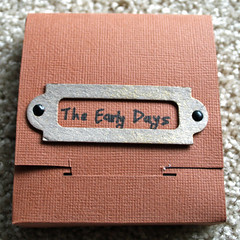
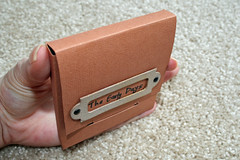
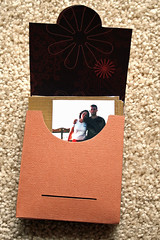
It has been a while since I last designed a free template for you guys. Now it’s time to hone my limited Photoshop and reverse engineering skills and provide you with another free template. This time a template for a mini album case.
This case is perfect for a 3″ by 3″ album, for those important pictures you want to always carry with you in your bag…
I created an album, made out of 3″ by 3″ laminated cards, featuring the early days with Nadav – long before we even thought about getting married 🙂
If you feel like making a similar mini-album, or you have some other ideas for this cute little case, then stay tuned and keep on reading.
[You can watch the video in HD on YouTube. While you’re there please rate & comment 🙂 ]
Step by Step Instructions
Download the templates by clicking on the link at the supply list above and print the case template on cardstock and the lining template on a patterned paper. Make sure the printer’s settings are set to a letter size (8½” by 11″) and to borderless printing. Print on the back side (the smooth side of a textured cardstock and the wrong side of your patterned paper), so the lines won’t show on your finished project.
Cut along all the solid lines with a craft knife and a ruler. Be careful not to cut any of the dashed lines. Finish off the curved parts with scissors, it’ll make a smoother cut along the curve.
Score all the dashed lines with a stylus and a ruler.
Fold all your score lines (You can use a bone folder for that).
Cut along the solid lines of the lining template. You can use either scissors or a craft knife, whatever is closer you feel more comfortable with.
Score along the dashed lines on the lining template and fold your score lines.
Adhere your lining to the case template – make sure you are concealing the printer’s lines, which means your positioning is correct. Don’t be shy with your adhesive and apply a generous layer, especially on the edges and the score lines.
Apply a strong adhesive tape to the small flaps and on the long flaps, on the right side of the template.
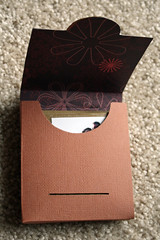
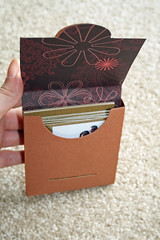
Assemble the case and voila, it’s too easy 🙂
Few pointers regarding the mini album –
Cut your cardstock to 3″ by 3″ squares (1 sheet of cardstock makes 16 squares).
Adhere your photos and journal on the back.
Laminate all your squares and cut the excess laminating material off.
Usually this type of albums gets handled often, not to mention it’s tossing and turning in your bag all the time. The laminating helps to keep the album more durable.
Use only flat elements on your cards so the lamination goes smoothly.
If you have any question, suggestion or remark – don’t hesitate to contact me – either leave a comment here, use the contact form or start a new thread on the Creativity Prompt Flickr Group!!!
I would also be very happy to see your own creations, so don’t be shy and share 🙂
You still have a chance to enter the drawing on Creativity Prompt for a $50 GIFT CERTIFICATE to Scrapbook.com. For more details on the giveaway click here.
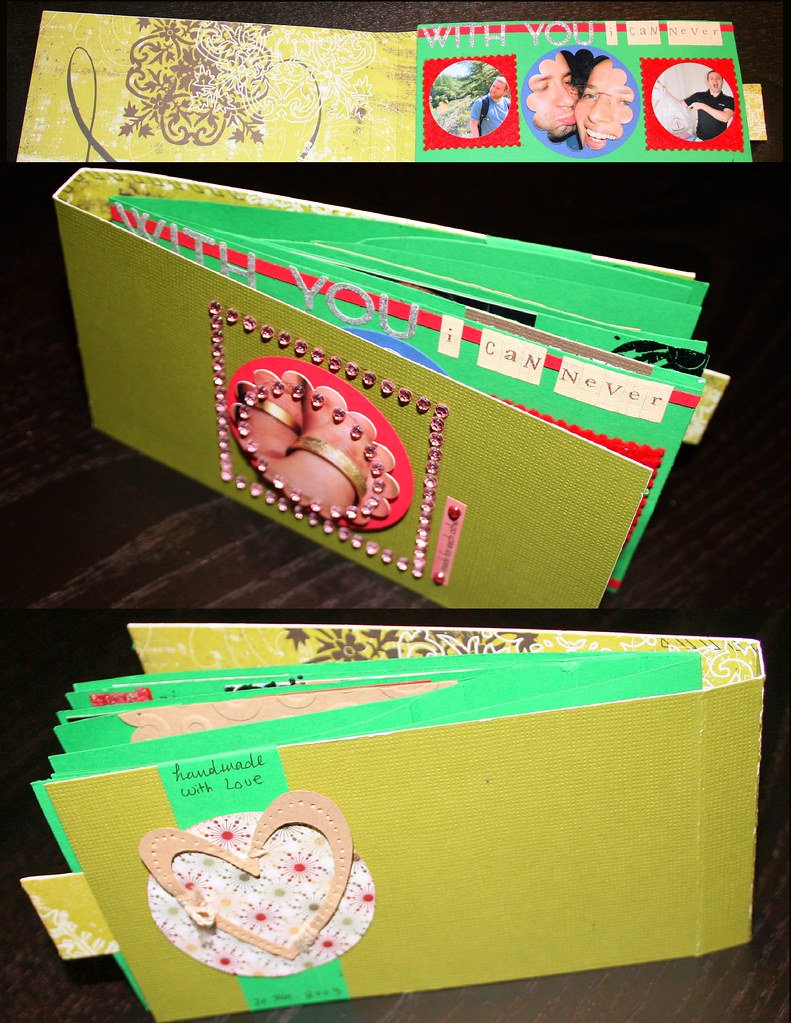
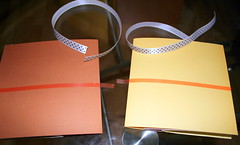
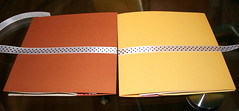
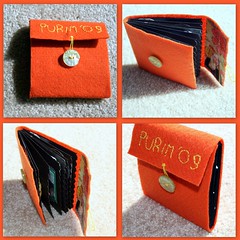
One of the hardest things in living far away from your family is being absent from family gatherings during the holidays. Purim is one of those occasions. The kids are wearing their costumes and the general atmosphere is one of joy and festivity. This Purim I wasn’t able to join my family, but I wanted to create a mini album that I can carry around so at least I will be near the photographed memories…
To capture the holiday spirit, I designed a mini album which is covered in felt and has some embroidery details on its cover, as well as a decorative edge to all the signatures inside. This mini album is in fact a dressed up version of the 10 minute mini book tutorial. I guess my minis want to dress up for Purim – who am I to stop them?
The felt cover protects the album, but also provides softness that makes you want to caress it… A feeling which goes hand in hand with the cute pictures of my nephews and niece: Superman, the Bride, Robin Hood and the Knight In Shining Armor…
If you want to make one for yourself or as a gift to a loved one, keep reading…
Cut your cardstock at 9″ by 4″. (If you want to give up the scalloped edge, or to simply round up the corners, you can cut your cardstock at 8″ by 4″ and score at 4″ instead).
Score your cardstock at 4½” and fold in half. Use a bone folder for a crisper crease.
Align the edges of each closed signature with the tick marks of the border punch. Make sure the ends are placed at the same tick mark on both sides. Punch firmly and repeat all across the edge. If you are more cautious about your [EXPENSIVE] punch, or if your signatures are made of heavy-weight cardstock, you can punch each edge individually, as long as your alignment is precise. It will just take longer.
Attach the signatures together with glue stick. Again, take special care at aligning the scallops together. Use a brayer to insure a strong hold.
Let the signatures dry while they are spread wide open to make sure they won’t get stuck together.
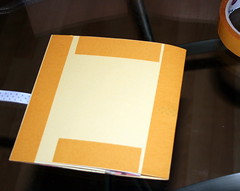
Measure and cut a stripe of felt. Use the signatures for measuring. Just pencil in a tick mark a little bit above the height of the signatures and cut along with sharp scissors. (~4¼” by 11½”).
Figure out the placement of your flap using the signatures. Note that the spine adds some dimension. After finding the right placement, pencil in your title and embroider over it using a backstitch.
After finishing your title design, use the remaining embroidery floss to create a loop in the middle of the flap. Thread your embroidery floss horizontally and allow a loop to form, then secure its ends. Don’t worry about the backside of the flap, as it’ll be covered later.
Use the signatures to find the placement of the flap on the felt cover when closed. Allow some room for adding dimensional elements to the album’s pages. Sew a button in correlation to the loop you have just added to the flap.
Measure and cut a piece of patterned paper and glue on the flap to conceal the embroidery’s backside. Use a brayer to insure a strong hold. (~4″ by 2″.)
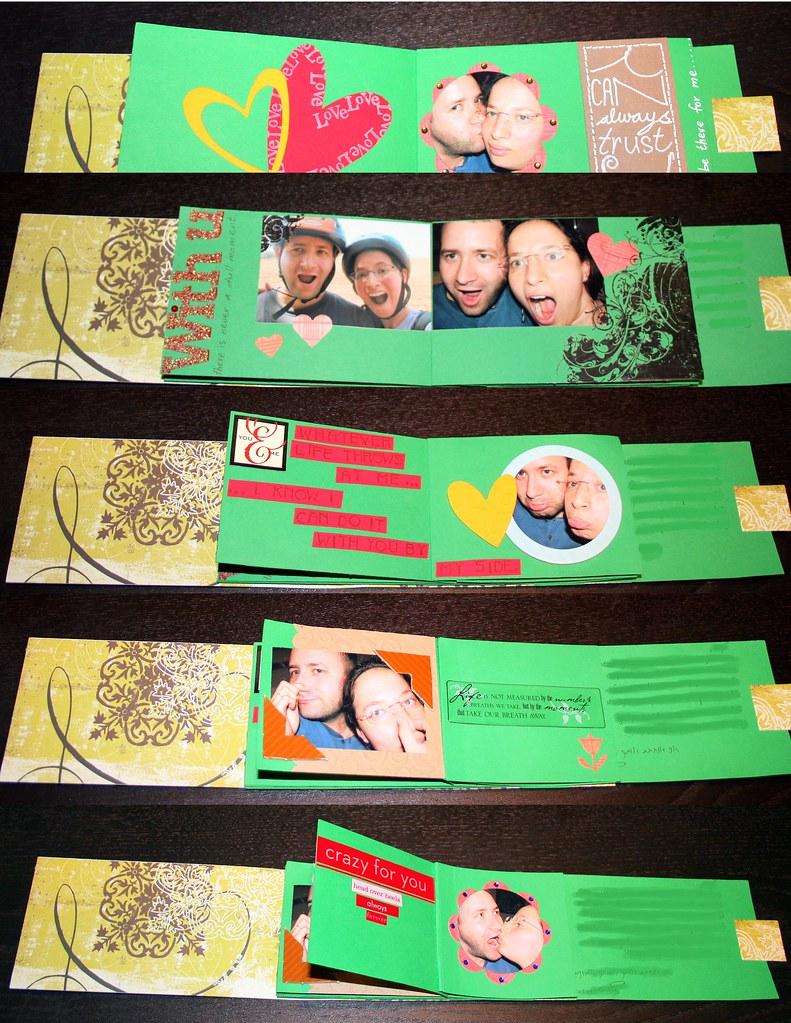
Attach the signatures to the felt with glue stick, let dry and start playing with the inside pages 🙂
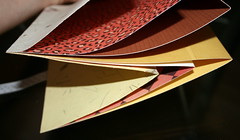
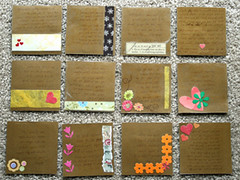
Here is a glimpse to all the inside pages of my mini album:
[Click on the photo for a closer view]
Share –
If you have any question, suggestion or remark – don’t hesitate to contact me – either leave a comment here, use the contact form or start a new thread on the Creativity Prompt Flickr Group!!!
I would also be very happy to see your own creations, so don’t be shy and share 🙂
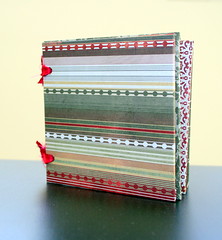
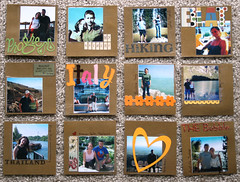
For this week’s Creativity Prompt I have a fun little project for you – The Waterfall Mini Album. It’s a whimsical album that showcases your treasured memories in a playful way.
I have seen a couple of these mini-albums online but non had provided any instructions for assembling it. Therefore I have reversed engineered this album by trial and error with copy paper, until I managed to get it right. It ended up looking nothing like the ones I have seen online, but I love it and I can call it ‘mine’.
Now you can learn from my mistakes and have the full proof way of making your own waterfall mini-album…
Tools & Supply –
[For a closer look, click on the photo]
Click here for more details on my basic tools and supply.
[The great music is by: Josh Woodward from his album: Only Whispering.]
More peeks –
[For a closer look, click on the photos. I have erased the private letter to my husband]
Enjoy!!!
If you have any question, suggestion or remark – don’t hesitate to contact me – either leave a comment, use the contact form or start a new thread on the Creativity Prompt Flickr Group!!!
I would also be very happy to see your own waterfall mini albums, so don’t be shy and share 🙂
Some more feedback on the videos is welcomed!!! (Don’t forget to rate & comment on YouTube. If you feel like it… 😉 )
After long deliberations with myself (I admit. I have those.) I have decided to go ahead, roll up my sleeves and make a video tutorial. I have chosen to make a project similar to a former creativity prompt – a mini album I have prepared from a recycled cardboard box, for my nephews’ and niece’s photos.
I hope you will enjoy this tutorial and that the instructions are clear enough. However, bear in mind that this is my first attempt at a video tutorial, so it’s a bit rough around the edges (and then some). Therefore I would be much appreciative for any feedback – good and bad, so I can apply it to my next videos.
Covering the cardboard (which is the same as covering chipboard) with patterned paper is a step which is repeated in many creativity prompts. So it’s good to have it “on tape” for you to see the way I am going about it. I believe that even in poor quality, a video is more explanatory than a photo.
This week’s creativity prompt is brought to you in a video form… Enjoy!
[To watch in high resolution, go here and press the link below the video]
The song on my video was made and performed by my brother in law and his friend while they were still in high-school. I was amazed at their talent and I would like to know what you’re thinking as well 🙂
Enjoy!!!
If you have any question, suggestion or remark – don’t hesitate to contact me – either leave a comment, use the contact form or start a new thread on the Creativity Prompt Flickr Group!!!
I would also be very happy to see your own creations, so don’t be shy and share 🙂
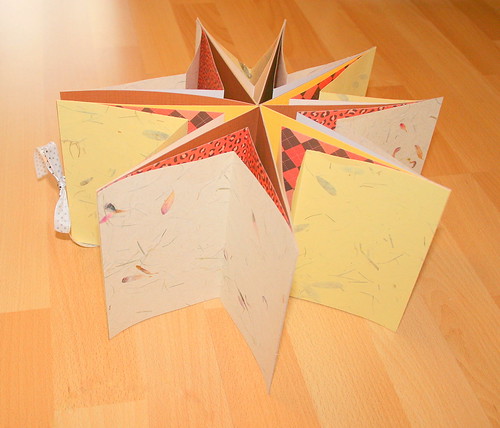
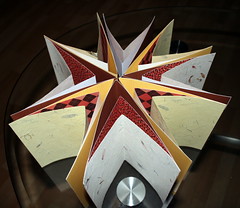
The star album has a strong “WOW” factor as it opens, but it is actually very simple to make one. The secret is in the graduating width of the partitions. For a step by step instructions on how to make this album, keep on reading:
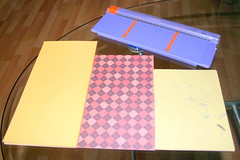
8 pieces of 6″ by 12″ cardstock (just cut your cardstock in half).
8 pieces of 6″ by 10″ patterned paper.
8 pieces of 6″ by 8″ patterned paper.
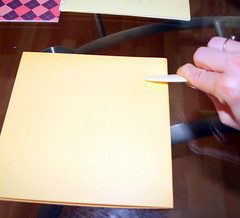
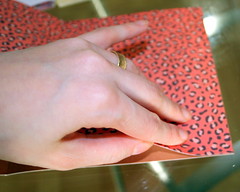
Fold each piece in half, along its long edge, and burnish well with a bone folder.
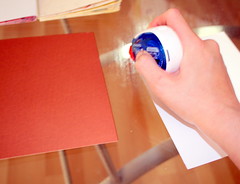
Apply adhesive to the 6″ edges of the patterned papers.
Then attach the partitions together –
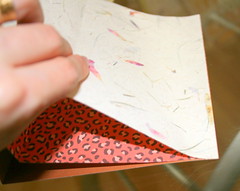
First, attach the 6″ by 10″ patterned paper to the 6″ by 12″ cardstock.
Then attach the 6″ by 8″ patterned paper to the 6″ by 10″ one.
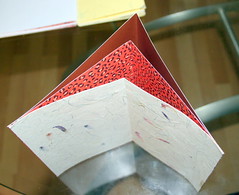
You should end up with this shape –
Now repeat, until you’ve got 8 “legs” for building the star.
After you finish adhering the star’s “legs” – assemble it on your desktop, to make sure everything works well together and to guide you through the next stages.
Pick 2 adjacent “legs” randomly (they are going to become the cover of your album) and apply a double sided tape strip along their midsection.
Note that the adhesive’s strip is bulging out of the creased edge – this is done in order to tuck-in the edges of the ribbon for an elegant and more finished looking closure. Just wrap the access adhesive’s strip over the crease and attach the ribbon to it.
Next, pick one of the outer “legs” and start attaching each 6″ by 6″ partition to the adjacent one.
This is when assembling the star’s shape in advance is going to come in handy.
Repeat the last stage, until you finish attaching all the star’s partitions to each other. Make sure not to attach the partitions with the ribbon to each other…
A glimpse at the star album while it’s closed:
Enjoy!!!
If you have any question, suggestion or remark – don’t hesitate to contact me – either leave a comment, use the contact form or start a new thread on the Creativity Prompt Flickr Group!!!
I would also be very happy to see your own star-album creations, so don’t be shy and share 🙂
I love making my own mini-albums. The handmade album is unique and filled with love and attention.
By definition, the handmade album is going to be a “one-of-a-kind”, even if you make a hundred of them – because as long as it is not mass produced by machines it is going to turn up a wee-bit different each time you make it.
Apart from the handmade album’s singularity, there are two more things that make me happy about making my own mini-albums:
Recycling. By making my own albums (and journals) I get to reuse stuff that otherwise would go to the bin and clutter the world… I can recycle boxes, notepads covers, chipboard which is used for flattening shirts and linens in their packaging. I get to literally turn trash into treasure, and I LOVE it.
Flexibility. When I am making something from scratch I am the one setting up the rules. I decide what shape it’ll be (or that it is going to be made out of multiple shapes). I decide what size is it going to be (or multiple sizes – to fit my own personal needs). I decide which materials I am going to use (hence the opportunity to recycle). I am the boss 🙂
In this week’s creativity prompt, I am calling you to use your flexibility and create a circular mini-album for yourself or as a gift for a loved one.
(for embellishing your album you can use whatever you have in your stash – patterned paper, paper flowers, buttons, glitter, ribbon etc. The sky is the limit when it comes to embellishments. You can be creative and do some recycling for creating your embellishments as well…)
Instructions –
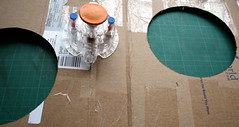
Start by making the album’s cover. Cut 2 circles from a cardboard box (mine are 6″ in diameter). Because of the thickness of the cardboard, the circle cutter won’t go all the way through, but it’ll help you in creating a nice groove that you can follow cut all the way through with either the utility scissors (very sharp) or the craft knife.
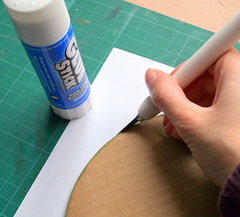
Next you need to cover the cardboard circles with patterned paper. Apply a generous amount of glue with your glue stick and stick each of the cardboard circles to a sheet of patterned paper. Then flip it over and cut the excess of the paper with either the utility scissors or your craft knife (what ever works better for you).
Alternatives: you can paint the cardboard with acrylic paints and a sponge brush or cover it with modge-podge or leave it as it is for a natural-recycled look.
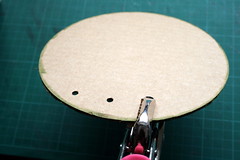
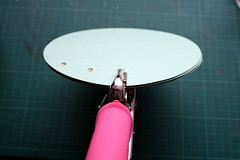
Punch the holes for your album with the trusty Crop-a-Dile. Make sure your hole is no farther than a ¼” from the edge, otherwise the pages of the album won’t turn easily (I’m speaking from my own experience here… You can see that in the picture below).
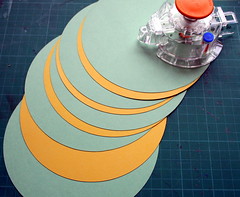
Cut the insert circles from your cardstock, using the circle scissors again. You can cut them a little bit smaller than the covers. You may use multiple colors of cardstock to make it more interesting visually.
Next punch the holes in your inserts. Use your punched covers as a guide and trace the holes lightly with a pencil. Using the Crop-a-dile, you can punch all your pages at ones to make it quicker and to insure even lining. (Don’t forget the ¼” rule from step 3 above!!!)
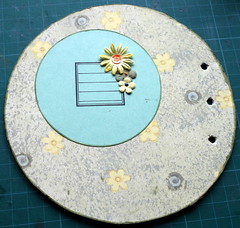
It’s time for the fun part – embellish!!! You can cut any excess by flipping the circle over and use your utility scissors or craft knife.
When all your album pages are done, thread them through with the loose leaf rings (you can also use ribbon or thread as an alternative binding method).
Share –
I would love to see your own interpretation to the circular mini-album.
Share you creations by leaving a link in the comment section below or by adding the pictures to the Flickr’s Creativity Prompt group pool.
Feel free to share your thoughts about this project. I’d love to hear what you think about it.
 Being environmentally friendly is important to me. It is actually very selfish of me, as I want my posterity to enjoy mother earth as long as possible. Therefore on one of my very first creativity prompts I have shown you how to turn your trash into treasure.
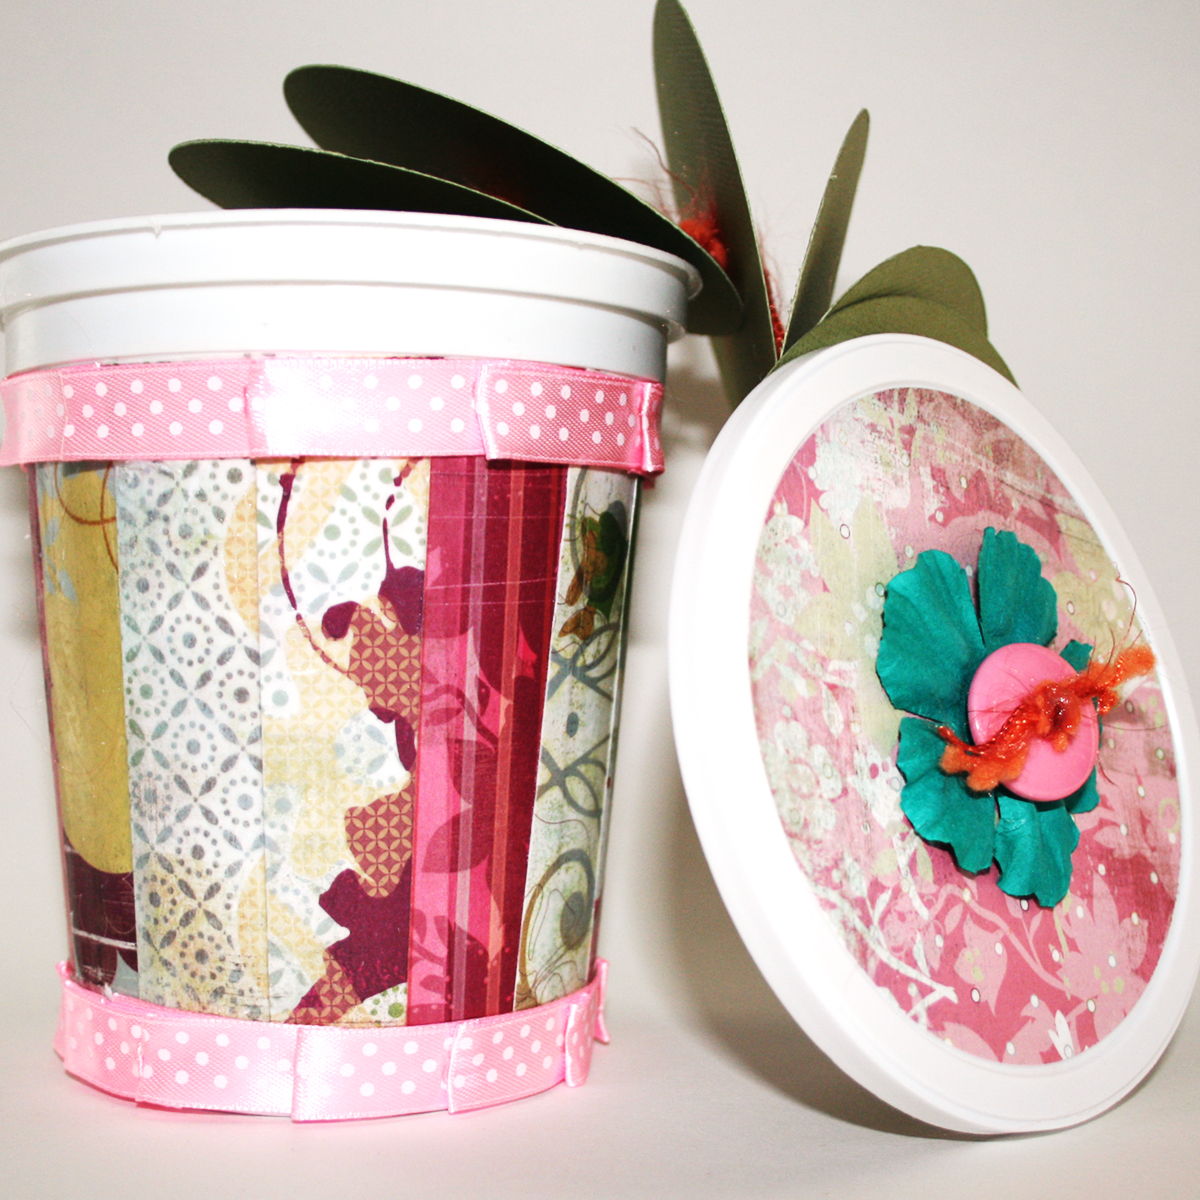
 Subscribe in a reader
 Subscribe by Email


 One of the hardest things in living far away from your family is being absent from family gatherings during the holidays.