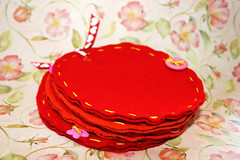
Surprisingly felt costs less than cardstock. How strange is that? Michael’s offers letter size pieces of felt in many vibrant colors for only 30 cents a piece. Regardless of its price, felt adds so much more to a project than a simple piece of cardstock. It adds softness, texture, cuteness and a dash of “je ne sais quoi” that makes everything better.
For this week’s creativity prompt I teach you how to make this cutest little felt mini album. If you feel like making one, stay tuned and keep on reading.
Cut from your cardstock 1 big oval and 5 ovals which are ¼” smaller then the first one. The big oval will be used as a template for your felt pages and the smaller ones will be used to support the felt pages and make them more durable.
Take your largest oval and lay it down on your felt. Trace around it with a marker. You will need 10 felt ovals for a 5-pages album.
Cut your felt ovals out.
Note: for the sake of this tutorial, I have skipped this step – which is the main one => Now it’s time for you to create your beautiful felt album pages. Make use of the felt’s special qualities. Embroider on it. Sew your pictures and patterned paper onto it (just pierce them first with an awl). Add buttons, flowers and other pieces of fabric with a needle and a thread. Be creative!!! All the back stitches will be covered in the next step.
“Sandwich” each 2 felt pages with 1 cardstock “core”. Adhere the felt pages temporarily with a tape runner.
Sew all around the edges of the felt “sandwich”. Make sure you don’t sew through the cardstock.
As you will not be able to conceal the edges of your embroidery floss, thread them through a button and tie in a knot. this way you can secure your stitching and add a decorative finishing touch at the same time. (Tip: Add a tiny bead of diamond Glaze to your knot to prevent it from fraying later on.)
Punch a hole at the top of each oval “sandwich” and set an eyelet in it. The crop-a-dile works the best. (as you can see on the video, I was trying to use a Provo Craft’s eyelet setter too and it was too hard to poke through the 3 layers of felt and cardstock).
Thread your ribbon (or book binding ring) through the eyelets (Tip: Cut the ends of the ribbon in a sharp angle to make the threading easier), make a cute knot and enjoy your fuzzy mini-album.
Share
If you have any question, suggestion or remark – don’t hesitate to contact me – either leave a comment here, use the contact form or start a new thread on the Creativity Prompt Flickr Group!!!
I would also be very happy to see your own creations, so don’t be shy and share 🙂
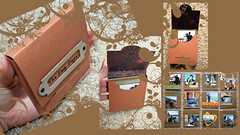
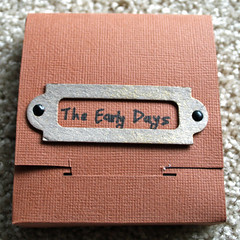
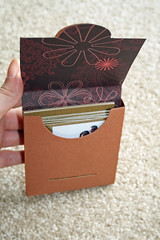
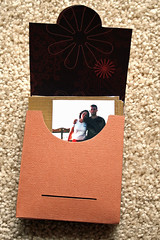
It has been a while since I last designed a free template for you guys. Now it’s time to hone my limited Photoshop and reverse engineering skills and provide you with another free template. This time a template for a mini album case.
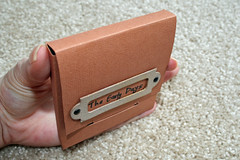
This case is perfect for a 3″ by 3″ album, for those important pictures you want to always carry with you in your bag…
I created an album, made out of 3″ by 3″ laminated cards, featuring the early days with Nadav – long before we even thought about getting married 🙂
If you feel like making a similar mini-album, or you have some other ideas for this cute little case, then stay tuned and keep on reading.
[You can watch the video in HD on YouTube. While you’re there please rate & comment 🙂 ]
Step by Step Instructions
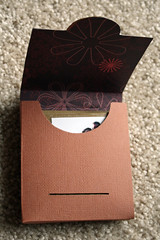
Download the templates by clicking on the link at the supply list above and print the case template on cardstock and the lining template on a patterned paper. Make sure the printer’s settings are set to a letter size (8½” by 11″) and to borderless printing. Print on the back side (the smooth side of a textured cardstock and the wrong side of your patterned paper), so the lines won’t show on your finished project.
Cut along all the solid lines with a craft knife and a ruler. Be careful not to cut any of the dashed lines. Finish off the curved parts with scissors, it’ll make a smoother cut along the curve.
Score all the dashed lines with a stylus and a ruler.
Fold all your score lines (You can use a bone folder for that).
Cut along the solid lines of the lining template. You can use either scissors or a craft knife, whatever is closer you feel more comfortable with.
Score along the dashed lines on the lining template and fold your score lines.
Adhere your lining to the case template – make sure you are concealing the printer’s lines, which means your positioning is correct. Don’t be shy with your adhesive and apply a generous layer, especially on the edges and the score lines.
Apply a strong adhesive tape to the small flaps and on the long flaps, on the right side of the template.
Assemble the case and voila, it’s too easy 🙂
Few pointers regarding the mini album –
Cut your cardstock to 3″ by 3″ squares (1 sheet of cardstock makes 16 squares).
Adhere your photos and journal on the back.
Laminate all your squares and cut the excess laminating material off.
Usually this type of albums gets handled often, not to mention it’s tossing and turning in your bag all the time. The laminating helps to keep the album more durable.
Use only flat elements on your cards so the lamination goes smoothly.
If you have any question, suggestion or remark – don’t hesitate to contact me – either leave a comment here, use the contact form or start a new thread on the Creativity Prompt Flickr Group!!!
I would also be very happy to see your own creations, so don’t be shy and share 🙂
You still have a chance to enter the drawing on Creativity Prompt for a $50 GIFT CERTIFICATE to Scrapbook.com. For more details on the giveaway click here.
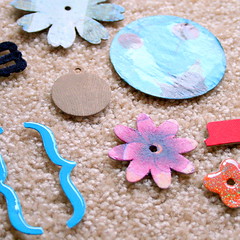
If you are anything like me then you probably have a ton of paper scraps. The scrapbooking industry keeps on wowing us with delicious patterned papers and I feel bad about throwing away any tiny little cut out… Not to mention the environmental repercussions of tossing all that paper (read: severed trees) away.
I have found a great “marriage” between my current stash of paper scrap and patterned paper which is still on my wish list. I have derived inspiration from the wonderful new collections from Sassafras Lass and recreated my own patterned paper design, while using only paper scraps.
[Go to YouTube to watch the video in HD and feel free to rate, comment and subscribe]
Step By Step Instructions –
Take a piece of scrap paper (I used recycled newsprint paper) and cut it to the size of your desired design. Mine is 8″ by 8″.
Cut a circle from your scrap piece of paper. It doesn’t have to be centered. Just position it whenever you’d like your focal picture to be.
With a pen and a ruler start drawing your design.
After you are pleased with your design, list all your individual shapes by number, this will make your life much easier later on.
Cut each individual shape with your scissors. Don’t worry about the curvy part, as your focal picture would lay over it.
Now it’s time to get all your paper scraps. Use as many or as little textures, colors and patterns as you like.
Adhere each individual shape to the back of your paper scrap. Make sure the number faces down (just apply your adhesive to the number itself, to avoid “mishaps“). Don’t forget to rewrite the number again at the back…
Using those numbers, reassemble your design and adhere all the individual shapes onto your background cardstock.
Adhere your focal picture with foam adhesive. The photo doesn’t have to be circular. I just think it adds some extra flair. (You can crop your photo with a photo editing software, such as Adobe Photoshop Elements, or you can use any circle cutting system you feel comfortable with).
Add your title and call it good (Well, except for some journaling).
Share –
If you have any question, suggestion or remark – don’t hesitate to contact me – either leave a comment here, use the contact form or start a new thread on the Creativity Prompt Flickr Group!!!
I would also be very happy to see your own paper-scraps creations, so don’t be shy and share 🙂
This is post is the second in the series of Embellishing Embellishments. A couple weeks ago I suggested ways of embellishing paper flowers and this week we are going to embellish raw chipboard shapes.
Chipboard is a great way to add some dimension to your project, without adding too much bulk. Chipboard is basically a bunch of layers of paper, pressed firmly together, therefore it provides a slight raise, when adhered on regular cardstock or paper.
Saying that, chipboard, in its raw state, is rather… well… ugly. Many companies provide covered chipboard shapes but the price tag can rise up and you never get EXACTLY the color, texture, finish you want on your project.
There are many companies offering raw chipboard shapes. Usually the price does play a role in telling the quality of the chipboard. For the sake of this tutorial I was using Colorbok’s chipboard shapes, they retail for 1$ but they are very thin and the layers are easily separated (especially in techniques that requires gel medium). I do recommend Maya Road’s chipboard. It has high quality yet isn’t very expensive.
The techniques I am showing on this week’s video are:
Each technique requires different tools and supply, and you may not want to experiment with all of the techniques, so I will list a separate supply and tools list for each technique below. I will also post a small picture of the chipboard, after the technique had been applied on it. You can click on each photo for a larger view.
Apply crackle paint to chipboard with the brush that comes with it. If you want, you can dilute the paint with a drop of water. Avoid bumps and clumps, but don’t apply it too thinly.
Let dry completely.
For an “epoxy” look, cover in Diamond Glaze and let dry for a few hours.
Apply gel medium to chipboard (you can put a base coat of ink before, if you want the final result to be tinted).
Separate the top layer of the napkin and lay it on the chipboard – right side up.
Apply a second coat of gel medium on top of napkin.
Wait until it dries completely. I was impatient and it made everything more complicated than it should be, So LET IT DRY!!!
Cut around the chipboard shape with micro-tip scissors. (you can poke them in any hole or cavity of the shape).
Apply a thin layer of gel medium to the edges of the shape. It will straighten all stray pieces of napkin as well as prevent the chipboard from separating.
Apply gel medium to the chipboard and lay the printed transparency over it, inked side down.
Apply pressure to the transparency with a brayer and rub the image off with a bone folder.
Gently peel off the transparency and make sure the top layer of the chipboard isn’t stuck to the transparency. If it is stuck, peel it gently with the tip of your craft knife’s blade and adhere it back on with some more gel medium.
Apply another coat of gel medium on top – but make sure it is completely dry first.
Share –
If you have any question, suggestion or remark – don’t hesitate to contact me – either leave a comment here, use the contact form or start a new thread on the Creativity Prompt Flickr Group!!!
Can you think of other ways to embellish chipboard? Which technique is your favorite? Which technique have you used before? Share your thoughts by leaving a comment on this post.
I would also be very happy to see your own creations, so don’t be shy and share a link 🙂
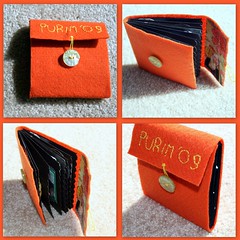
One of the hardest things in living far away from your family is being absent from family gatherings during the holidays. Purim is one of those occasions. The kids are wearing their costumes and the general atmosphere is one of joy and festivity. This Purim I wasn’t able to join my family, but I wanted to create a mini album that I can carry around so at least I will be near the photographed memories…
To capture the holiday spirit, I designed a mini album which is covered in felt and has some embroidery details on its cover, as well as a decorative edge to all the signatures inside. This mini album is in fact a dressed up version of the 10 minute mini book tutorial. I guess my minis want to dress up for Purim – who am I to stop them?
The felt cover protects the album, but also provides softness that makes you want to caress it… A feeling which goes hand in hand with the cute pictures of my nephews and niece: Superman, the Bride, Robin Hood and the Knight In Shining Armor…
If you want to make one for yourself or as a gift to a loved one, keep reading…
Cut your cardstock at 9″ by 4″. (If you want to give up the scalloped edge, or to simply round up the corners, you can cut your cardstock at 8″ by 4″ and score at 4″ instead).
Score your cardstock at 4½” and fold in half. Use a bone folder for a crisper crease.
Align the edges of each closed signature with the tick marks of the border punch. Make sure the ends are placed at the same tick mark on both sides. Punch firmly and repeat all across the edge. If you are more cautious about your [EXPENSIVE] punch, or if your signatures are made of heavy-weight cardstock, you can punch each edge individually, as long as your alignment is precise. It will just take longer.
Attach the signatures together with glue stick. Again, take special care at aligning the scallops together. Use a brayer to insure a strong hold.
Let the signatures dry while they are spread wide open to make sure they won’t get stuck together.
Measure and cut a stripe of felt. Use the signatures for measuring. Just pencil in a tick mark a little bit above the height of the signatures and cut along with sharp scissors. (~4¼” by 11½”).
Figure out the placement of your flap using the signatures. Note that the spine adds some dimension. After finding the right placement, pencil in your title and embroider over it using a backstitch.
After finishing your title design, use the remaining embroidery floss to create a loop in the middle of the flap. Thread your embroidery floss horizontally and allow a loop to form, then secure its ends. Don’t worry about the backside of the flap, as it’ll be covered later.
Use the signatures to find the placement of the flap on the felt cover when closed. Allow some room for adding dimensional elements to the album’s pages. Sew a button in correlation to the loop you have just added to the flap.
Measure and cut a piece of patterned paper and glue on the flap to conceal the embroidery’s backside. Use a brayer to insure a strong hold. (~4″ by 2″.)
Attach the signatures to the felt with glue stick, let dry and start playing with the inside pages 🙂
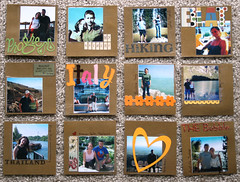
Here is a glimpse to all the inside pages of my mini album:
[Click on the photo for a closer view]
Share –
If you have any question, suggestion or remark – don’t hesitate to contact me – either leave a comment here, use the contact form or start a new thread on the Creativity Prompt Flickr Group!!!
I would also be very happy to see your own creations, so don’t be shy and share 🙂
Embellishing embellishments? Have I gone crazy? No. Not really. I was just thinking how can I stretch my supply a little bit and get a personalized look and this is what I came up with.
Many crafters have heaps of plain paper flowers laying around, but only you will have the altered version of these flowers… Think about all the possibilities… Exciting, isn’t it? Some companies offer pre-embellished flowers, but embellishing them yourself isn’t only cheaper, but also more fun and creative.
In today’s video I suggest and show just a few options: sewing, adding bling, embossing, flocking, stamping and decoupaging – but the possibilities are really endless.
You can use the embellished flowers on cards, layouts as well as on wall art and other mixed-media projects.
How-To
[I apologize in advance for the quality of the editing. I am slowly learning to work with iMovie…]
[If you head over to YouTube, please rate, comment & subscribe]
On this video –
Stamping – Use pigment ink and press hard on the stamp, to get into all the folds and crevices.
Adding BLING – Apply some strong liquid adhesive that dries clear (like diamond glaze) and sprinkle beads, glitter or gemstones onto it. Allow it to dry and add a little bit of adhesive on top, to make sure it’ll stick.
Flocking – Similarly to adding bling, just apply some Diamond Glaze and pour in the flock. Tap on it gently with your finger to make sure the flock is applied evenly.
Decoupage – Choose a scrap of napkin or tissue paper that fits your flower. Use only the top layer of the napkin. Apply gel medium or Mod-Podge generously on the flower and adhere the napkin to it. Apply a second coat of gel medium on the covered flower. Allow it to dry and cut the excess with scissors.
Embroidery – Add some appeal to the flower with an embroidery floss. There are many options. On the video, I applied sequins to the flower, using a “French Knot“.
Embossing – Put the flower into an embossing folder and move it through a Cuttlebug machine (or another die-cutting & embossing machine). Make sure you pick an embossing design that fits in scale to the flower’s size.
More options –
Inking – change the color of the flowers with an ink pad or an even coat of acrylic paint.
Crackle Paint – Apply a thick layer of crackle paint on the flower and allow to dry.
Photo transfer – The idea is similar to decoupaging, but instead of napkins you use a photo, printed on transparency with an inkjet printer. Note that this technique isn’t as smooth as decoupaging and the printed design won’t be transferred as crisply. (Use a gel medium for this technique).
Take a closer look at the embellished flowers (click on the photo):
If you have any question, suggestion or remark – don’t hesitate to contact me – either leave a comment here, use the contact form or start a new thread on the Creativity Prompt Flickr Group!!!
I would also be very happy to see your own creations, so don’t be shy and share 🙂
Do you have more ideas for embellishing paper flowers? Please share!
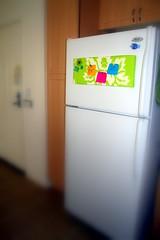
This week I have another quick and easy, and most importantly – recycling – project for you.
Saying styrofoam is bad for the environment is quite an understatement. Nevertheless it is widely used for packaging and some other “really important” (NOT) purposes. Changing the world is done one step at a time, right? So our baby step today is reusing the styrofoam.
The styrofoam is light weight as well as soft enough to be pierced repeatedly (while chanting: “Bad styrofoam. Bad. Bad. Bad”) what makes it perfect to serve as a magnetic bulletin board! By salvaging a never-has-been-no-longer-will-be in use pillow cover we got ourselves the perfect recycling project and quite a nice addition to the fridge. (This looks much neater than a bunch of scraps scattered around).
If you recognize the fabric from the easy peasy hardbound journal tutorial, you are right… (and I haven’t used the rest of the sheets yet, so stay tuned).
Tools & Supply
Styrofoam
Fabric scrap (~3 inches larger than the styrofoam all around)
Adhesive lines/ Plain office stapler (Whatever you have at hand)
Measure a piece of fabric, about 3 inches larger than the styrofoam, both lengthwise and widthwise.
Cut the fabric to size. You can use your scissors or cut a small slit ant rip along.
Put the fabric on your desktop – right side down – and straighten it. You can use an iron if you feel much inclined. I don’t.
Adhere the fabric flaps to the back of the styrofoam. I used Thermoweb’s Clear adhesive Lines but you can use a stapler, just as well (probably better). Start with the long flaps and then move to the shorter ones. Make sure they are pulled tight before adhering or stapling them.
Tuck the edges of the small flaps in, as if you are wrapping a present. Then adhere or staple them to the back of the styrofoam.
To embellish the bulletin board I threaded a string through some buttons and adhered the buttons to some paper flowers. I then adhered the flowers to the board with pop-up glue dots.
[Click on the picture above for a better view]
Share –
If you have any question, suggestion or remark – don’t hesitate to contact me – either leave a comment here, use the contact form or start a new thread on the Creativity Prompt Flickr Group!!!
I would also be very happy to see your own creations, so don’t be shy and share 🙂
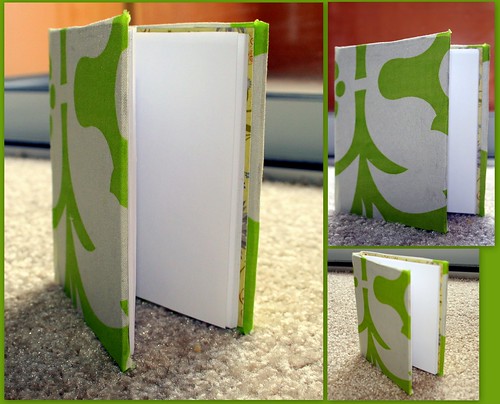
This week I want to suggest another quick and easy way for making an hardbound journal. Covering the thick chipboard with fabric adds additional appeal, the coveted and elusive “je ne sais quoi” 🙂 . Yet, it is soooooo easy to do (provided you did not cut your finger in the process).
Unfortunately, I DID cut my finger in the process, therefore my journal isn’t really as beautiful as I would like it to be (see the frayed edges in the corners)… So please ignore the imperfections and see the hidden potential in it… Considering you can see this raw potential read on for the full (video) tutorial.
Patterned cardstock & copier paper – 7 1/2″ by 4 1/2″
Chipboard: spine – 1/4″ by 4 5/8″ cover – 2 (3 7/8″ by 4 5/8″)
How To –
[Click twice on the video to get to You Tube and watch in high quality.
While you’re there, feel free to rate and comment 🙂 ]
Step By Step Instructions –
[I hope it is helpful for those of you who cannot watch the video]
Adhere the chipboard pieces to the fabric with a glue-stick.
Start at the middle with the spine. Then attach the cover pieces – one on each side of the spine. Use a brayer to insure a strong bond.
Cut all 4 corners of the fabric in an angle. Leave a 1/8″ gap between the fabric and the chipboard edges.
Adhere the fabric’s flaps with a glue stick. Tuck in the corners, for a nice fold.
Fold the patterned paper (heavy weight) and copier paper stack in half. Crease well with the bone folder.
Straighten up the copier paper stack with a sharp craft knife. To avoid falling finger tips… don’t press hard on your knife, but rather use repeated soft strokes.
Lay your signature (patterned paper + copier paper stack) on a soft mat (I’m using salvaged styrofoam) and staple together. Use your bone folder to flatten the lil’ prongs.
Cover the signature with strong double sided tape. Some added glue stick doesn’t hurt…
Carefully adhere the signature to your chipboard cover.
Voilà ! Enjoy!
Enjoy!!!
If you have any question, suggestion or remark – don’t hesitate to contact me – either leave a comment here, use the contact form or start a new thread on the Creativity Prompt Flickr Group!!!
I would also be very happy to see your own creations, so don’t be shy and share 🙂
In an effort to make you share more, I want to show you the FABULOUS notebooks the talented Robin Gibson made, following this notebook tutorial. [Click on the picture to go to her Flickr photo page]:
Back in the days… when I was a teenager, I remember trying to make shift with the supply I had had. One of the things I remember doing was to open my small stapler and staple with it on a soft, yet firm surface, to overcome not having a staple-gun or a larger and cooler office stapler.
Now it’s the time to use my childhood’s creativity and apply the same trick for making a notebook in less than 5 minutes – no matter what size your stapler is OR what size notebook you want to make. If you are interested in watching how to make it, stay tuned for the video tutorial.
I embellished my front cover with 3 strips of 1¼” by 5¼” cardstock which I ran through the Cuttlebug machine with 3 different embossing folders (Spots and dots, Swiss dots and Bubbles).
How To Video –
Measurements –
Copy paper – 5½” by 8¼” (folded in half, and straightened with a craft knife, while folded).
Cardstock – 5½” by 8¾”, scored at 4¼” on each side.
In this video I tried You-Tube’s audio swap option. I hope it isn’t too annoying… Please tell me what you think about it and leave a comment.
If you have any question, suggestion or remark – don’t hesitate to contact me – either leave a comment, use the contact form or start a new thread on the Creativity Prompt Flickr Group!!!
You can also comment, rate and subscribe to the videos on You-Tube. If you feel like it. Please rate them, so I know how to go about the future videos.
Share the notebook you have made with us. Leave a link at the comment section or upload your photo to the Creativity Prompt Flickr group pool.
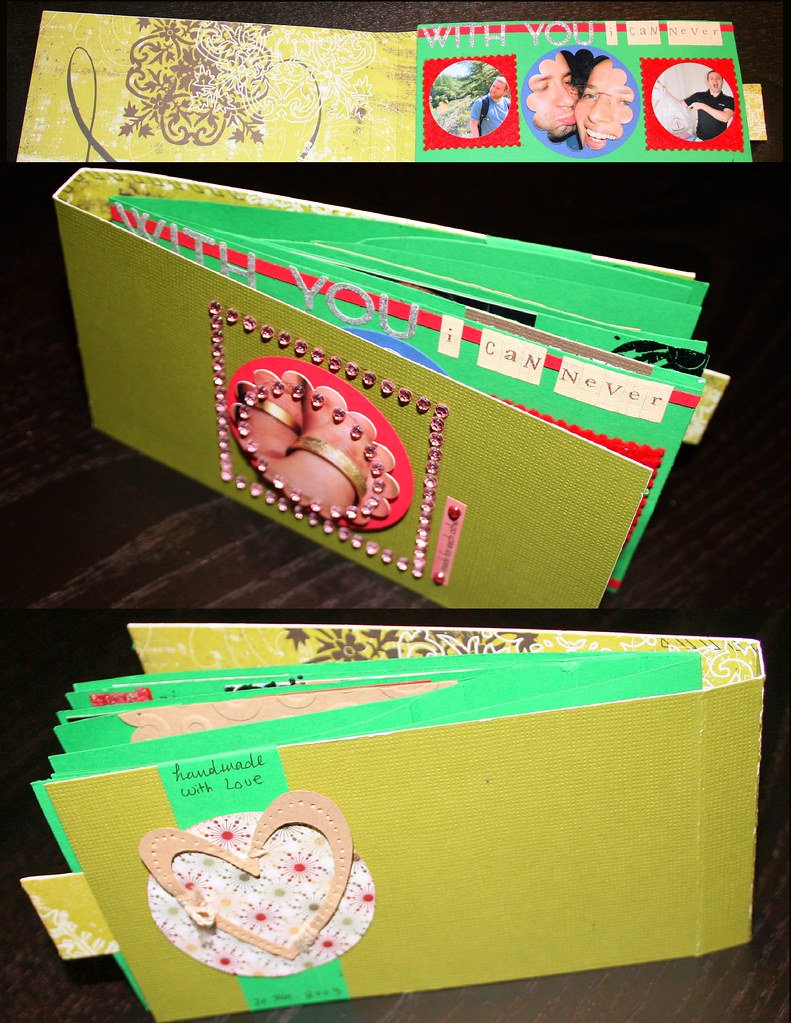
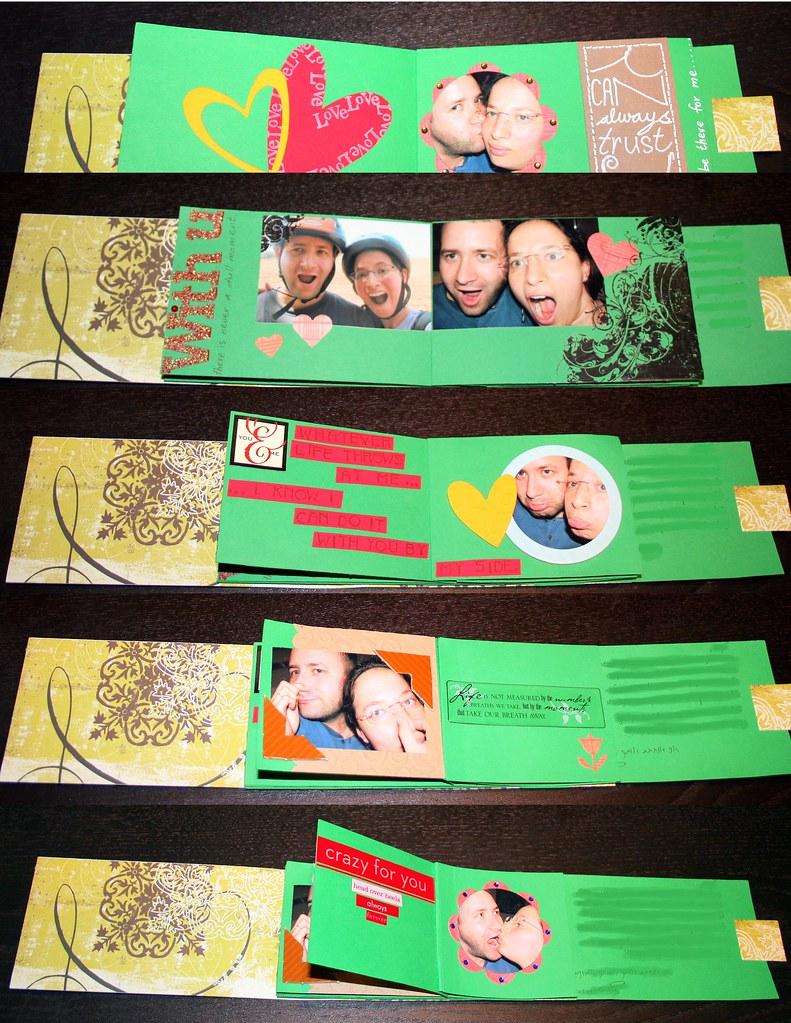
For this week’s Creativity Prompt I have a fun little project for you – The Waterfall Mini Album. It’s a whimsical album that showcases your treasured memories in a playful way.
I have seen a couple of these mini-albums online but non had provided any instructions for assembling it. Therefore I have reversed engineered this album by trial and error with copy paper, until I managed to get it right. It ended up looking nothing like the ones I have seen online, but I love it and I can call it ‘mine’.
Now you can learn from my mistakes and have the full proof way of making your own waterfall mini-album…
Tools & Supply –
[For a closer look, click on the photo]
Click here for more details on my basic tools and supply.
[The great music is by: Josh Woodward from his album: Only Whispering.]
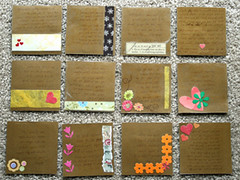
More peeks –
[For a closer look, click on the photos. I have erased the private letter to my husband]
Enjoy!!!
If you have any question, suggestion or remark – don’t hesitate to contact me – either leave a comment, use the contact form or start a new thread on the Creativity Prompt Flickr Group!!!
I would also be very happy to see your own waterfall mini albums, so don’t be shy and share 🙂
Some more feedback on the videos is welcomed!!! (Don’t forget to rate & comment on YouTube. If you feel like it… 😉 )


 One of the hardest things in living far away from your family is being absent from family gatherings during the holidays.


 This week I have another quick and easy, and most importantly – recycling – project for you.