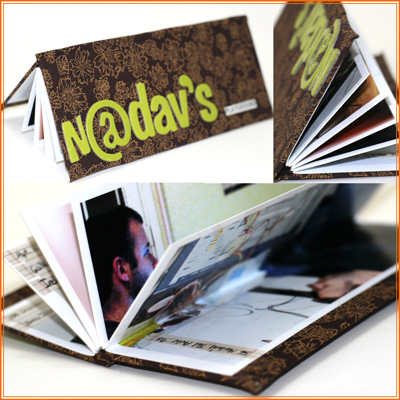
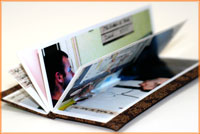
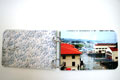
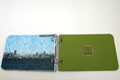
For this week’s project you don’t even need cardstock. It’s as simple and easy as it gets…
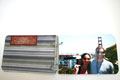
All you need is a batch of 4″ by 6″ photos, a 5″ by 6″ piece of chipboard and a fabric scrap.
Is that all? Yes. That. Is. All.
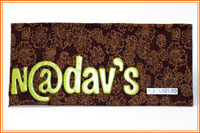
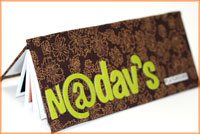
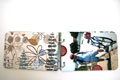
In my album I gathered pictures from 5 different apartments my husband has lived at (in 5 different continents). There is one common denominator in each photo – my husband is completely absorbed in his computer. I named the mini album: “Nadav’s Playground”…
If you have a few photos that tell a story and you wish to compile them in this cute album you can carry around or gift to a dear one, than read on.
Fold each photo in half lengthwise (into 2″ by 6″).
Adhere half of each photo to the next with glue stick – back to back – to create a photo booklet. Go over it with a brayer to eliminate air bubbles or glue bumps.
Lay your chipboard pieces over the left side of the fabric scrap. Leave a gap between the 2 chipboard pieces. The gap should be as thick as the booklet’s spine.
Adhere the chipboard to the fabric with glue stick as laid before.
Trim off the excess fabric. Leave a 2″ edge all around the chipboard pieces.
Cut the corners of the fabric, but leave a small gap for a neat fold later.
Adhere the fabric flaps to the chipboard with glue stick. Use a brayer to ensure the adhesion.
Adhere the booklet to the cover with glue stick.
Embellish! (Although the American Crafts letter stickers are self adhered, I added a dab of strong liquid glue to make sure they stay put. TIP – I ran out of some of the letters so I switched on my creative half. The ‘N’ is actually a trimmed ‘M’ and one of the ‘A’s is an ‘at’ sign – which goes well with the computers theme.)
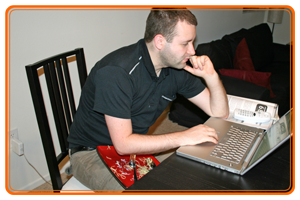
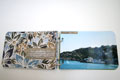
I want to share with you one of my favorite pictures from this mini album. It was taken here at our apartment in California. Note the pasta on his lap and the computer on the dinner table…
Isn’t that a memory to cherish?
Share
If you have any question, suggestion or remark – don’t hesitate to contact me – either leave a comment here, use the contact form or start a new thread on the Creativity Prompt Flickr Group!!!
I would also be very happy to see your own creations, so don’t be shy and share 🙂
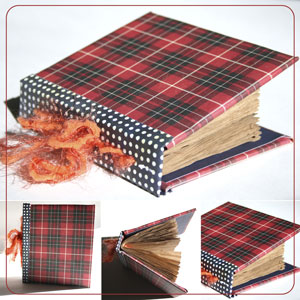
I loverecycling and every time I manage to turn trash into treasure, I am happy. Maybe too happy, but that’s for the professionals to judge 🙂
If you are as jubilant about recycling as I am and would like to make a fat journal out of cardboard and packaging paper used for padding – then keep on scrolling.
I’ve got a video tutorial just for you.
Tools & Supply
Packaging material – cardboard and padding paper (or plain copier paper)
Cut cardboard at: 5½” by 4½” | 5½” by 4½” | 5½” by 1″.
Cut 2 pieces of patterned paper for the cover, at: 8″ by 6″.
Adhere the cover pieces to the center of the patterned paper with glue stick.
Cut the corners of the patterned paper and leave a gap from the cardboard corners – a gap as long as the cardboard is thick (between ½” to ¼” depending on the cardboard).
Fold the remaining patterned paper flaps over and adhere to the cardboard with glue stick.
To cover the spine, cut a 6″ by 6″ piece of patterned paper diagonally. Cut it 2″-1½” away from the corner on each side.
Fold and adhere the top patterned paper flaps to the cardboard spine with glue stick.
Apply strong double sided adhesive to both edges of the patterned paper and attach the cover pieces to it. Allow an 1/8″ gap between the spine and each of the cover pieces.
For the inside cover, cut your patterned paper at: 5¼” by 4¼” | 5¼” by 4¼” | 5¼” by 1″.
Adhere the patterned paper to the inside cover with glue stick. Optional – To secure the adhesion go over the cover with a brayer a few times in different directions.
Punch 2 holes in the spine using a Crop-a-Dile.
Cut the insert pages (from the packaging paper, or any other plain paper you have) at 8″ by 5″.
Fold the insert pages in half.
Optional – Use a T-Square ruler to straighten up the inserts (or leave them looking rustic).
Position your folded pages where they should lay inside the journal and mark the placement of the holes, then punch the inserts accordingly.
Thread your string through the inserts, from the inside – out.
Thread the ends of the string through the spine and secure in a knot or a double bow.
Write your secrets and deepest wishes in the pages of your new handmade journal.
Share
If you have any question, suggestion or remark – don’t hesitate to contact me – either leave a comment here, use the contact form or start a new thread on the Creativity Prompt Flickr Group!!!
I would also be very happy to see your own creations, so don’t be shy and share 🙂
A good quality art journal with sturdy signatures may burn a hole in our pocket. However, by using just 5 high quality cardstock pieces, you can make your own art journal for a fraction of the price – not to mention the cute foam cover you get…
If you are interested in watching how to make one of these cute art journals, than keep on scrolling…
Tools and Supply
Heavy weight cardstock (5 sheets of 8½” by 11″ will make 10 signatures = 20 pages)
Fold the signatures in half. For a sharp crease use a bone folder.
Poke holes along the crease line of each signature. Start at the center and then continue each inch below and above the center.
Sew your signatures together. Start at the top hole and go through each hole with a plain running stitch, after you went through the bottom hole go back through the top hole again.
When attaching the second signature (and the ones after it) secure each stitch by going through the stitches on the spine before threading the needle through the holes.
After you have made the last stitch on the last signature, secure the ends with a few knots.
Cut the fun foam at 9″ by 5¼” for the cover.
Attach the signatures to the fun foam with a generous layer of glue stick. Apply pressure on the journal for an hour or so to ensure good adhesion.
Start painting and sketching in your new art journal…
Share
If you have any question, suggestion or remark – don’t hesitate to contact me – either leave a comment here, use the contact form or start a new thread on the Creativity Prompt Flickr Group!!!
I would also be very happy to see your own creations, so don’t be shy and share 🙂
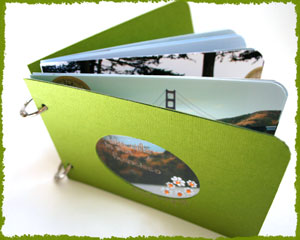
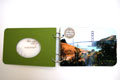
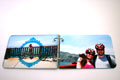
I am always trying to come up with the quickest and easiest projects for Creativity Prompt, but this time I have really outdone myself…
All you have to do is gather all your 4″ by 6″ photos together and in a matter of minutes they are all assembled in a cute mini album, with a twist.
This project is perfect as a last minute gift, or a mass production gift as well as a way to deal with a large amount of photos that convey the same story.
If you want to watch me make this mini album, than keep scrolling.
Tools & Supply
Your batch of standard size photos (4″ by 6″)
1 sheet of 12″ by 12″ cardstock (cut to 4 pieces sized 4″ by 6″ each)
Temporarily adhere both cardstock pieces together and cut a shaped window out of them – you may use any shape and any die-cutting system you prefer.
Adhere the cardstock pieces and the acetate in a Cardstock-Acetate-Cardstock sandwich.
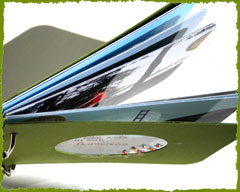
Back each photo with a 4″ by 6″ piece of patterned paper.
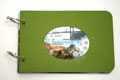
For the back cover, cut 2 additional pieces of cardstock at 4″ by 6″ each and adhere together – back to back.
Gather all your photos and both cover pieces together and punch 2 holes w/ the Crop-a-Dile.
Fasten with the binding rings.
Tell the story.
Shana Tova (Happy New Year) to all my Jewish readers!!!
Share
If you have any question, suggestion or remark – don’t hesitate to contact me – either leave a comment here, use the contact form or start a new thread on the Creativity Prompt Flickr Group!!!
I would also be very happy to see your own creations, so don’t be shy and share 🙂
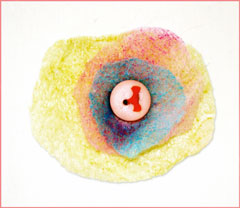
This week’s creativity prompt is more of an idea on how to reuse drier sheets after they have made your laundry smell fresher and become softer. You know how much I love recycling, so this project is right up my alley.
It takes merely seconds to make this flower and it has a fabric-like texture. Think of it as a tissue paper that won’t rip.
The added bonus of the drier sheet is that even after it does its job inside the drier machine, it still holds its smell. That means that you are not only adding cuteness to the project but a scent too!
Add color by rubbing ink directly onto the circles. If the ink pad falls off, no worries. Stick it right back with a glob of Diamond Glaze.
Cluster the circles together and adhere with Diamond Glaze – a dot of glue will do. (dry adhesive, like a tape runner or glue dots will not work)
To finish off the look, thread an embroidery floss through a button and adhere to the top circle with another dab of Diamond Glaze.
Let dry. After the adhesive has dried up and hardened, you can go ahead and attach the flower to the project with a glue dot. (Position the glue dot directly on the hardened adhesive).
Share
Share your thoughts and your own drier-sheet creations by leaving a comment!
There are many ways to tell a story with our design and with our journaling. However the story telling begins while we stand behind the camera and capture a still moment. The lighting, the angle, the composition all take part in portraying our story.
I have not yet included a photography prompt on Creativity Prompt, but I plan on including many more. Please let me know what you think about it!
This week’s photography prompt is to take a photo that conveys happiness.
I took this photo of my niece, Tsuf, last November while I was visiting home. Let me count the ways this photo communicate “happiness” to me:
It reminds me of my visit back home. Being with my family always means happy times for me.
This photo also helps me remember how delighted my niece was to see me after a long period of time I had been away (…and now it’s been even longer). When I look at her in this picture I recall the warm hug and the soft kiss she gave me a few minutes before when she entered my parents’ house.
Looking at my niece with her broad smile, dancing and having fun in the middle of my parents’ living room reminds me of me at her age – just looking for ways to have fun and be happy. The happiness of children is always the brightest!
Join Capture Your Dream workshop for a unique experience of
inspiration, journaling and creativity.
Learn valuable tips and techniques while making your dream come true!
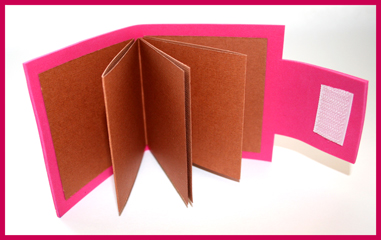
Score each strip at 3″, 6″ & 9″. You can just align your score lines with the 3″ mark on your paper trimmer.
Fold your score lines – once up and once down – to create an accordion fold.
Adhere the folded cardstock strips to the fun foam with a double sided adhesive. Optional – Before attaching each cardstock strip, you can add a strip of ribbon to it – just align the middle of the ribbon with the center point of the back of the cardstock and adhere to the fun foam. Tie the ends of the ribbon in a bow to make sure your accordion fold stays put.
Find the center of the fun-foam cover’s flap with the grid ruler and mark 1″ on each side. Cut along these marks all the way to the bottom of the flap and snip off the ends.
Adhere the velcro or magnetic snaps to the flap. To make sure the aligning is perfect, adhere both parts of the velcro while they’re attached together and then peel off the backing and close the flap. To allow some room for bulky embellishments, make sure you don’t close the flap too snag.
Share
If you have any question, suggestion or remark – don’t hesitate to contact me – either leave a comment here, use the contact form or start a new thread on the Creativity Prompt Flickr Group!!!
I would also be very happy to see your own creations, so don’t be shy and share 🙂
Reminder
Only a few more days left for the early bird’s admission to “Capture Your Dream“. Don’t miss the special offer of only $14.95 for 30 downloadable lessons!!! (LESS THAN 50 CENTS PER LESSON)
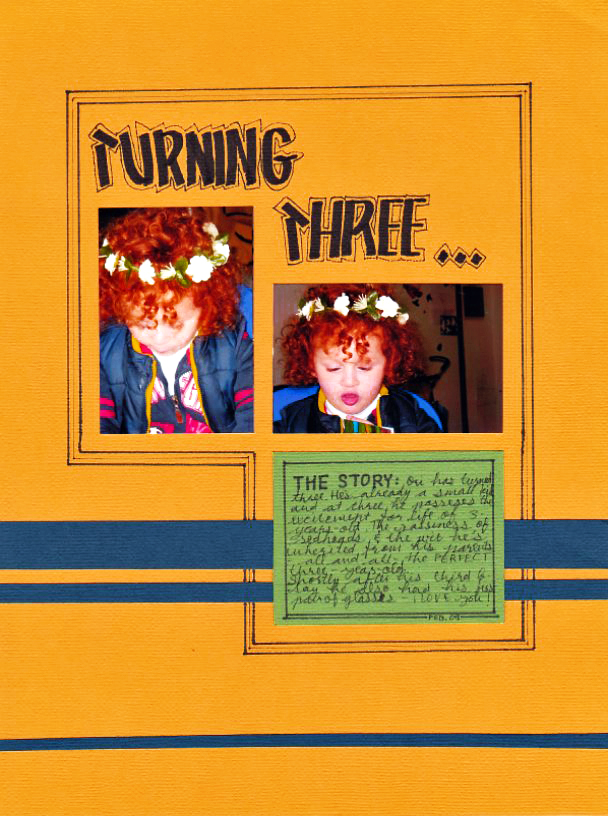
Every once in a while when I feel the muse is playing hide-and-seek I like to take a step backward, get rid of all the fluff and go back to the basics. The same applies to scrapbooking.
The industry is flooded with beautiful products and tools. Wonderful papers, inks, stamps, embellishments, die-cuts and so on and so forth. Design team members are making layouts that can be presented in art galleries. Little by little, the wonderful hobby of putting together a scrapbook to tell our stories is becoming a tedious chore with a lot of pressure involved.
I am sorry to say that I have heard many creative people deciding to give up scrapbooking altogether. Some did it knowingly and some just don’t get to it anymore because of all the work and pressure involved… Isn’t it a shame?
Pressure and high expectations are known foes of our inner creative child. They practically eliminate our creativity and drive our muse away.
Therefore for this week’s creativity prompt, I prod you to go back to scrapbooking basics. Make a layout with only your photos and cardstock and nothing else. Preferably without using any fancy tools as well.
Use the grid on your cutting mat and ruler to align and cut elements to size without measuring. Just align the edge with the marks on the grid for a fool-proof straight-cutting and even positioning.
You can also use the grid ruler to draw perfect frames around any element. Align the edge of your element with the grid and trace with a marker.
Emboss your journaling surface (either a tag or the background cardstock itself) to create subtle journaling guidelines.
Vary the tip size of the markers you use to add instant graphic interest to your journaling design.
DON’T FORGET THE STORY.
Most importantly – don’t fiddle with your layout. Know when to call it done and move forward to the next story. HINT – Perfection is NOT the criteria…
Share
How are you going back to scrapbooking basics? When was the last time you only pulled out your photos and cardstock?
Being environmentally friendly is important to me. It is actually very selfish of me, as I want my posterity to enjoy mother earth as long as possible. Therefore on one of my very first creativity prompts I have shown you how to turn your trash into treasure.
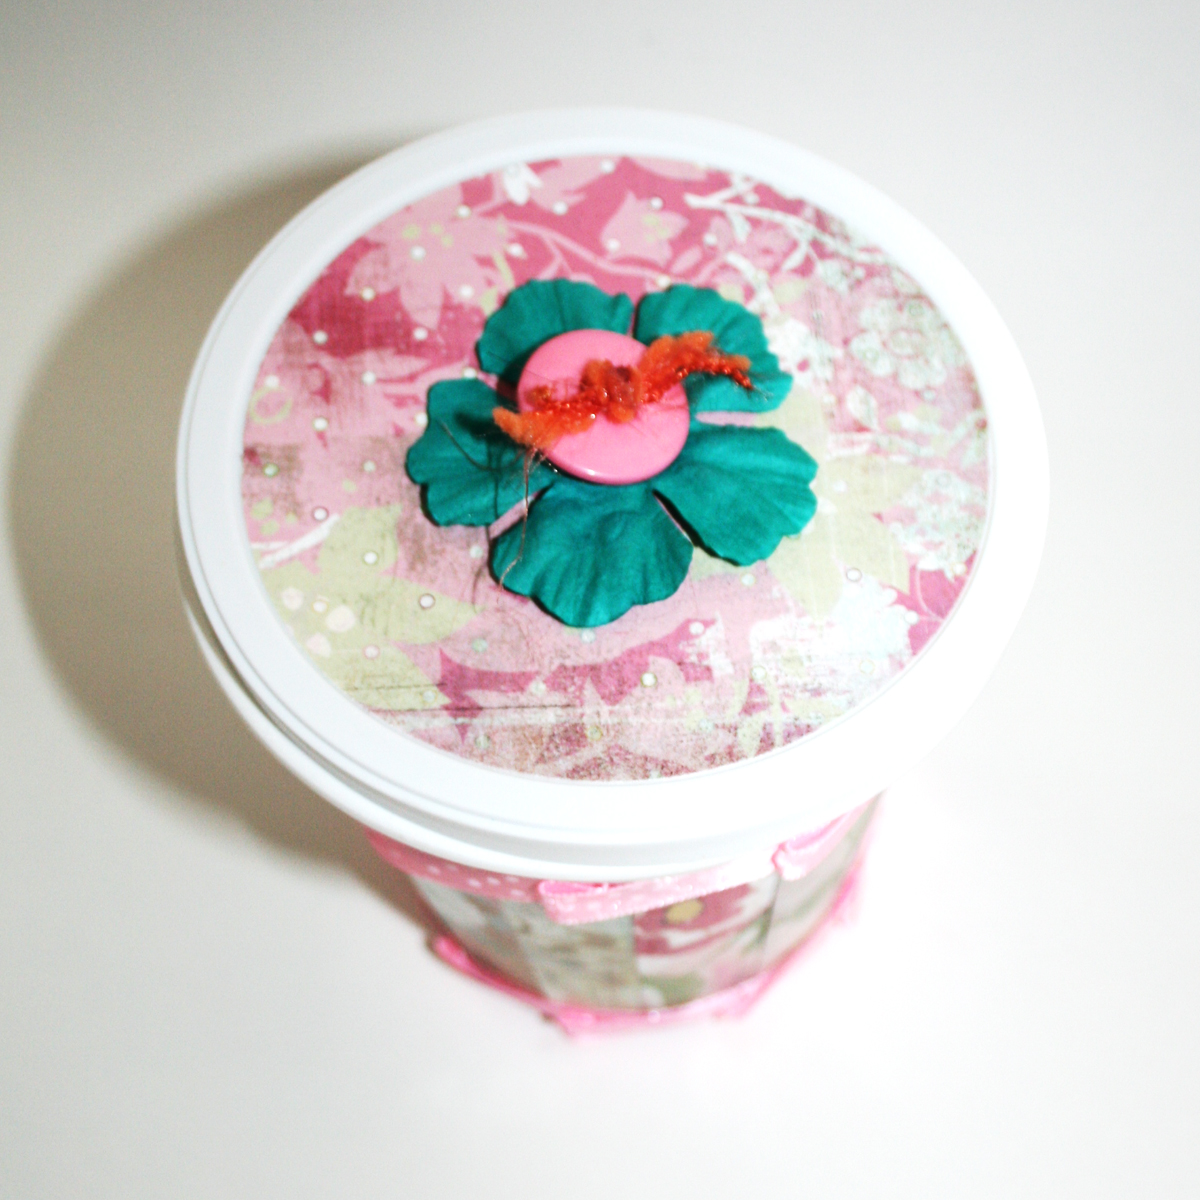
This week I am revisiting this idea and I am going to show you how you can upcycle an empty yogurt container, just before it hits the recycle bin, and make a beautiful surprise mini album with it. If you are not a big fan of mini albums in boxes, you can stop half way through and make a lovely pencil (or brushes…) holder from it.
So if you are interested in turning your trash into treasure too, keep on reading.
[The fabulous music is by Josh Woodward from his album: “Not Quite Connected”]
Step By Step Instructions
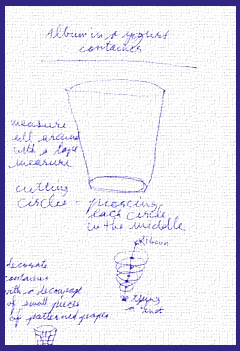
Measure the lid’s diameter with a ruler.
Cut a circle from your patterned paper in the same diameter.
Adhere the patterned paper circle to the lid with Mod-Podge and seal with another generous layer of Mod-Podge on top. Let dry completely.
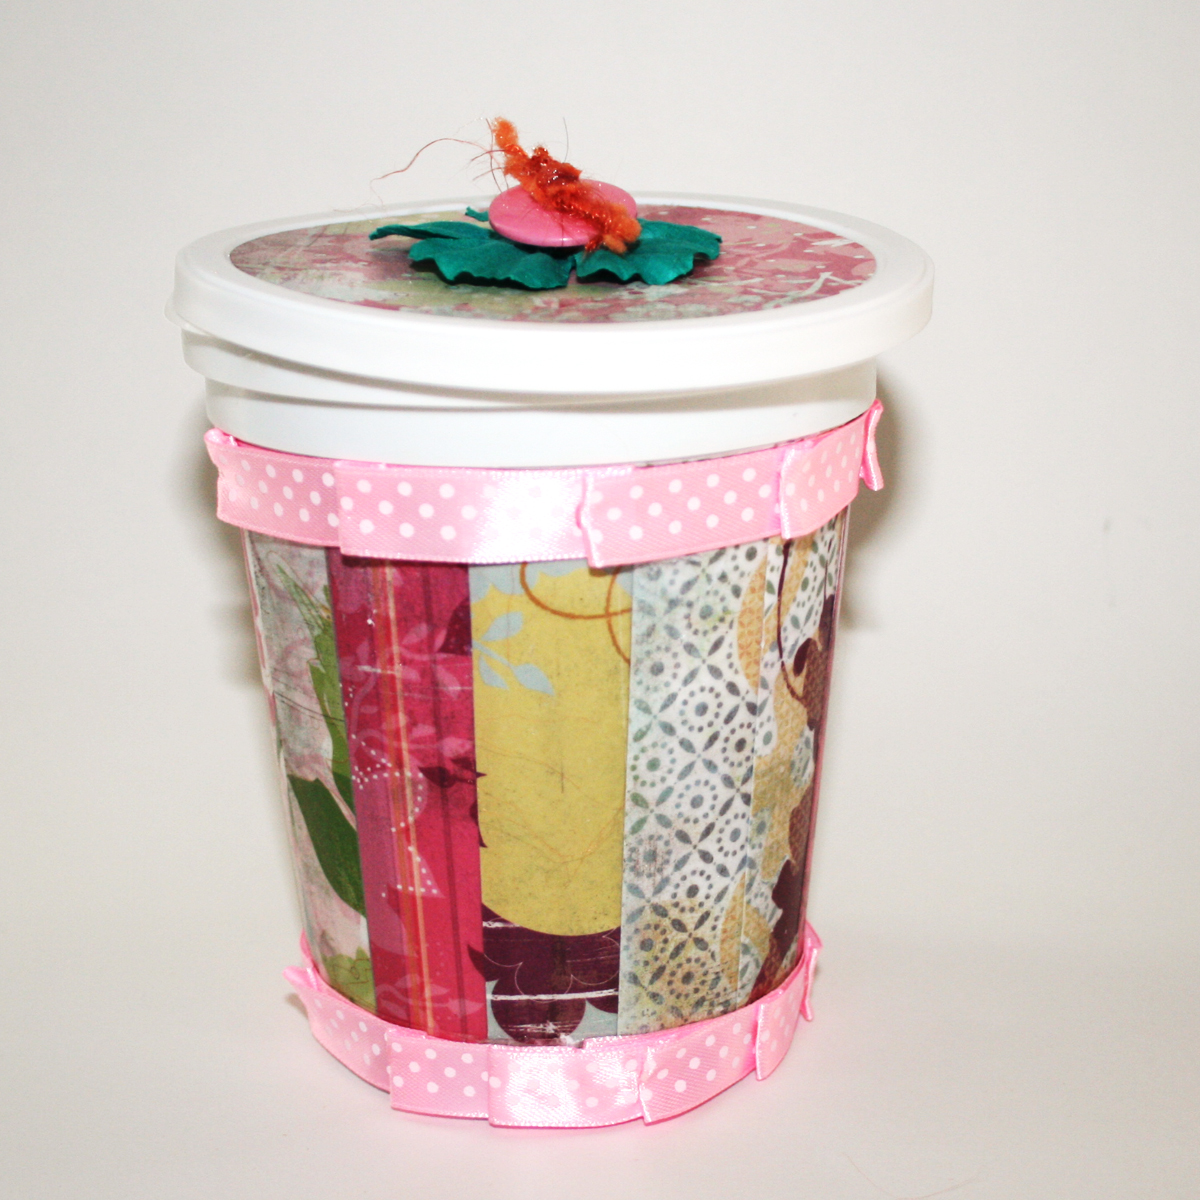
Cut a bunch of patterned papers to the same height as your container and a 1″ width. [mine are 4″ by 1″]
Adhere the strips to the container – one by one – using Mod Podge. To eliminate air bubbles, rub each stripe with your finger. It’s messy, but important to secure your paper strips to the plastic container.
Seal your strips of paper with another generous layer of Mod Podge and put aside until it dries completely.
Measure the diameter of the bottom of your container to figure out the smallest size of a circle that can fit into your container.
Cut as many cardstock circles as the number of pages you wish to have in your mini-album. The circles vary in size whilst the smallest has the same diameter as the container’s bottom and the largest has the same size as the container’s lid.
To find the center of the cardstock circles, cut some more circles from scrap paper, at the same size as your cardstock ones. Fold each scrap paper circle once vertically and once horizontally and mark the point of conjunction. This point is exactly at the center.
Use the scrap circles as a template and punch a hole at the center of each cardstock circle.
Cut a long strip of strong decorative string and fold in half.
Make a knot at the fold (with the two long string edges coming out of it).
Weave both edges of the string through the circles. Secure each circle with a knot and add another knot between each circle, at about 1″, as a spacer.
Punch a hole at the center of the lid and apply Diamond Glaze (or any other strong liquid adhesive) to the inside of the lid.
Thread the ends of the string through the hole and make sure the top cardstock circle gets stuck well to the inside of the lid.
To finish off the lid, thread the ends of the string through the paper flower and the button and secure in a knot. Dab some diamond Glaze on the knot to make sure it stays put.
Cut a piece of ribbon that circumscribes the top of your container. Apply a strong tape adhesive to the back of the ribbon and adhere to the top edge of your container. Repeat on the bottom of your container. This will finish off the edges.
For a more cohesive look, add a second strip of ribbon (about 1½ times the circumference of your container) and then adhere to the edges with glue dots, while pleating the ribbon at each 1″. Secure each pleat with a glue dot.
Variation – You can skip steps 1-3 & 7-16 and make a quick and easy pencil holder instead…
How Ideas Become Creativity Prompts…
A page torn from my bedside journal:
Share
If you have any question, suggestion or remark – don’t hesitate to contact me – either leave a comment here, use the contact form or start a new thread on the Creativity Prompt Flickr Group!!!
I would also be very happy to see your own creations, so don’t be shy and share 🙂
If you liked this post you may want to subscribe to my feed:
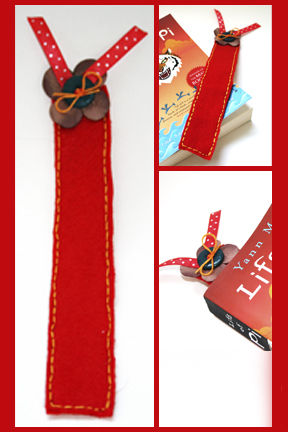
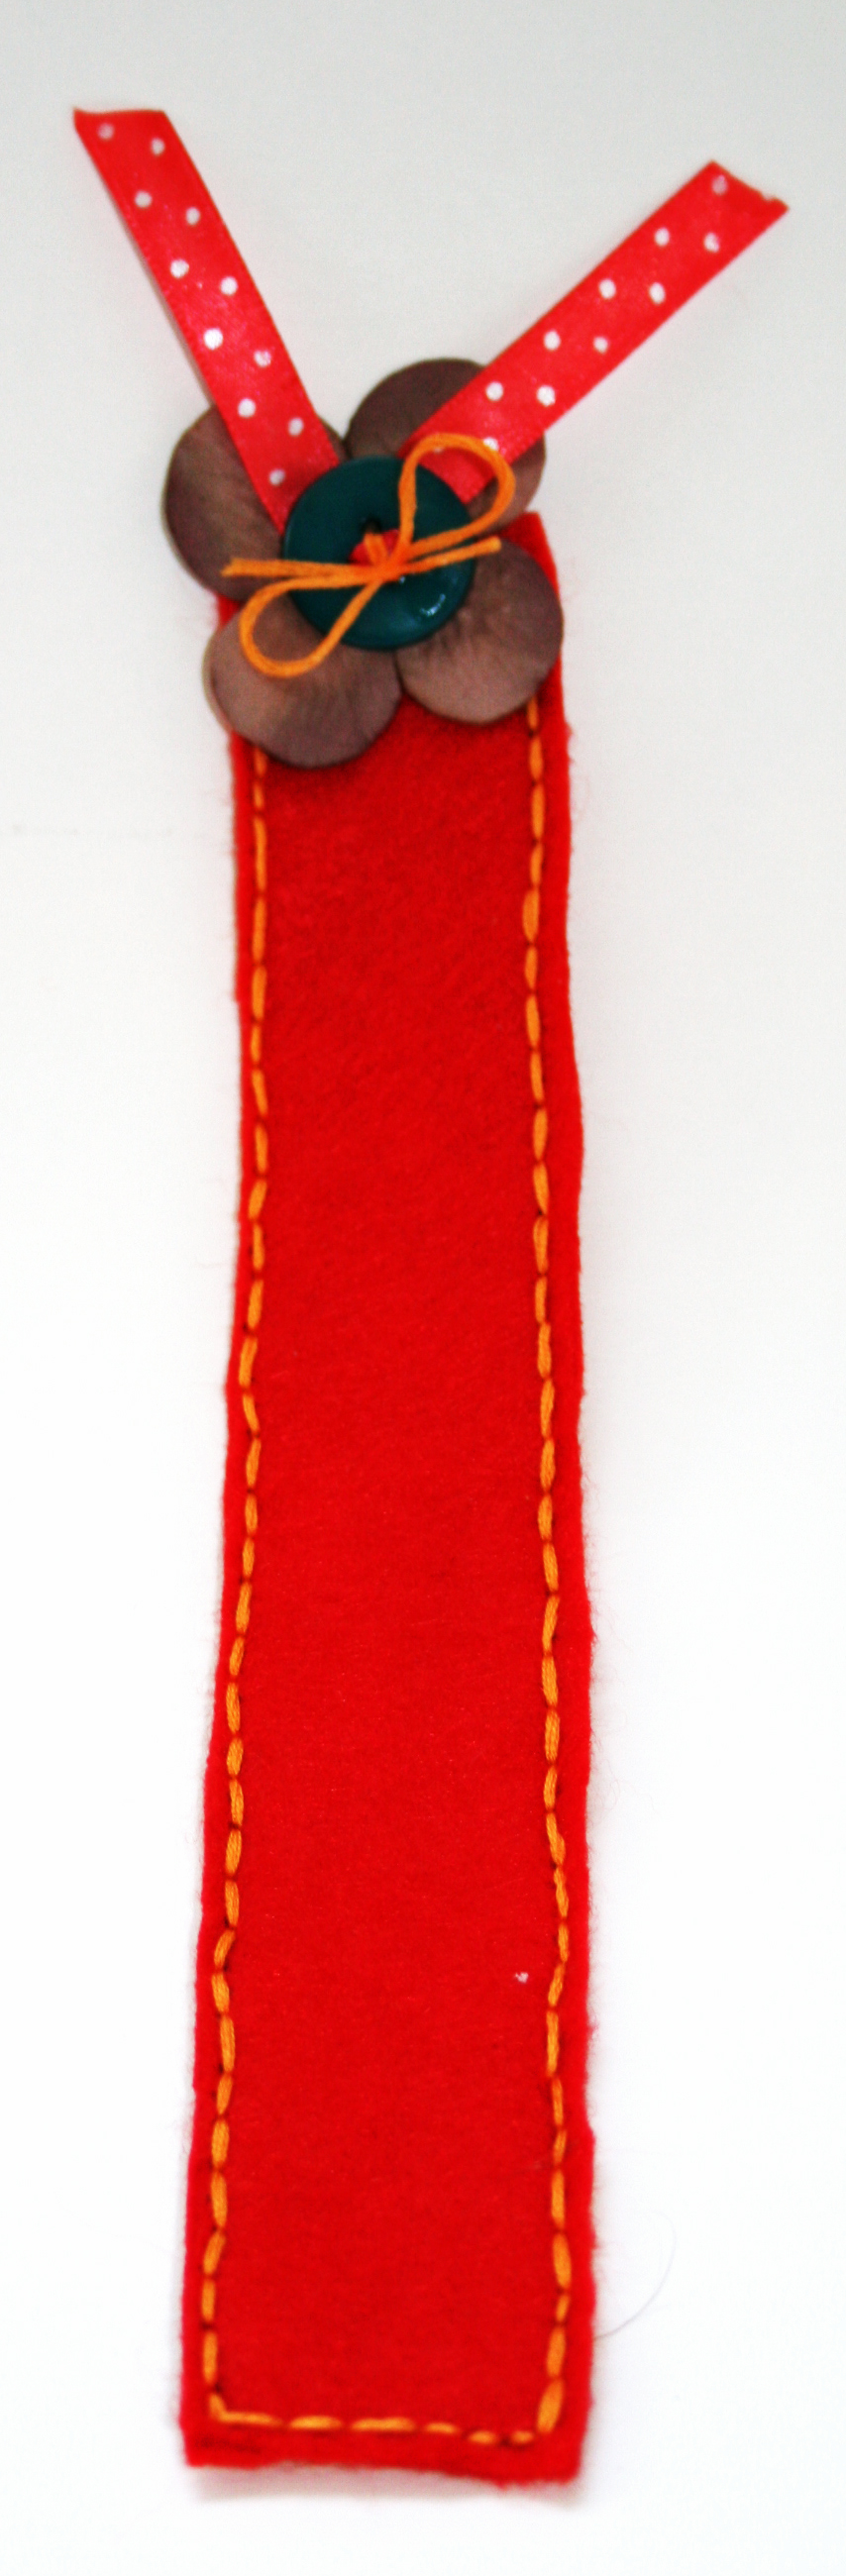
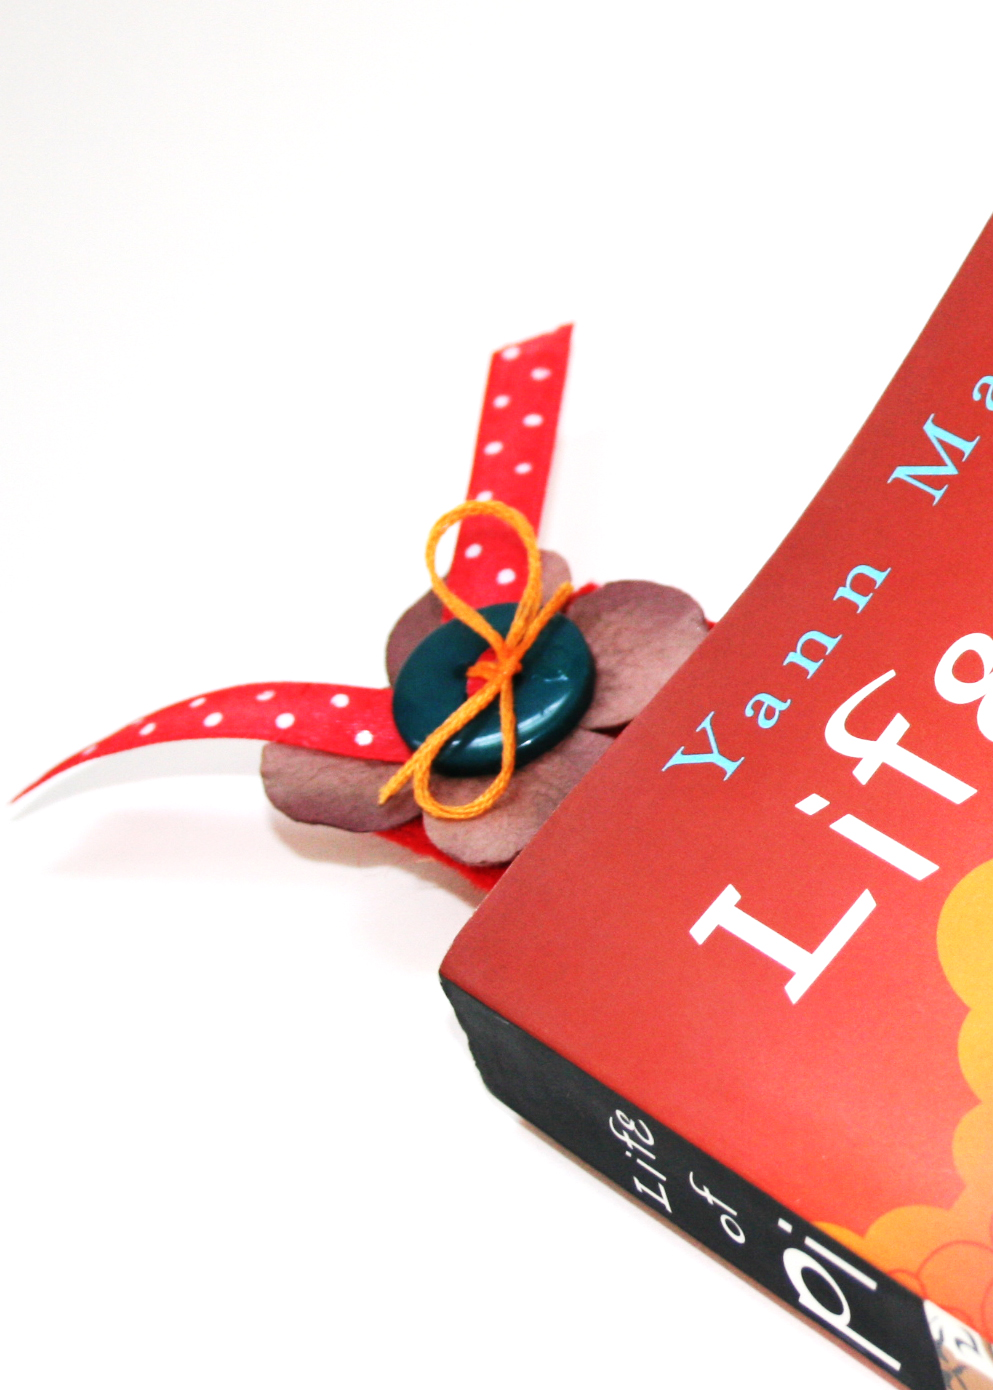
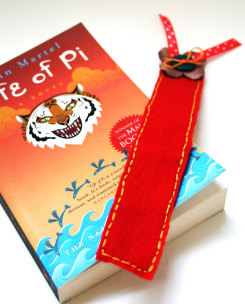
I am equally [i.e. very] passionate about two things: making stuff and reading… Therefore, it is only natural that sooner or later I came up with a way to combine both by making bookmarks – so cute I sometimes stare at them for a while before I start reading (another oddity you’ve learned about me).
A few years back, when I had no time for arts and crafts – working looooong hours at the office – I purchased a laminating machine, making bookmarks for my self and for my parents and for my sisters and… Well, you got the picture. Sadly the laminating machine passed away after we had moved to Ireland. It never made it to California. Technically speaking it didn’t even make it to Ireland…
Well, when laminating is out of the question, lets pull out our felt stash and make the cutest bookmark e-v-e-r! Are you with me on that?
Tools & Supply
Felt scraps (2 strips at your desired bookmark’s size)
Cardstock (scraps would work, you need only 1 strip)
[Music by the talented Josh Woodward from his album: “The Simple Life”]
Step by Step Instructions
Cut two pieces of felt to your desired bookmark’s size (mine were 9¼” by 1½”).
Trace one of your felt strips on a piece of plain cardstock.
Align the edge of your traced rectangular with the ¼” mark of your ruler and draw a line – both lengthwise and widthwise, then cut the smaller rectangle with sharp scissors.
Make s felt “sandwich”, by placing the cardstock strip between the 2 felt strips. temporarily adhere the cardstock to the felt with a [permanent] tape runner.
Take your ruler and place it about an 1/8th of an inch from the edge of your felt sandwich and mark at each ¼” as a sewing guide for later on. Keep on marking all around the rectangle’s edges – you can also make smaller marks, depending on your desired stitch’s size.
To allow your ribbon to easily go through the button’s holes, cut both ends to a pointy edge, then thread it through 2 of the button’s holes. Cut the excess ribbon off and protect the edges from fraying by applying a tiny dab of Diamond Glaze.
We are using the button as a tool to finish off the sewing, as we cannot conceal the knot anywhere else. Therefore thread the embroidery floss through the button and into the flower and then through the felt sandwich. Leave a long tale for your knot at the end.
Keep on stitching the edges of the felt sandwich with a backstitch.
Secure your sewing by threading the embroidery floss back through the flower and the button and tying it in a knot with the tail you’ve left before. A dab of diamond glaze will keep the knot secured.
Share
If you have any question, suggestion or remark – don’t hesitate to contact me – either leave a comment here, use the contact form or start a new thread on the Creativity Prompt Flickr Group!!!
I would also be very happy to see your own creations, so don’t be shy and share 🙂
If you liked this post you may want to subscribe to my feed:
 For this week’s project you don’t even need cardstock. It’s as simple and easy as it gets…
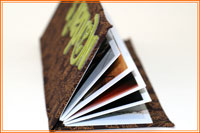
 I am always trying to come up with the quickest and easiest projects for Creativity Prompt, but this time I have really outdone myself…
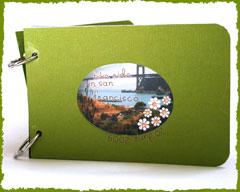


 This week’s creativity prompt is more of an idea on how to reuse drier sheets after they have made your laundry smell fresher and become softer. You know how much I love
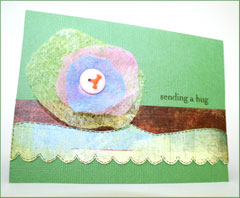

 There are many ways to tell a story with our design and with our journaling. However the story telling begins while we stand behind the camera and capture a still moment. The lighting, the angle, the composition all take part in portraying our story.
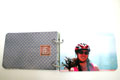
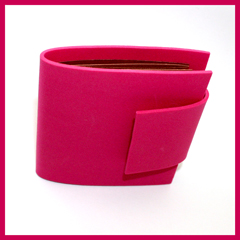
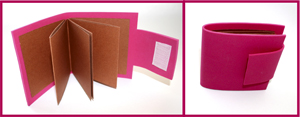 For this week I have a 5-minute-project for you. An adorable little brag book with a fun foam cover that makes it extra “snugglable”.
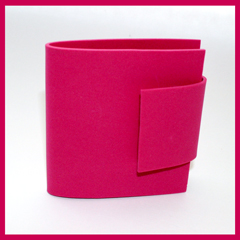
 Every once in a while when I feel the muse is playing hide-and-seek I like to take a step backward, get rid of all the fluff and go back to the basics. The same applies to scrapbooking.
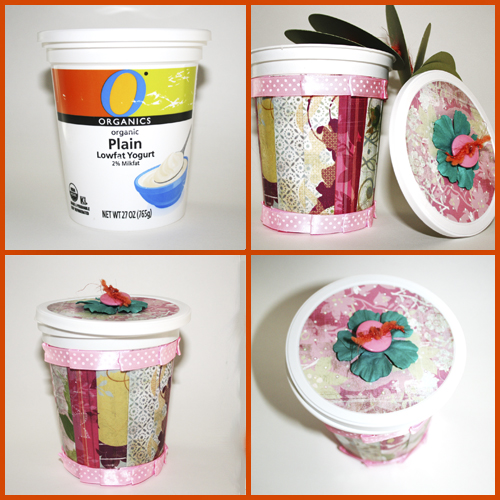 Being environmentally friendly is important to me. It is actually very selfish of me, as I want my posterity to enjoy mother earth as long as possible. Therefore on one of my very first creativity prompts I have shown you how to
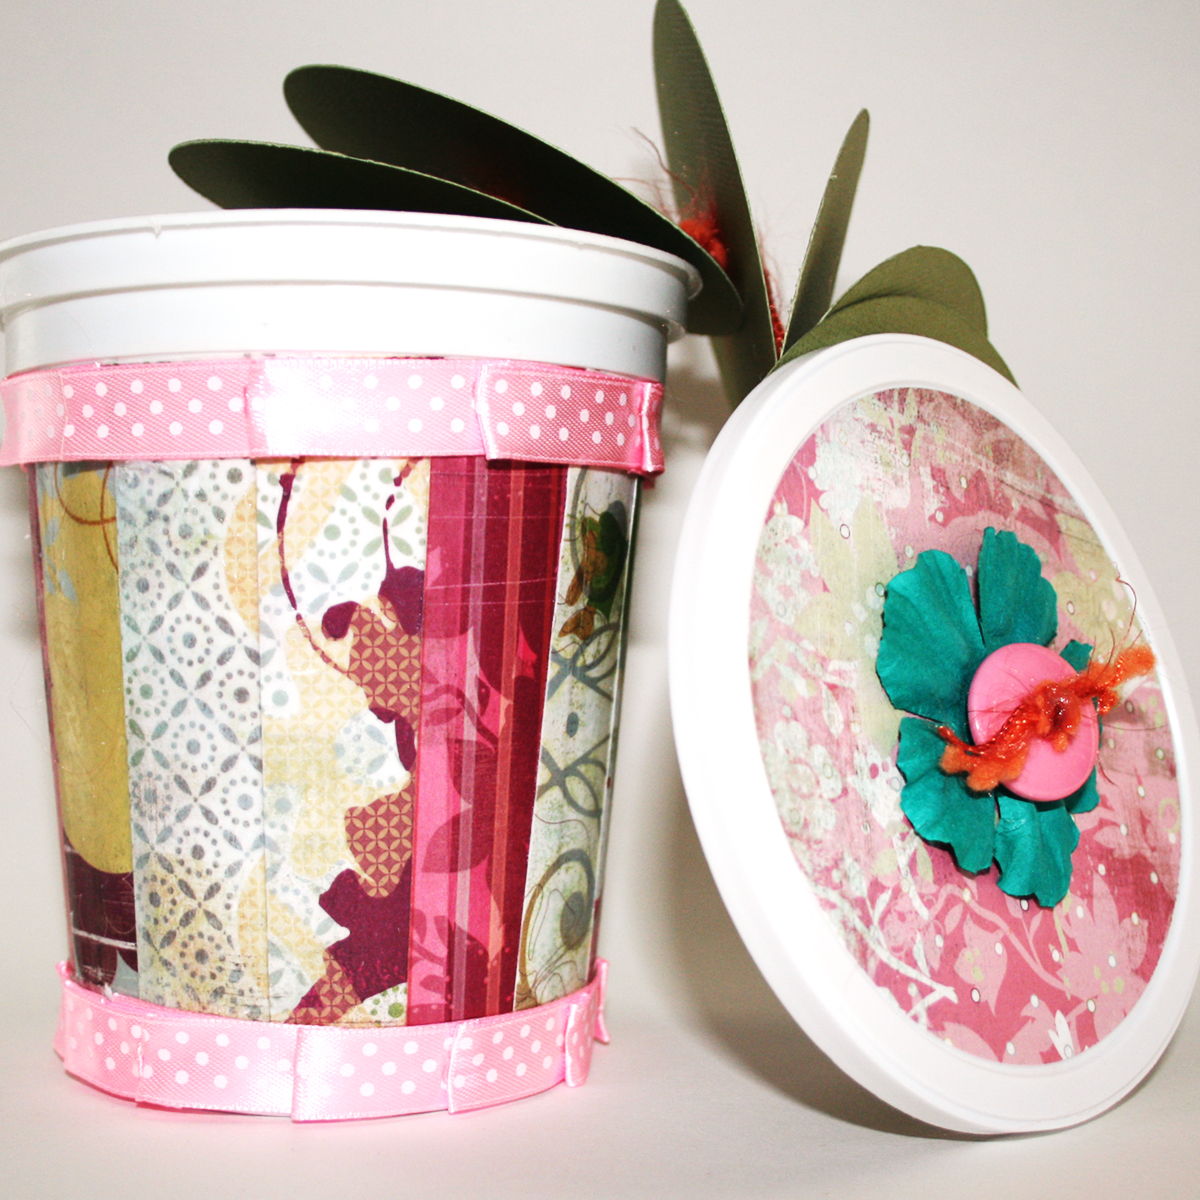
 Subscribe in a reader
 Subscribe by Email