/** Font types */

Posts Tagged ‘creativity prompt’

Gate Fold Thank You Card – Because You Care

Wednesday, March 24th, 2010

Thank You Card

I caved in. I admit it.

I thought a scoring board is redundant. Unnecessary.

But I bought one anyway…

…and i LOVE it!!!

When I buy new patterned paper, I usually store it immediately in my very own papers’ necropolis. However, when I buy new tools – I usually try them right away (sometimes they’re getting buried too). Same happened here, as soon as I got Martha Stewart’s scoring board I had an urge to score me some cards – it was so easy, so addictive.

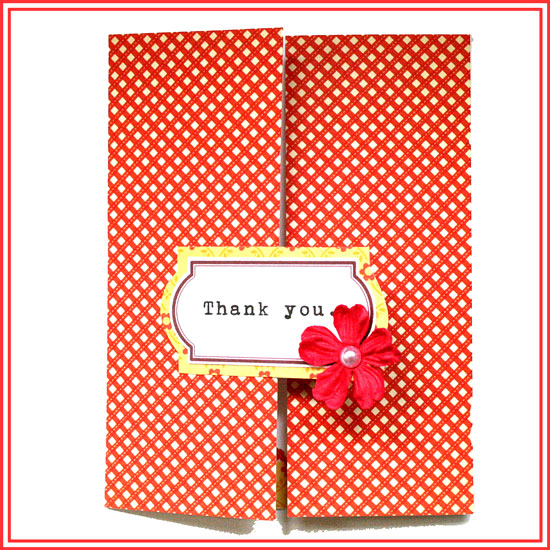
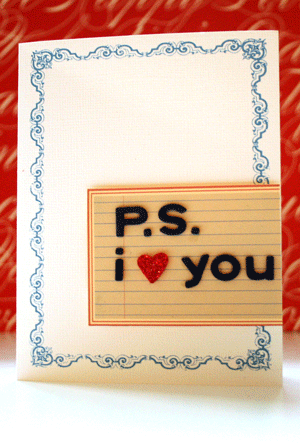
So here I am, living with a small stack of blank, prescored cards and not doing anything with them. For a couple day. Then came the epiphany – use a journaling label for the greeting!

Simple. Easy. Striking. (If you don’t mind me sayin’…)

Thank You Card

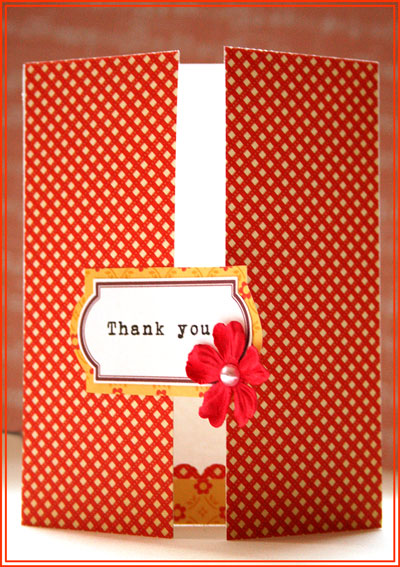
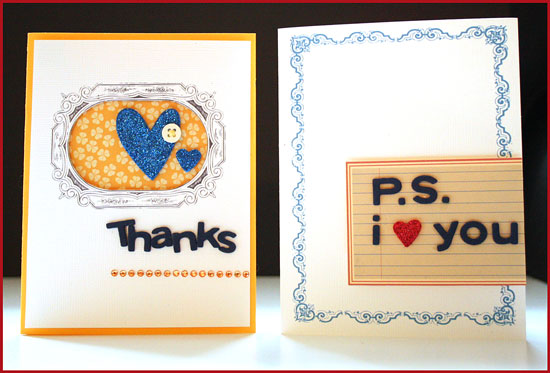
Step By Step Instructions

  1. Cut your cardstock base at 8½” by 5½”. Score at 2 1/8″ and at 6 3/8″.
  2. Cut 2 panels of patterned paper, 5½” by 2 1/8″ each. I used Cosmo Crickt’s 6″ by 6″ Material Girl paper pad.
  3. Adhere the above panels to the panels at the front of the card.
  4. To print on the journaling label, I first printed the greeting on a plain paper (Erika Ormig font, 60Pt.) Then I adhered the label with removable adhesive to the plain paper, on top of the greeting and ran it through the printer again. [This specific labels set will be posted on the blog on Friday, so stay tuned]
  5. I adhered the printed label on another piece of patterned paper from the same pad and cut around it, leaving a nice fat gap. I used Fiskars spring-action scissors for that. They are very easy to manipulate around the curves.
  6. I applied adhesive to only half of the greeting “tag” and adhered it to the left panel – centering it between the two panels.
  7. Then I stuck on a Prima flower and a pearl and called it a happy day.

Share

Have you bought a cool tool lately? What is your favorite tool? Please share – I want to know ๐Ÿ™‚

Make Your Own Planner Workshop
Check out Creativity Prompt’s self paced workshop: “Capture Your Dream”. In this workshop you will capture, follow and make your dream come true as well as document your journey in a mixed media mini album.

Using Up OLD Patterned Paper – Creativity Prompt

Sunday, March 21st, 2010

I am not sure about you but I have got a TON of patterned papers. When I say a ton I mean a few shelves full of it plus an overflowing scrap basket.

Only a small part of my paper stash has been purchased recently [and I am waiting for one more order with a couple 6 by 6 packs to arrive on Monday].

Most of my papers have been accumulated over time ever since I started scrapbooking a while back. That means I have some pretty old paper.

Why do I have so much paper? Well…

First, I love papers. I am drawn to their patterns, colors or the overhaul happiness they confer.

Second, I am afraid to use pretty paper. Yes, I admit. I’m silly like that. What good will the paper bring if I don’t use it, I don’t know. But I’m still afraid to take a beautiful piece of paper and cut it or stick stuff on it. To make things worse, a few years back I used to buy every pattern at least twice (occasionally in several colors). Beware, don’t think it made me use it more often. I just have double-trouble right now…

Lastly, when I was working as a lawyer back home I used to compensate the lack of free time with excessive supply shopping. Every time I had a few minutes to spare on my lunch time I would go online and look for cute scrapbooking supply – and between us crafters, what scrapbook supply isn’t cute and inviting?

To make a long story short, I have A LOT of papers. Most are old. Many are “out of fashion” [some have made a come back, though].

So what do I do now?

Simple.

Steering clear of my new stuff and start pulling the old stuff. Here’s what I made this weekend:

What is on your mind layout

What’s On your mind Layout

Patterned paper: Chatterbox
Letter stickers: Doodlebug Designs
Rub ons: American Crafts Remarks
Marker: American Crafts
Flowers: handmade
Button: Autumn Leaves
Tools: Tiny Attacher by Tim Holtz; Doily Lace punch by Martha Stewart.

Boys will be boys layout

Boys Will Be Boys Layout

Patterned paper: Background – Pebbles Inc.; Cut flowers – Autumn Leaves.
Letter stickers: Doodlebug Designs
Paper Frills: Doodlebug Designs
Marker: American Crafts
Gems: Zva
Tools: Precision scissors

Sometimes sad but mostly happy layout

Sometimes Sad But Mostly Happy Layout

Cardstock: Bazzill
Patterned paper: Chatterbox
Letter stickers: American Crafts Remarks “JFK”
Marker: Uniball white gel pen
Button: Autumn Leaves
Tools: Corner Chomper by We R Memory Keepers; Heart punch by Martha Stewart.

Very happy layout

Very Happy Layout

Cardstock: Bazzill
Patterned paper: Chatterbox
Letter stickers: American Crafts, Jenni Bowlin
Marker: American Crafts, Uniball white gel pen
Chipboard button: Love Elsie by KI Memories
Stickers: KI Memories
Rub ons: DCWV
Tools: Corner Chomper by We R Memory Keepers, Precision scissors.

Share

Have you been piling up your stash too? What type of supply do you tend to accumulate most? Share by leaving a comment. I’d LOVE to hear I am not the only one.

Make Your Own Planner Workshop
Check out Creativity Prompt’s self paced workshop: “Capture Your Dream”. In this workshop you will capture, follow and make your dream come true as well as document your journey in a mixed media mini album.

Scavenging My Scrap Basket – Creativity Prompt

Monday, March 8th, 2010

My scrap basket is a disgrace. I seem to only use it one way – dumping more and more bits and pieces inside. I have scraps of papers from companies that no longer exist… (not that it’s that difficult in our economy, but I am talking about Chatterbox and the like…).

A scrap basket isn’t supposed to act as a burial place for broken 12 by 12 sheets… It is supposed to live symbiotically with the rest of the supply. Complete and enrich each other.

This is not the case, unfortunately.

My total lack of time drives me repeatedly to my stash of paper pads and loose leaf papers because it is easier, fresher, more approachable. Not the most economically and environmentally friendly way of working with papers… I know.

Sometimes I am determined to work with my scraps, and I usually love the result but it doesn’t happen frequently enough.

This weekend I felt like pulling out my scrap basket and see what treasures I can find inside, here is what I made –

Sunshine Boys Layout
Supply

Patterned papers: Black River, Sassafras, Chatterbox.

Letter stickers: American Crafts, Making Memories.

Embellishments: Paper frills by Doodlebug Designs, buttons by We R Memory Keepers, Crochet flowers – handmade.

Journaling tag: Creativity Prompt.

Tools: Tim Holtz (Tiny Attacher + Scissors), We R Memory Keepers Corner Chomper.

Goodog Layout
Supply

Patterned papers: Black River, KI Memories.

Cardstock & letter stickers: American Crafts.

Embellishments: Ribbon: American craft (orange), Other (lace). Chipboard accents: Making Memories. Jewels: Basic Grey.

Journaling tag: Creativity Prompt.

Tools: Tim Holtz. (I absolutely love the Tiny attacher. I was skeptic at first, but it goes through the chipboard like butter)

Home Field Layout
Supply

Patterned papers: vintage textbook paper.
Cardstock: Bazzill (dark brown) DCWV (red).

Letter stickers: American Crafts, Doodlebug Designs; White gel pen: Uniball Signo.

Punches: Martha Stewart (Heart + Doily Lace), Fiskars (Threading Water + Scallop Sentiment), Other: Small heart.

Journaling tag: Creativity Prompt (will be posted soon).

Other: colored pencils (Prisma)

Share

Have you been working with your paper scraps lately? What relationship do you have with your scrap basket/ drawer/ tray? Please share and leave a comment.

If you have any question, suggestion or remark – don’t hesitate to contact me – either leave a comment here, use the contact form or start a new thread on the Creativity Prompt Flickr Group!!!

I would also be very happy to see your own creations, so don’t be shy and share ๐Ÿ™‚

Make Your Own Planner Workshop
This year you can really make your dream come true!

“Capture Your Dream” workshop is a self-paced, six weeks long workshop, that will walk you through a journey of capturing your biggest dream and making it come true.

In the process of making your dream happen – with lots of inspiration and guided self-exploration, you will also create a mixed media mini album from scratch and learn many tips and techniques – including some photography pointers that will add character to your photos and will help you take better pictures of your projects.

The workshop includes 30 printable PDF lessons with step-by-step pictures and instructions as well as several printable templates you may use in other projects too.

I am confident you will enjoy it and find it helpful so I also offer full money back guarantee while the workshop lasts.

Build A Scene OR Paper Piecing Card – Creativity Prompt

Saturday, February 27th, 2010

Paper Piecing Card

Way back, when I was a wee kid, my sister used to tell me the most wonderful made-up stories. I was completely mesmerized by her stories, not to mention extremely gullible…

My favorite stroy was about a magic typewriter, hidden in a secret compartment inside the wall (I used to spend HOURS looking for it). Everything you type on it with the words: “I wish” at the beginning, comes true. You could write short sentences such as ‘I wish I had ice-cream with hot chocolate sauce…‘ and immediately enjoy the treat, or you may materialize imaginary worlds, built from scratch with the power of your words (These were my favorite types of stories).

In crafts, as in creative writing or story telling, you may build imaginary worlds from scratch and go as far as your imagination and creativity go.

Go ahead and build a scene. Let your inner creative child guide you through the labyrinth of your vast imagination.

Step by Step Instructions

  1. Adhere a vintage text paper onto a plain, non-textured cardstock using glue stick.
  2. Stamp your image a few times on different patterned papers, including on the vintage text paper. Use as many patterned papers as the number of pieces you want to combine together.
  3. Cut each piece of your image with precision scissors.
  4. Start assembling the “scene”: Adhere the “flat” pieces with a glue pen and the dimensional pieces with foam dots.
  5. For the “hill” – cut a piece of patterned paper in a curve.
  6. Draw some freehand clouds on your leftover text paper and cut the out with precision scissors.
  7. Spritz your “clouds” with Glimmer Mist.
  8. Stamp or punch the little heart on a reddish patterned paper. Apply some Glossy Accent. Let dry and cut out. Adhere to the image with a foam dot.
  9. Stamp the greeting in a curve, by laying it that way on the acrylic block.
  10. Add some gems for the finishing touches.

Share

If you have any question, suggestion or remark – don’t hesitate to contact me – either leave a comment here, use the contact form or start a new thread on the Creativity Prompt Flickr Group!!!

I would also be very happy to see your own creations, so don’t be shy and share ๐Ÿ™‚

Make Your Own Planner Workshop
Check out Creativity Prompt’s self paced workshop: “Capture Your Dream”. In this workshop you will capture, follow and make your dream come true as well as document your journey in a mixed media mini album.

Hybrid Cards – Mix Fancy With Funky

Tuesday, February 23rd, 2010

Hybrid Cards - Mix Fancy With Funky

I was looking at Shimelle’s new kit: Write It Down Ornate Frames, which “aired” today on Two Peas In A Bucket, and thought it would be just perfect for making a bunch of hybrid cards.

At first I thought to edit them on photoshop, add the greeting with one of my gazillion fonts, print out, add a ribbon, or some gems and call it a day. A great way to make a bunch of coordinating classic cards.

Then I thought, lets take it up a notch… It would be really cool to mix Shimelle’s beautiful, classical, traditional ornate frames with some funky patterned papers and a funky – non-traditional – design, and that’s exactly what I did.

I hope you like it and will give it a try. (Shimelle’s kit costs just 99 cents…)

Step by Step Instructions

Hybrid I Love You Card

  1. Use a photo editing program to lay the frame on the right side of a letter size document. Size it to measure 4″ by 5¼”. Print out the document on textured white cardstock, using the borderless settings of your printer.
  2. Cut the cardstock in half – to 5½” and fold in half at 4¼” to create a standard size card.
  3. Print out Creativity Prompt’s free classic journaling tags on plain non-textured cardstock. Cut out one of the tags and cut off about an inch from its right edge.
  4. For the letters I used plain and glittered fun foam that I cut with my Cuttlebug, using QuicKutz Moonlight dies, and adhered it with Tombow Mono Multi glue you can also use American Crafts Thickers.
  5. Adhere the journaling tag to the bottom right edge of the card using foam squares.

Hybrid Thanks Card

  1. Use a photo editing program to lay the frame on the right side of a letter size document. Size it to measure about 3½” wide (keep its proportions). Print out the document on textured white cardstock, using the borderless settings of your printer.
  2. Cut the cardstock to 5¼” by 4″.
  3. Use a craft knife to cut off the oval center of the frame.
  4. Cut a textured yellow cardstock to 8½” by 5½” and fold in half at 4¼” to make a standard size card.
  5. Cut a piece of a funky patterned paper at 3½” by 3½”.
  6. Lay the printed cardstock on the yellow card base and trace the oval window with a pencil. Adhere the patterned paper where the window will lay, over the pencil marks.
  7. For the letters I used plain and glittered fun foam that I cut with my Cuttlebug, using QuicKutz Moonlight dies, and adhered it with Tombow Mono Multi glue you can also use American Crafts Thickers.
  8. Adhere the printed cardstock with foam squares.
  9. Adhere the hearts. I Cut the heart with a Cuttlebug die from the glittered fun foam. (I used a VERY old punch for the small heart)
  10. Adhere the button (I would have used a yellow button if I had one…) with a couple mini glue dots.
  11. Adhere the line of yellow gems below the greeting.

Share

If you have any question, suggestion or remark – don’t hesitate to contact me – either leave a comment here, use the contact form or start a new thread on the Creativity Prompt Flickr Group!!!

I would also be very happy to see your own creations, so don’t be shy and share ๐Ÿ™‚

Make Your Own Planner Workshop
“Capture Your Dream” workshop is relaunching as a self-paced workshop. Isn’t this the perfect time for you to capture your dream and make it happen?

Experiment With Color On Your Layouts – Creativity Prompt

Sunday, January 24th, 2010

Experiment With Color On Your Layouts

I am a great believer in the power of the written word. In fact, only recently I’ve urged you to write as if your next word will be your last. However, there comes a time when you just need to play. Remind yourself what is it that you love so much? Why do your fingers tingle? Why does your heart beat so hard when you stumble upon a pile of ink pads and paint mists?

Unleash your creative child and experiment with colors. Reveal the artist within you!

In the layout above I did just that. I experimented and played and had fun. Here is how I did it:

Tools & Supply

Step-By-Step Instructions

  1. Cut the smooth cardstock to 2″ by 5″ strips.
  2. Stamp the petticoat pattern all over the strip with Versamark ink and emboss with a clear embossing powder, using the heat tool.
  3. Squeeze the distress ink pads on a craft sheet and mist with plain water until the ink bubbles up. Then lay your strips – stamped side down – on the wet ink and move it around. Use the heat tool to dry and set the ink.
  4. Spray the strips with the water-diluted pearl medium and with the glimmer mist and blot down the excess ink with a paper towel.
  5. Intensify the color by using the distress inks directly on the strips with the foam blending tool. Work in a circular motion, from the outside in. Use darker colors on the edges of the strips. Wipe the strips with a paper towel or a baby wipe to emphasize the embossed pattern.
  6. Dip your finger in clean water and flip it over the strips. The distress ink will react to the water and spread out. It will create a vintagey worn-wallpaper look. Once you get the affect you want, immediately dry it out with a heat tool to avoid farther spreading of the ink.
  7. Once the strips are completely dry, stamp over them with the rest of the stamps, using Versamark ink and emboss with a black embossing powder. For the Chandelier’s cord I used a glue pen and poured the embossing powder over it.
  8. Attach the strips to the bottom of your cardstock, about an inch from the edge, centered and evenly spaced from each other. (I used both a tape runner and some glue dots.)
  9. Adhere the red mat (11″ by 6½”) above the paper strips.
  10. Adhere the photo on the left edge of the mat, evenly spaced from all 3 adjacent edges.
  11. Assemble your long title with the letter stickers.
  12. Hand draw an outline around the mat with a white gel pen and don’t forget to write down the date.
  13. Use the foam blending tool to ink up the edges of your background cardstock with the Fired Brick distress ink by Rangers.

How was your play time?

Share

If you have any question, suggestion or remark – don’t hesitate to contact me – either leave a comment here, use the contact form or start a new thread on the Creativity Prompt Flickr Group!!!

I would also be very happy to see your own creations, so don’t be shy and share ๐Ÿ™‚

Make Your Own Planner Workshop
Check out “Make Your Own Planner” workshop for an affordable monthly and weekly planner in a workshop that keeps on giving…

Participate In A Creative Challenge To Break A Block- Creativity Prompt

Wednesday, January 13th, 2010

Participate In A Creative Challenge

[Cardstock: Papertrey Ink; Patterned paper: Basic Grey; Ribbon + letter stamps – Michael’s; Baby stamp set – Panduro, Norway; Punches: 2″ circle squeeze punch and Apron Lace by Fiskars; Corner Chomper – We R Memory Keepers; Ink: Papertrey Ink + Versamark; Embossing powder and Rock Candy Stickles – Ranger Industries.]

Raspberry Suite Color challenge #21It may sound counterintuitive but when you feel blocked one of the best ways to break out of the creative rut is to confine yourself to a limited set of colors or to a certain sketch.

This week I decided to participate in Dawn McVey‘s Raspberry Suite Color Challenge.

The colors were already picked for me and all I had to do is to come up with the design. My design is inspired by Kristina Werner’s last MACM.

As you can see I took the colors and the design idea and had made them mine, but more importantly, I have shattered my creative block and kept on creating other cards, layouts and ATCs afterward.

Step-by-Step Instructions

  1. Cut your card base (8½” by 5½”) and fold in half (into 4¼” by 5½” card).
  2. Cut the yellow patterned paper to 3″ by 5″.
  3. Stamp the yellow strip with the border text stamp with versamark ink and heat emboss it with clear embossing powder.
  4. Stamp your greeting on the bottom of the yellow strip with permanent brown ink, using individual letter stamps.
  5. Punch a circle at the center of the top part of the strip.
  6. Tie a ribbon around the yellow strip.
  7. Cut 2″ strip of the brown patterned paper and punch one side with the border punch.
  8. Adhere the brown strip to the back side of the yellow strip, by applying adhesive to the edge of the yellow strip. Allow only the decorative border to show.
  9. Before adhering the patterned paper to the card base, lay it over the card base where you’d like to position it and mark the circle with a pencil.
  10. Stamp your image inside the pencil circle with brown ink, then heat emboss the image with clear embossing powder.
  11. When the ink is completely dry, erase the pencil mark and adhere the patterned paper with foam dots.
  12. Round the corners of the card base.
  13. Go over the image with a layer of Stickles glitter glue and let dry.

Share

If you have any question, suggestion or remark – don’t hesitate to contact me – either leave a comment here, use the contact form or start a new thread on the Creativity Prompt Flickr Group!!!

I would also be very happy to see your own creations, so don’t be shy and share ๐Ÿ™‚

Make Your Own Planner Workshop
Check out “Make Your Own Planner” workshop for an affordable monthly and weekly planner in a workshop that keeps on giving…

How To Make Flowers Out Of Recycled Dryer Sheets – Creativity Prompt

Friday, January 8th, 2010

Make Flowers Out Of Recycled Dryer Sheets

I love recycling. It is no news to you. What can I say, giving something a new lease of life just before it was about to be tossed away is magical to me.

I have already posted a tutorial before on how to make dryer-sheet flowers, and today I want to suggest 2 more options as well as a new idea on how to inject color onto them.

If you are interested in learning how I did the flowers above, than keep on reading!

Tools & Supply

How To


[Watch on You Tube & while there, please rate, comment and subscribe]

Step-By-Step Instructions

First Flower Style –

  1. Cut your sheet into strips of about 1″ wide. It doesn’t have to be precise. The wider the strip, the larger the flower would be. For a Two layered flower, make 1 strip wider than the other.
  2. Dye your strip with Glimmer Mists and Perfect Pearls mixed with water.
  3. Dry your dryer sheet completely. You may use a heat gun to dry the strips, but be careful not to get too close and not to concentrate on one zone for too long, or the strip will rip from the heat. You may also use a paper towel to blot the excess liquids.
  4. Pleat the strip around the button and make sure all the ends are tucked underneath the button. Secure all the pleats with a button and embroidery floss.
  5. Tie both ends of the embroidery floss in a double knot and cut off the excess.

Second Flower Style –

  1. Take a couple of sheets and lay them together. Fold them into thirds and cut out an imperfect circle to create a stack of dryer-sheet-circles.
  2. Dye each circle with the mists. To make it more interesting, use different colors on each circle.
  3. Let the circles dry completely.
  4. Stack them together again in an order that appeals to you and secure them with a button and embroidery floss. Alternative: Sew them together with embroidery floss threaded with small beads.
  5. Tie both ends of the embroidery floss in a double knot and cut off the excess.

Dryer sheet Flowers

Share

If you have any question, suggestion or remark – don’t hesitate to contact me – either leave a comment here, use the contact form or start a new thread on the Creativity Prompt Flickr Group!!!

I would also be very happy to see your own creations, so don’t be shy and share ๐Ÿ™‚

Make Your Own Planner Workshop
This year you can really make your dream come true!

“Capture Your Dream” workshop is a self-paced, six weeks long workshop, that will walk you through a journey of capturing your biggest dream and making it come true.

In the process of making your dream happen – with lots of inspiration and guided self-exploration, you will also create a mixed media mini album from scratch and learn many tips and techniques – including some photography pointers that will add character to your photos and will help you take better pictures of your projects.

The workshop includes 30 printable PDF lessons with step-by-step pictures and instructions as well as several printable templates you may use in other projects too.

I am confident you will enjoy it and find it helpful so I also offer full money back guarantee while the workshop lasts.

The 10 Best Creativity Prompts in 2009

Friday, January 1st, 2010

In light of the coming new year, I backtracked a little bit and gathered the most popular posts on creativity Prompt in 2009.

Without further ado, here are the posts which attracted most of your attention and sparked a wonderful conversation รขโ‚ฌโ€œ either on the blog or privately, via e-mails.

  1. Make a Hybrid Board Book.
  2. Chunky Mini-Album.
  3. Waterfall Mini-Album.
  4. Make A Notebook With A Simple Stapler.
  5. Make A Fabric Covered Hardbound Journal.
  6. Embellishing Paper Flowers.
  7. How To Use Those Paper Scraps.
  8. How To Make A Cute Box Of Drawers.
  9. How To Make a Drier Sheet Flower.
  10. How To Make THE QUICKEST Mini Album รขโ‚ฌโ€œ EVER.

&

Another favorite compilation post was the holiday handmade gift guide: 10 Handmade Gifts Under 10 Minutes.

Share

What Creativity Prompt did you like the best? What types of projects are pulling you to create?

What project have you tried yourself? Share a link!

Happy New Year!!!

Make Your Own Planner Workshop
This year you can really make your dream come true!

“Capture Your Dream” workshop is a self-paced, six weeks long workshop, that will walk you through a journey of capturing your biggest dream and making it come true.

In the process of making your dream happen – with lots of inspiration and guided self-exploration, you will also create a mixed media mini album from scratch and learn many tips and techniques – including some photography pointers that will add character to your photos and will help you take better pictures of your projects.

The workshop includes 30 printable PDF lessons with step-by-step pictures and instructions as well as several printable templates you may use in other projects too.

I am confident you will enjoy it and find it helpful so I also offer full money back guarantee while the workshop lasts.

Make A Simple Notebook With Ribbon Binding – Creativity Prompt

Friday, December 25th, 2009

Notebook With Ribbon Binding

This project is also an easy one you can whip up in under 10 minutes. I love those type of projects and I can never have enough notebooks to sketch, doodle and write in. Can you?

I used the ribbon for the binding, as an alternative to the linen thread or embroidery floss I normally use for binding and as an added bonus, the ends of the ribbon also provide a nifty closure for the notebook.

If you are interested in making this sweet and simple notebook, then keep on reading for the supply, video how to and step-by-step instructions. Enjoy!

Tools & Supply

How To

[Watch on YouTube. While you’re there, please comment, rate & subscribe]

Step-by-Step Instructions

  1. Cut your papers 8″ wide and 5½” tall. Fold in half to 5½” by 4″.
  2. Straighten the edges of the paper stack with a grid ruler, aligned with the edge of the paper and a craft knife.
  3. Cut your cardstock 8½” wide and 5½” tall and wrap around the paper stack to adjust the spine.
  4. Lay the paper stack over the cardstock cover and mark the piercing holes: one at the center and one to each side – 1″ apart.
  5. Pierce the papers and cardstock following the marks you created before.
  6. Thread the ribbon through the needle so both ends would meet and start the binding stitching from the inside out, through one of the outer holes.
  7. Then go in through the opposite hole.
  8. Tie the ends together in a double knot and thread the needle out through the center hole and in again through the same hole.
  9. Thread the needle through the loop the tied ends create and then underneath the first stitch.
  10. Thread the needle out through the center hole again.
  11. Cut the ribbon off the needle and use the ends to close the notebook.
  12. To embellish the notebook I adhered 3 buttons with a dab of Diamond Glaze to the center of the notebook’s cover and adhered three punched out circles of patterned paper to the button. I then secured the patterned paper with another layer of Diamond Glaze.

Share

If you have any question, suggestion or remark – don’t hesitate to contact me – either leave a comment here, use the contact form or start a new thread on the Creativity Prompt Flickr Group!!!

I would also be very happy to see your own creations, so don’t be shy and share ๐Ÿ™‚

Make Your Own Planner Workshop
“Capture Your Dream” workshop is relaunching as a self-paced workshop. Isn’t this the perfect time for you to capture your dream and make it happen?