/** Font types */

Archive for the ‘Tutorial’ Category

Be Playful – Creativity Prompt

Wednesday, April 21st, 2010

Dress Up - playful Layout

[Fonts: Rough_typewriter, Barnes_erc_; Digital Kits: KD Tweet, KD For The Boy, KD Frame Essentials – all by Karla Dudley.]

All work and no play? not in my (scrap)book!

Scrapbooking is important.
Telling the story is important.
Perpetuating memories is important.

saying that, scrapbooking is also a hobby.
As a hobby it’s supposed to be awesome.
As a hobby it’s supposed to be fun.
As a hobby it’s supposed to conform to OUR rules – not vice versa!

So I am very much into inserting some more playfulness into the process.

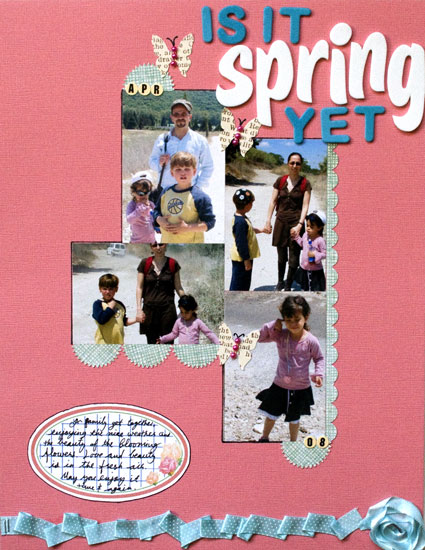
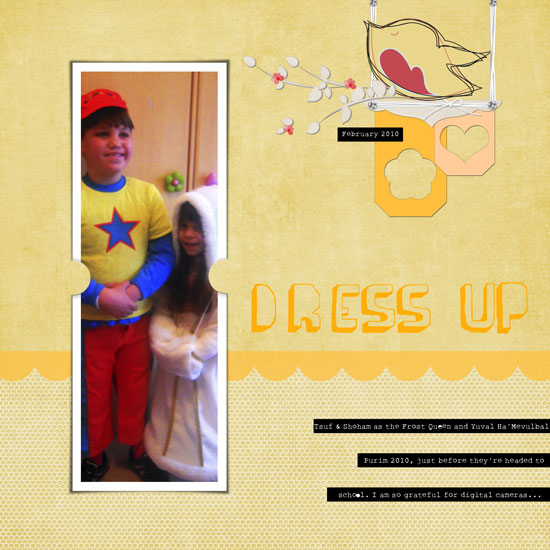
In this layout, with help from Karla Dudley‘s playful designs and a playful free font I have injected a much needed gaiety and cheerfulness into my layout.

The bird, for instance, is actually made out of 3 different images from the KD Tweet kit, that I layered and locked into one layer. You may need to adjust the angle of the image a bit (move your mouse cursor next to the top edge of the bounding box until it looks like a rounded arrow, then click and drag slightly up or down). I also “built” the bird-swing by using different images together, not necessarily the way one would traditionally use them.

You can mimic this idea/look with traditional “hard-copy” products by layering embellishments together or using things a bit differently than usual.

It made me smile. It might make you smile too!

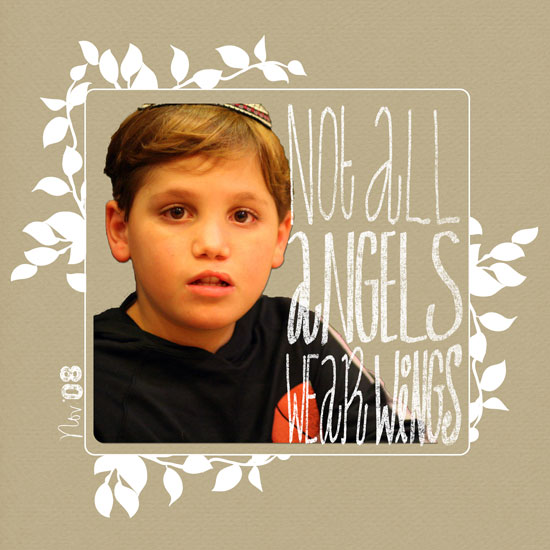
Photoshop Elements Tip
How did I make the labeler-like strips?

Easy!

  • Use the rectangle shape tool to draw a short and wide strip. Make sure your shape color is black.
  • Choose the type tool and pick a typewriter font, make sure your font color is white.
  • Click on your rectangle and start typing. Click twice to commit.
  • Choose the move tool and pick 2 layers – the shape and the type (make sure they are both highlighted).
  • Click on the ‘align’ button at the top of your window and align the 2 layers together, both vertically and horizontally.
  • Lock the layers together to keep the alignment.
  • Repeat.

Share

How do you insert playfulness to your layouts? Share by leaving a comment (or a link to your playful layout)

Is It Spring Yet – Sharing A Layout And A Techniqe

Tuesday, April 6th, 2010

Is It Spring Yet

Supply

  • cardstock: Bazzill
  • Patterned paper: My Minds Eye “Home” (pale blue), Autumn Leaves (text)
  • Adhesive: Fabri Tac by beacon; Glue Glider Pro by Glue Arts; 2 Way Glue by EK Success.
  • Letter Stickers: American Crafts “Lullaby” Thickers (white), Generic from the Dollar bin at Target (turquoise), Jenni Bowlin Tiny Circle Stickers.
  • Tools: Punches: EK Success (scallop border punch), Martha Stewart (starburst); Stapler: Tiny Attacher by Tim Holtz.
  • Journaling tag: Creativity Prompt.
  • Ribbon: American Crafts (Dotted), Generic and o-l-d (seafoam thin satin)
  • Jewels: generic.

How To

Pleated Ribbon

  1. Attach the edge of your ribbon with 2 tiny staples.
  2. Apply a line of fabric glue. Fabri Tac is WONDERFUL. (I wish I was endorsed by Beacon. I am not)
  3. Pleat the ribbon along the glue line irregularly to create a messy look. don’t worry about the pleats opening up at this stage.
  4. Go back and apply a bead of glue underneath each “pleat” to keep it in place.

Ribbon Flower

Also Known as – what to do if you run out of ribbon while pleating but happen to have a similarly colored ribbon at hand…

  1. Put a drop of fabric glue where you want your flower center to be at and adhere the tip of your ribbon strip to it.
  2. Apply some more glue around the glued edge and start turning your ribbon around it, flipping the ribbon occasionally.
  3. Keep applying more beads of glue around and building your “flower” until you are satisfied with its size.
  4. Cut off the excess ribbon and tuck the end underneath one of the pleats with another bead of glue.

Share

Is it spring yet? Share your thoughts by leaving a comment.
If you give the techniques a try – pweeeeeze share ๐Ÿ™‚

Make Your Own Planner Workshop
Check out Creativity Prompt’s self paced workshop: “Capture Your Dream”. In this workshop you will capture, follow and make your dream come true as well as document your journey in a fabulous mixed media mini album.

Do You Know An Angel – Journaling Prompt + How To Make Personal Digital Word Art

Monday, April 5th, 2010

not All Angels Wear Wings

[Digital Kits: KD Cardstock Essentials, KD Blakely & KD Capture + Record – All by Karla Dudley]

Do you know an angel?

I know one.

My angel has a pure heart and beaming eyes.

My angel only knows one feeling. My angel knows LOVE.

My angel doesn’t envy. My angel isn’t mad. My angel doesn’t compete. My angel doesn’t hurt. My angel doesn’t lie. My angel doesn’t swear. He NEVER does. Ever.

My angel doesn’t wear wings, does yours do?

[In this layout is my nephew Shoham, 9 years old.]

Digital Tip

I created the word art in this layout my self. This is how I did it:

  1. First, I wrote my words on a white paper with various pens (both plain black pens and black calligraphy pens).
  2. Next, I scanned my paper in high resolution (600 dpi) and saved it as a JPG file.
  3. Then I opened the file with my Photoshop Elements and cranked up the levels [ctr+L/CMD+L]. Turning the “black” dial all the way to the first peak and the mid-tones dial all the way to the black one. The effect you are looking for is to have all the black parts REALLY black and all the white parts REALLY white.
  4. Then I turned my background layer into a simple layer, by clicking on it twice and opened a new layer beneath it.
  5. I made sure that I am on the original layer and picked up all the white parts with the Quick Selection Tool. I then pressed “delete” and the transparent layer showed up where the white used to be. I picked each of the small cavities inside the letters (e.g. the O’s and A’s) individually and deleted these white parts too.
  6. Then I merged the two layers together (merge not simplify!) and saved the file as a PNG file to keep the transparent attributes.
  7. Once your text is on a transparent background, you can select each word and each letter individually with the selection tool and then adjust its height and width with the move tool.

Give it a try, it is so simple and it lets you inject some personality to the digital layout. No tablet is necessary!

Share

Who is the angel in your life? share your thoughts by leaving a message.

Are you planning on giving the digital word art a try? If you do, please share your work with us.


Unleashing The Creative Child Within You

Simple Cards To Create In Minutes

Thursday, April 1st, 2010

Thank You Card

Thank You Card

Supply

How-To Pointers

  • For the greeting, all I did was to open a new 8½” by 11″ document at 300dpi and write “Thank You” in black with the text tool. Than I duplicated the layer a few times and changed the size by dragging the edge of the bounding box. I Positioned each layer randomly and changed the opacity of each layer. Then I printed it on white cardstock, punched it and sprayed it with Glimmer Mist (immediately absorbing the excess liquid, so the ink won’t spread).
  • For the flower accent, I just adhered the dew drop on a Basic Grey paper with some Diamond Glaze. I’ve found it easier to put the glue on the dew drop and then press on the paper than to do that the other way around. Ranger Glossy Accents will also work great. I love it too. After the glue dries up, I cut around the dew drop, which also acts as a weight to help the gate-fold card stay shut.

I Love You Card

I Love You Card

Supply

How-To Pointers

  • The self adhesive fun foam wouldn’t go through the punch, so I punched a scrap piece of paper, adhered it to the backer of the fun foam (as the shape is symmetric), and cut around with precision scissors.
  • To attach the vellum greeting I used the Tiny Attacher and tried to aim the staples to the lines of the letters… almost successfully… I concealed the back of the staples with a strip of patterned paper I adhered to the back.
  • For the faux stitching box, I first marked it with a pencil, using a T-Square ruler and then went over it with American Crafts brown precision pen and erased the pencil marks.
  • This card isn’t standard. It’s a square card, measured 4¼” by 4¼”. It started as a standard card, but after finishing it I felt a smaller size would look better. Trial and error, that’s the way to go.

Thanks Card

Thanks Card

Supply

How-To Pointers

  • I made the flower from used dryer sheets and Glimmer mists. You may find the video tutorial here.
  • I used the scoring board to make the pleated cardstock “ribbon”. I just scored repeatedly in intervals of ½” and 1/8″ and folded the scoring lines later to create the pleats. A mountain fold after each ½” mark and a valley fold after each 1/8″ mark. Down and up and down and up… I attached it to the patterned paper with a line of glue runner, then supported it with 2 tiny staples that also attached the felt ribbon to it.
  • For the funky greeting, I first penciled it on the paper lightly (using 2 pencils held together to create the broad line), then I went over the lines with a black pen, erased the pencil marks and cut around it with precision scissors. I adhered each letter with a tiny foam dot to add dimension.

My favorite card is the first one, with the “photoshopped” greeting. Which one is yours?

Share

Have you recently made a card to show you care? Share your thoughts by leaving a comment or share your card on the Creativity Prompt Flickr Group.

Unleashing The Creative Child Within You
Back when we were kids creativity came naturally to us. Everything was possible and our prolific imagination was the only limit we knew.
Through the years we have grown apart from our inner creative child and along with that – have lost our pristine and utter joy of creation.

In this e-book I will pave your way back to your inner creative child, brick by brick.

“Unleashing The Creative Child Within You” will explain why you became distant from your core creativity and will reveal the secret to getting it back.
With exercises designed specifically to help you find the inner child within you, regain its confidence and unleash it – you are bound to get your mojo back faster than you think.

Your inner creative child wants to come out and play, so don’t disappoint it and get “Unleashing The Creative Child Within You“.

Gate Fold Thank You Card – Because You Care

Wednesday, March 24th, 2010

Thank You Card

I caved in. I admit it.

I thought a scoring board is redundant. Unnecessary.

But I bought one anyway…

…and i LOVE it!!!

When I buy new patterned paper, I usually store it immediately in my very own papers’ necropolis. However, when I buy new tools – I usually try them right away (sometimes they’re getting buried too). Same happened here, as soon as I got Martha Stewart’s scoring board I had an urge to score me some cards – it was so easy, so addictive.

So here I am, living with a small stack of blank, prescored cards and not doing anything with them. For a couple day. Then came the epiphany – use a journaling label for the greeting!

Simple. Easy. Striking. (If you don’t mind me sayin’…)

Thank You Card

Step By Step Instructions

  1. Cut your cardstock base at 8½” by 5½”. Score at 2 1/8″ and at 6 3/8″.
  2. Cut 2 panels of patterned paper, 5½” by 2 1/8″ each. I used Cosmo Crickt’s 6″ by 6″ Material Girl paper pad.
  3. Adhere the above panels to the panels at the front of the card.
  4. To print on the journaling label, I first printed the greeting on a plain paper (Erika Ormig font, 60Pt.) Then I adhered the label with removable adhesive to the plain paper, on top of the greeting and ran it through the printer again. [This specific labels set will be posted on the blog on Friday, so stay tuned]
  5. I adhered the printed label on another piece of patterned paper from the same pad and cut around it, leaving a nice fat gap. I used Fiskars spring-action scissors for that. They are very easy to manipulate around the curves.
  6. I applied adhesive to only half of the greeting “tag” and adhered it to the left panel – centering it between the two panels.
  7. Then I stuck on a Prima flower and a pearl and called it a happy day.

Share

Have you bought a cool tool lately? What is your favorite tool? Please share – I want to know ๐Ÿ™‚

Make Your Own Planner Workshop
Check out Creativity Prompt’s self paced workshop: “Capture Your Dream”. In this workshop you will capture, follow and make your dream come true as well as document your journey in a mixed media mini album.

Build A Scene OR Paper Piecing Card – Creativity Prompt

Saturday, February 27th, 2010

Paper Piecing Card

Way back, when I was a wee kid, my sister used to tell me the most wonderful made-up stories. I was completely mesmerized by her stories, not to mention extremely gullible…

My favorite stroy was about a magic typewriter, hidden in a secret compartment inside the wall (I used to spend HOURS looking for it). Everything you type on it with the words: “I wish” at the beginning, comes true. You could write short sentences such as ‘I wish I had ice-cream with hot chocolate sauce…‘ and immediately enjoy the treat, or you may materialize imaginary worlds, built from scratch with the power of your words (These were my favorite types of stories).

In crafts, as in creative writing or story telling, you may build imaginary worlds from scratch and go as far as your imagination and creativity go.

Go ahead and build a scene. Let your inner creative child guide you through the labyrinth of your vast imagination.

Step by Step Instructions

  1. Adhere a vintage text paper onto a plain, non-textured cardstock using glue stick.
  2. Stamp your image a few times on different patterned papers, including on the vintage text paper. Use as many patterned papers as the number of pieces you want to combine together.
  3. Cut each piece of your image with precision scissors.
  4. Start assembling the “scene”: Adhere the “flat” pieces with a glue pen and the dimensional pieces with foam dots.
  5. For the “hill” – cut a piece of patterned paper in a curve.
  6. Draw some freehand clouds on your leftover text paper and cut the out with precision scissors.
  7. Spritz your “clouds” with Glimmer Mist.
  8. Stamp or punch the little heart on a reddish patterned paper. Apply some Glossy Accent. Let dry and cut out. Adhere to the image with a foam dot.
  9. Stamp the greeting in a curve, by laying it that way on the acrylic block.
  10. Add some gems for the finishing touches.

Share

If you have any question, suggestion or remark – don’t hesitate to contact me – either leave a comment here, use the contact form or start a new thread on the Creativity Prompt Flickr Group!!!

I would also be very happy to see your own creations, so don’t be shy and share ๐Ÿ™‚

Make Your Own Planner Workshop
Check out Creativity Prompt’s self paced workshop: “Capture Your Dream”. In this workshop you will capture, follow and make your dream come true as well as document your journey in a mixed media mini album.

Hybrid Cards – Mix Fancy With Funky

Tuesday, February 23rd, 2010

Hybrid Cards - Mix Fancy With Funky

I was looking at Shimelle’s new kit: Write It Down Ornate Frames, which “aired” today on Two Peas In A Bucket, and thought it would be just perfect for making a bunch of hybrid cards.

At first I thought to edit them on photoshop, add the greeting with one of my gazillion fonts, print out, add a ribbon, or some gems and call it a day. A great way to make a bunch of coordinating classic cards.

Then I thought, lets take it up a notch… It would be really cool to mix Shimelle’s beautiful, classical, traditional ornate frames with some funky patterned papers and a funky – non-traditional – design, and that’s exactly what I did.

I hope you like it and will give it a try. (Shimelle’s kit costs just 99 cents…)

Step by Step Instructions

Hybrid I Love You Card

  1. Use a photo editing program to lay the frame on the right side of a letter size document. Size it to measure 4″ by 5¼”. Print out the document on textured white cardstock, using the borderless settings of your printer.
  2. Cut the cardstock in half – to 5½” and fold in half at 4¼” to create a standard size card.
  3. Print out Creativity Prompt’s free classic journaling tags on plain non-textured cardstock. Cut out one of the tags and cut off about an inch from its right edge.
  4. For the letters I used plain and glittered fun foam that I cut with my Cuttlebug, using QuicKutz Moonlight dies, and adhered it with Tombow Mono Multi glue you can also use American Crafts Thickers.
  5. Adhere the journaling tag to the bottom right edge of the card using foam squares.

Hybrid Thanks Card

  1. Use a photo editing program to lay the frame on the right side of a letter size document. Size it to measure about 3½” wide (keep its proportions). Print out the document on textured white cardstock, using the borderless settings of your printer.
  2. Cut the cardstock to 5¼” by 4″.
  3. Use a craft knife to cut off the oval center of the frame.
  4. Cut a textured yellow cardstock to 8½” by 5½” and fold in half at 4¼” to make a standard size card.
  5. Cut a piece of a funky patterned paper at 3½” by 3½”.
  6. Lay the printed cardstock on the yellow card base and trace the oval window with a pencil. Adhere the patterned paper where the window will lay, over the pencil marks.
  7. For the letters I used plain and glittered fun foam that I cut with my Cuttlebug, using QuicKutz Moonlight dies, and adhered it with Tombow Mono Multi glue you can also use American Crafts Thickers.
  8. Adhere the printed cardstock with foam squares.
  9. Adhere the hearts. I Cut the heart with a Cuttlebug die from the glittered fun foam. (I used a VERY old punch for the small heart)
  10. Adhere the button (I would have used a yellow button if I had one…) with a couple mini glue dots.
  11. Adhere the line of yellow gems below the greeting.

Share

If you have any question, suggestion or remark – don’t hesitate to contact me – either leave a comment here, use the contact form or start a new thread on the Creativity Prompt Flickr Group!!!

I would also be very happy to see your own creations, so don’t be shy and share ๐Ÿ™‚

Make Your Own Planner Workshop
“Capture Your Dream” workshop is relaunching as a self-paced workshop. Isn’t this the perfect time for you to capture your dream and make it happen?

How To Make Flowers Out Of Recycled Dryer Sheets – Creativity Prompt

Friday, January 8th, 2010

Make Flowers Out Of Recycled Dryer Sheets

I love recycling. It is no news to you. What can I say, giving something a new lease of life just before it was about to be tossed away is magical to me.

I have already posted a tutorial before on how to make dryer-sheet flowers, and today I want to suggest 2 more options as well as a new idea on how to inject color onto them.

If you are interested in learning how I did the flowers above, than keep on reading!

Tools & Supply

How To


[Watch on You Tube & while there, please rate, comment and subscribe]

Step-By-Step Instructions

First Flower Style –

  1. Cut your sheet into strips of about 1″ wide. It doesn’t have to be precise. The wider the strip, the larger the flower would be. For a Two layered flower, make 1 strip wider than the other.
  2. Dye your strip with Glimmer Mists and Perfect Pearls mixed with water.
  3. Dry your dryer sheet completely. You may use a heat gun to dry the strips, but be careful not to get too close and not to concentrate on one zone for too long, or the strip will rip from the heat. You may also use a paper towel to blot the excess liquids.
  4. Pleat the strip around the button and make sure all the ends are tucked underneath the button. Secure all the pleats with a button and embroidery floss.
  5. Tie both ends of the embroidery floss in a double knot and cut off the excess.

Second Flower Style –

  1. Take a couple of sheets and lay them together. Fold them into thirds and cut out an imperfect circle to create a stack of dryer-sheet-circles.
  2. Dye each circle with the mists. To make it more interesting, use different colors on each circle.
  3. Let the circles dry completely.
  4. Stack them together again in an order that appeals to you and secure them with a button and embroidery floss. Alternative: Sew them together with embroidery floss threaded with small beads.
  5. Tie both ends of the embroidery floss in a double knot and cut off the excess.

Dryer sheet Flowers

Share

If you have any question, suggestion or remark – don’t hesitate to contact me – either leave a comment here, use the contact form or start a new thread on the Creativity Prompt Flickr Group!!!

I would also be very happy to see your own creations, so don’t be shy and share ๐Ÿ™‚

Make Your Own Planner Workshop
This year you can really make your dream come true!

“Capture Your Dream” workshop is a self-paced, six weeks long workshop, that will walk you through a journey of capturing your biggest dream and making it come true.

In the process of making your dream happen – with lots of inspiration and guided self-exploration, you will also create a mixed media mini album from scratch and learn many tips and techniques – including some photography pointers that will add character to your photos and will help you take better pictures of your projects.

The workshop includes 30 printable PDF lessons with step-by-step pictures and instructions as well as several printable templates you may use in other projects too.

I am confident you will enjoy it and find it helpful so I also offer full money back guarantee while the workshop lasts.

The 10 Best Creativity Prompts in 2009

Friday, January 1st, 2010

In light of the coming new year, I backtracked a little bit and gathered the most popular posts on creativity Prompt in 2009.

Without further ado, here are the posts which attracted most of your attention and sparked a wonderful conversation รขโ‚ฌโ€œ either on the blog or privately, via e-mails.

  1. Make a Hybrid Board Book.
  2. Chunky Mini-Album.
  3. Waterfall Mini-Album.
  4. Make A Notebook With A Simple Stapler.
  5. Make A Fabric Covered Hardbound Journal.
  6. Embellishing Paper Flowers.
  7. How To Use Those Paper Scraps.
  8. How To Make A Cute Box Of Drawers.
  9. How To Make a Drier Sheet Flower.
  10. How To Make THE QUICKEST Mini Album รขโ‚ฌโ€œ EVER.

&

Another favorite compilation post was the holiday handmade gift guide: 10 Handmade Gifts Under 10 Minutes.

Share

What Creativity Prompt did you like the best? What types of projects are pulling you to create?

What project have you tried yourself? Share a link!

Happy New Year!!!

Make Your Own Planner Workshop
This year you can really make your dream come true!

“Capture Your Dream” workshop is a self-paced, six weeks long workshop, that will walk you through a journey of capturing your biggest dream and making it come true.

In the process of making your dream happen – with lots of inspiration and guided self-exploration, you will also create a mixed media mini album from scratch and learn many tips and techniques – including some photography pointers that will add character to your photos and will help you take better pictures of your projects.

The workshop includes 30 printable PDF lessons with step-by-step pictures and instructions as well as several printable templates you may use in other projects too.

I am confident you will enjoy it and find it helpful so I also offer full money back guarantee while the workshop lasts.

Make A Simple Notebook With Ribbon Binding – Creativity Prompt

Friday, December 25th, 2009

Notebook With Ribbon Binding

This project is also an easy one you can whip up in under 10 minutes. I love those type of projects and I can never have enough notebooks to sketch, doodle and write in. Can you?

I used the ribbon for the binding, as an alternative to the linen thread or embroidery floss I normally use for binding and as an added bonus, the ends of the ribbon also provide a nifty closure for the notebook.

If you are interested in making this sweet and simple notebook, then keep on reading for the supply, video how to and step-by-step instructions. Enjoy!

Tools & Supply

How To

[Watch on YouTube. While you’re there, please comment, rate & subscribe]

Step-by-Step Instructions

  1. Cut your papers 8″ wide and 5½” tall. Fold in half to 5½” by 4″.
  2. Straighten the edges of the paper stack with a grid ruler, aligned with the edge of the paper and a craft knife.
  3. Cut your cardstock 8½” wide and 5½” tall and wrap around the paper stack to adjust the spine.
  4. Lay the paper stack over the cardstock cover and mark the piercing holes: one at the center and one to each side – 1″ apart.
  5. Pierce the papers and cardstock following the marks you created before.
  6. Thread the ribbon through the needle so both ends would meet and start the binding stitching from the inside out, through one of the outer holes.
  7. Then go in through the opposite hole.
  8. Tie the ends together in a double knot and thread the needle out through the center hole and in again through the same hole.
  9. Thread the needle through the loop the tied ends create and then underneath the first stitch.
  10. Thread the needle out through the center hole again.
  11. Cut the ribbon off the needle and use the ends to close the notebook.
  12. To embellish the notebook I adhered 3 buttons with a dab of Diamond Glaze to the center of the notebook’s cover and adhered three punched out circles of patterned paper to the button. I then secured the patterned paper with another layer of Diamond Glaze.

Share

If you have any question, suggestion or remark – don’t hesitate to contact me – either leave a comment here, use the contact form or start a new thread on the Creativity Prompt Flickr Group!!!

I would also be very happy to see your own creations, so don’t be shy and share ๐Ÿ™‚

Make Your Own Planner Workshop
“Capture Your Dream” workshop is relaunching as a self-paced workshop. Isn’t this the perfect time for you to capture your dream and make it happen?